Deals
The Deals module offers a customizable pipeline and deal-tracking features, simplifying campaign management.
The Deals module belongs to ourScaleplan or higher.
The Deals module offers a customizable pipeline and deal-tracking features, simplifying campaign management.
Whether negotiating a sponsorship, booking ad placements, or tracking campaign performance, this module provides all the tools you need in one place.
Let's explore how to make the most of this functionality.
Understanding the Deals module
The Deals module is a flexible module that allows you to manage campaigns in a kanban-style system organising deals into stages, each representing a different part of the deal lifecycle and making it easy to visualize and manage your progress.
Within the Deals module you can also send proposals to your sponsors easily connecting it to your existing deal flow.
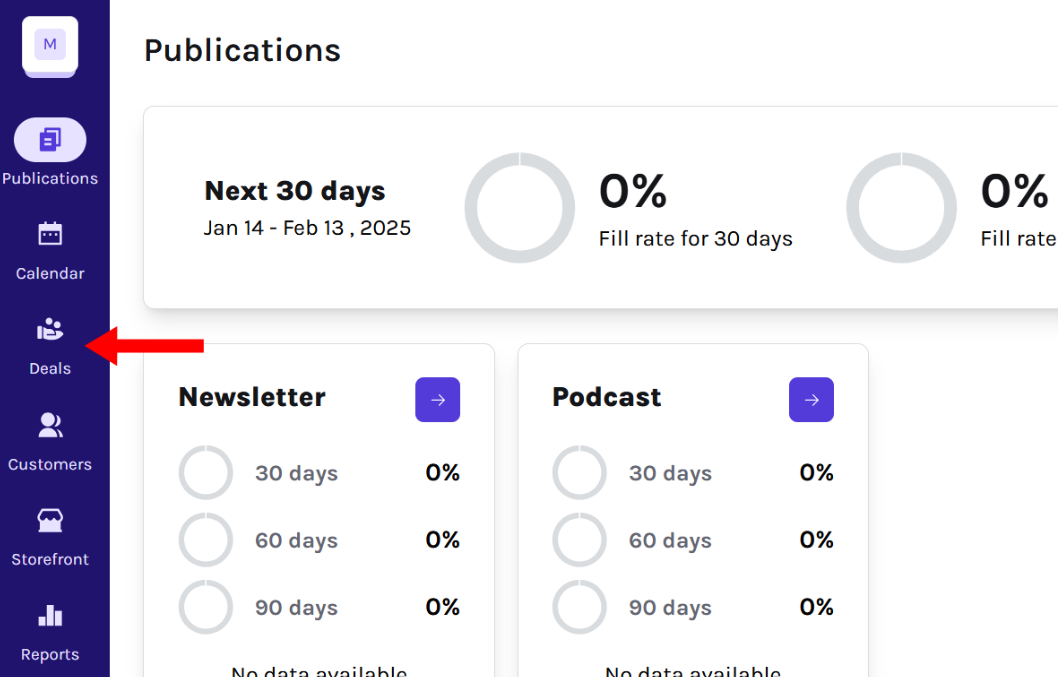
You can access this module by clicking Deals in the left sidebar.
Key features:
- Deal management: Manage campaigns from negotiation to reporting on top of your ad inventory
- Proposals Management: Send and manage proposals sent to your sponsors and connect deal flow with ad inventory
- Metrics: Monitor performance metrics and track campaign outcomes.
- Customizable pipeline: Tailor the stages to match your workflow.
- Filters: Quickly find deals based on criteria like Status, Customer, or Sales Rep.
Customizing your pipeline
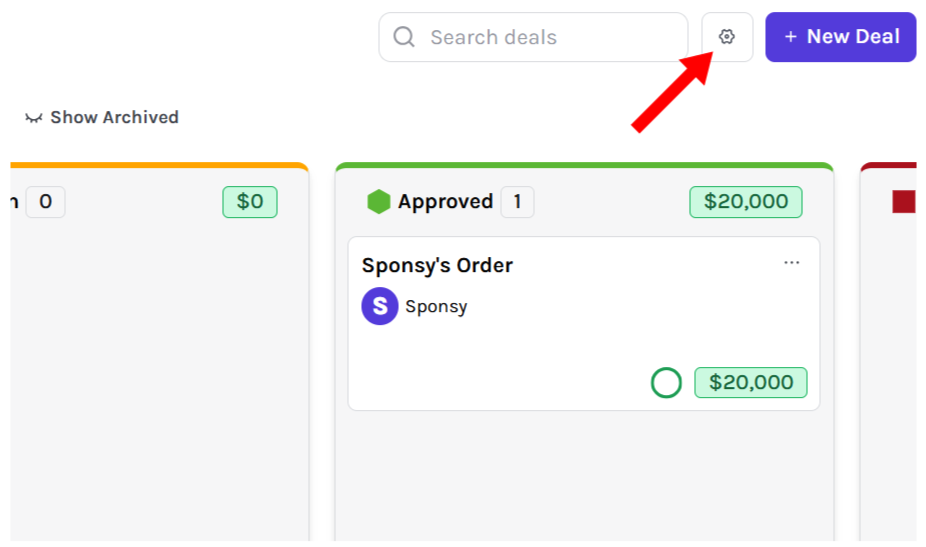
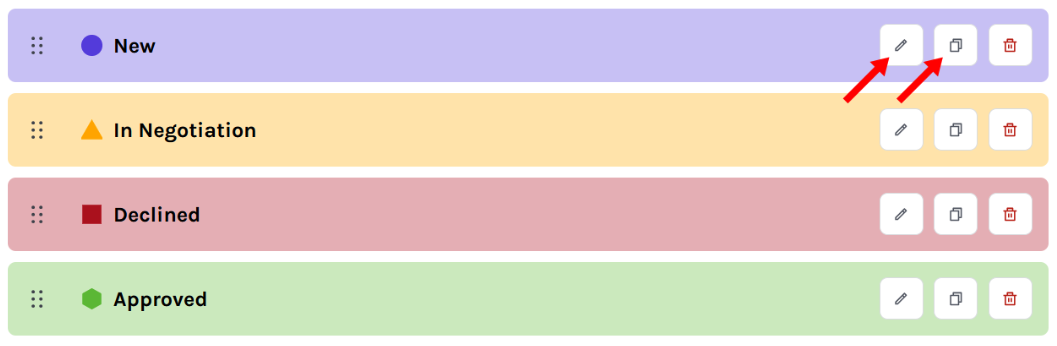
Every company has unique workflows, and Sponsy's Deals module lets you adapt the pipeline to suit yours. To do so, access the customization panel by clicking the gear icon ⚙ button at the top of the screen.
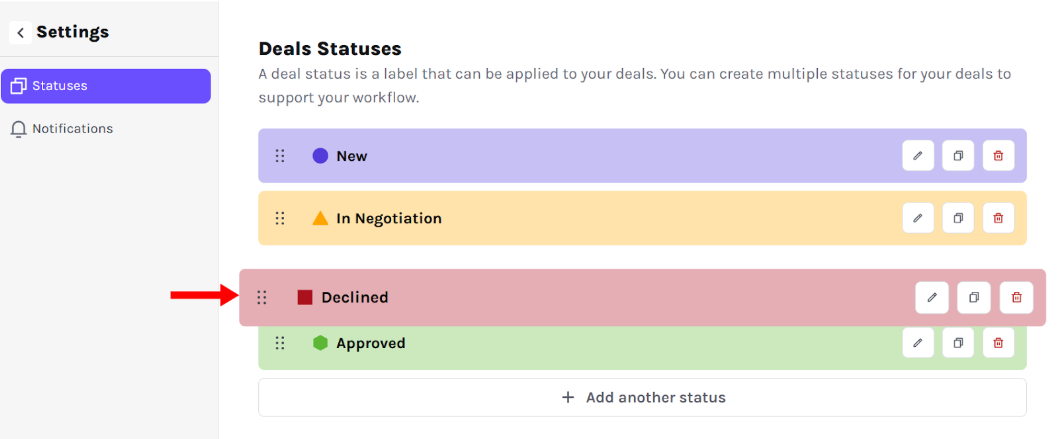
From here you can:
- Reorder by drag and dropping the status order
- Use the
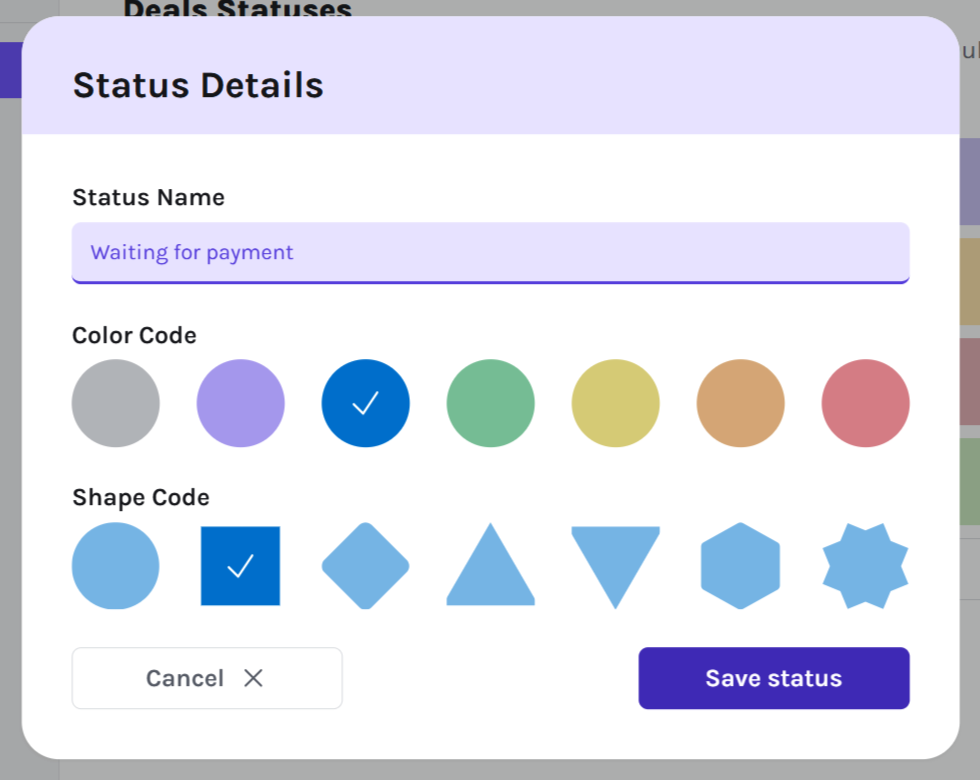
Add another statusbutton to create new status. You can create, for example, a “Waiting for payment” status if that aligns with your process
Editorduplicatea status by pressing the respective button
Create a new deal
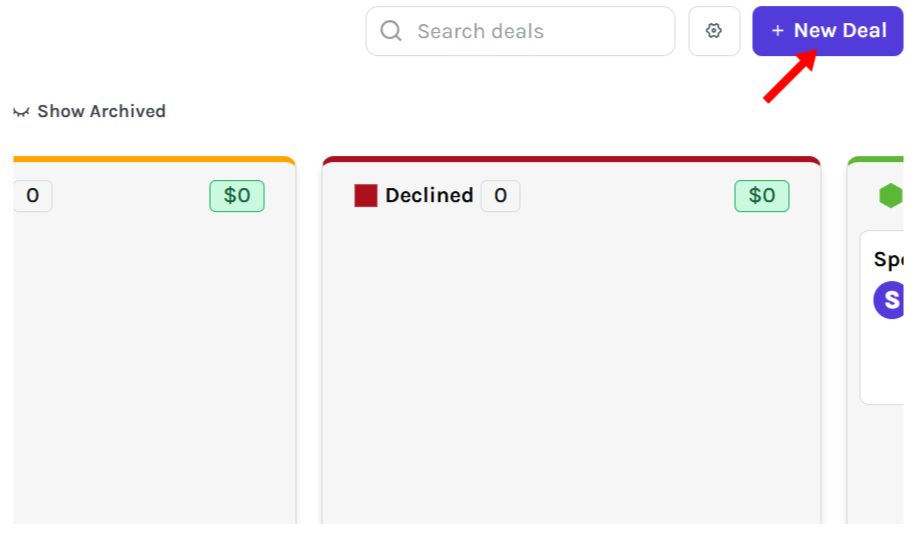
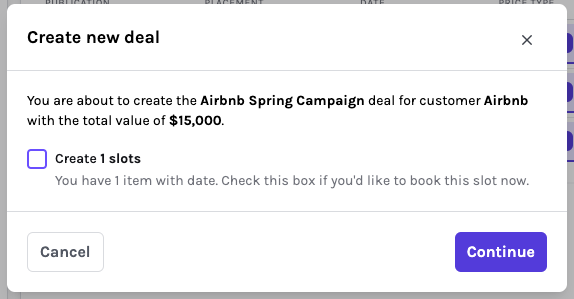
To create a deal, click the New Deal button at the top of the screen.
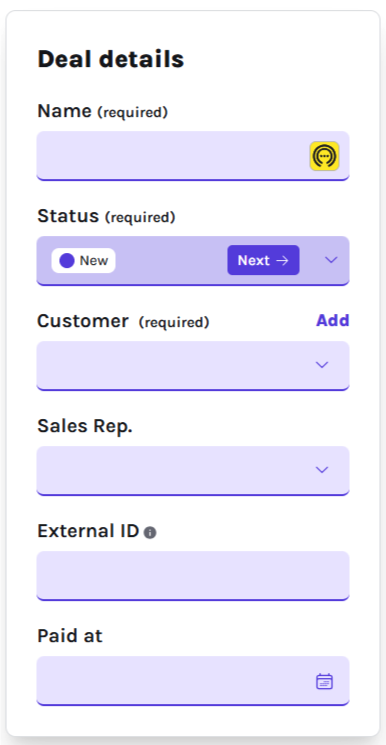
Fill out the deal details:
- Name: Use a descriptive name (e.g., "Airbnb Spring Campaign").
- Status: Select the initial status for the deal
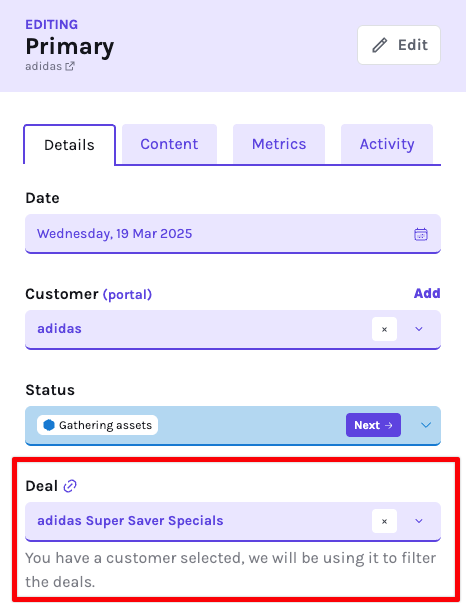
- Customer: Assign the deal to a specific customer.
- Agency: Optionally assign the agency managing the deal on behalf of the advertiser.
- Main contact: Choose the primary contact for the deal. For agency-managed deals, this can be a contact from the agency when that person is leading the relationship.
- Sales Rep: Optionally, designate the team member responsible for managing this deal.
- External ID: Optionally, include an ID from an external CRM system for cross-referencing.
- Paid At: Optionally, record the payment date to mark the deal as paid.
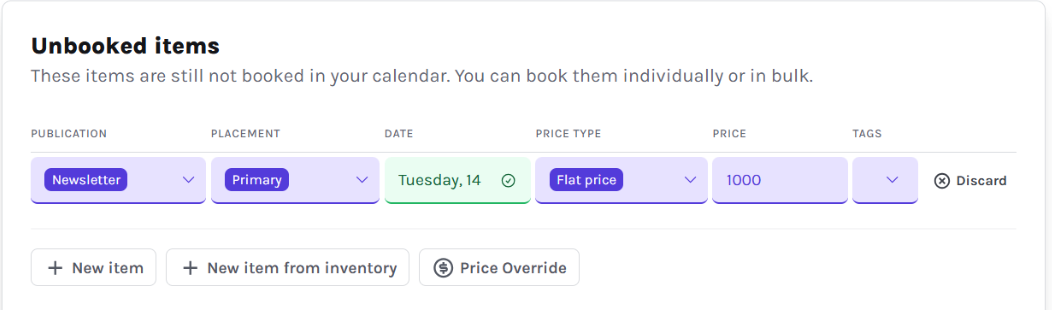
Fill out the items that compose this deal. These items don’t need a date yet, and they will not be booked into your inventory (unless you select that option during creation).
- Use the
New Itembutton to add items manually. - Click
New item from inventoryto access the inventory calendar and book slots based on availability. - Adjust pricing using options like
Flat Price,CPC(Cost Per Click), orCPM(Cost Per Thousand Impressions). - Use the
Price Overridebutton to define the total price of the deal and divide it equally for all the items. It will only apply the division to items that haveFlat Priceas the price type. You can always update the price of an individual item if you’d like, or update the total deal price.
To finalize, click Create New Deal. If one or more items include a selected date, you will have the option to create these slots immediately and book them into your inventory.
Booking slots right away has the advantage of signaling to the rest of the team that the date and placement are reserved for this deal.
However, in some cases - such as during deal negotiations - you may prefer not to book the slots immediately. Instead, you can use tentative dates as placeholders, which can later be adjusted by a campaign manager.
Managing Deals
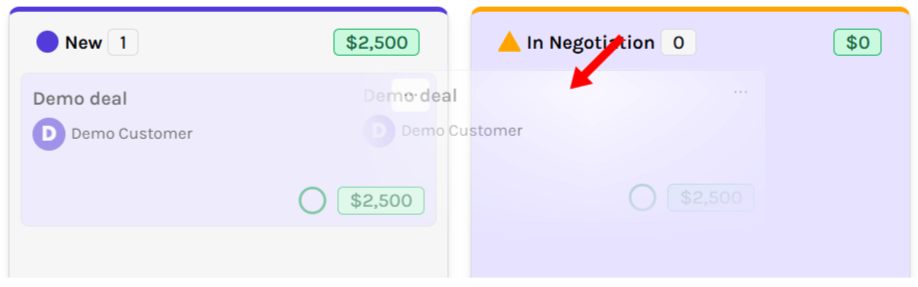
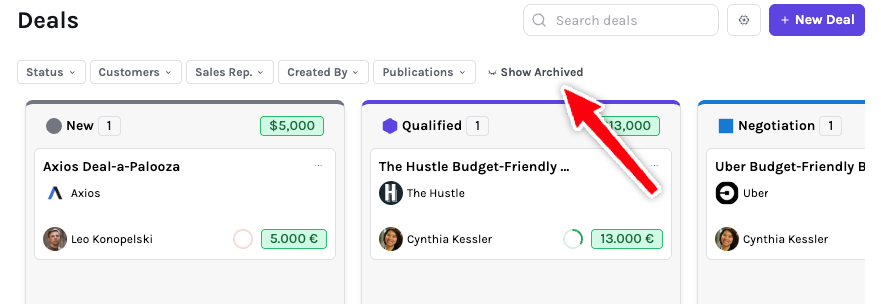
In the kanban view, you can manage all your deals and monitor their statuses. Each status represents a stage where the deal currently stands. At the top of the view, filters are available to help you quickly locate specific deals based on your criteria. You can filter by Status, Customer, Sales Rep, Created By, and Publications, and toggle the view to include or exclude archived deals.
Example: If you're looking for campaigns that include items from your podcast, apply the "Publications" filter and select the Podcast publication.
To update a deal's status, simply drag and drop the deal card to the desired status column.
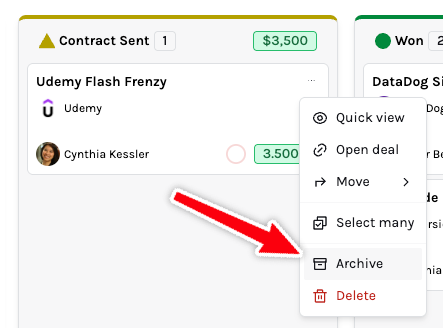
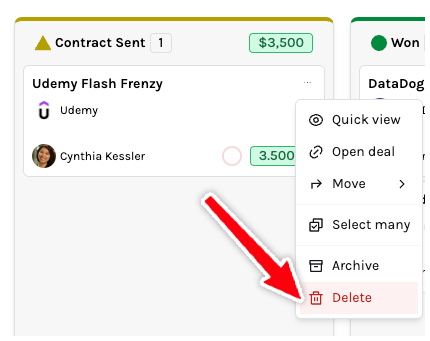
Alternatively, you can use the quick menu on each deal card.

The quick menu allows you to:
- Open the deal details.
- Archive the deal.
- Delete the deal.
Archiving Deals
Archiving Deals helps you keep data without cluttering your kanban view. It's useful for closed deals or any deal you no longer need to see actively.
Archived Deals can be unarchived anytime if you need to restore them.
To archive a Deal, use the Archive button available in the deal side panel.
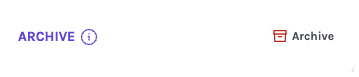
You can also archive directly from the kanban view using the quick actions menu in the top-right corner of the deal card.
You can see archived deals in the kanban board by using the Show Archived toggle.
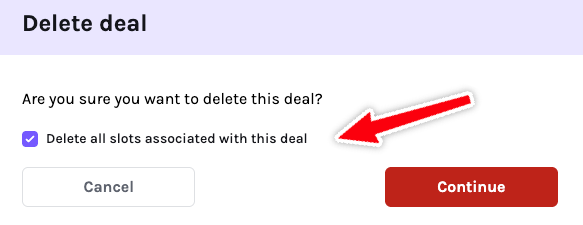
Deleting Deals
If you no longer need a Deal and want to remove it completely — including its related data like ad slots — you can delete it.
Unlike archiving, deleted Deals cannot be recovered, so make sure you really want to delete them before confirming.
To delete a Deal, use the Delete button in the deal side panel.
You can also delete a Deal directly from the kanban view using the quick actions menu in the top-right corner of the deal card.
When deleting a Deal, you'll have the option to delete all ad slots associated with the Deal from your calendar. This is helpful when testing out Deals or if a campaign is postponed and needs to be restarted from scratch.
Deal Details
To access the details of a deal, click the three dots on the deal card and choose Open deal, or use the Edit button at the top of the deal quick view sidebar. This will take you to the comprehensive deal view page.
On the left side displays general deal details such as the name, customer, current status, and price. You can also update the total value of the deal at any time.
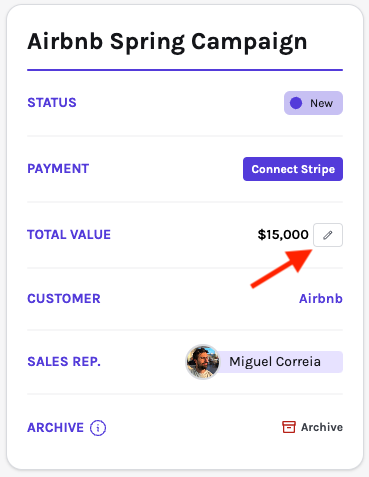
The right side contains more in-depth information about the deal, including performance and fulfillment details.
Dashboard
The Dashboard provides a detailed overview of the deal's status and performance. Key insights include:
- Fulfillment Status: View the number of slots that have been fulfilled, booked but not yet run (unfulfilled), or still available to be booked.
- Revenue and Performance Metrics: Access relevant data from the entire campaign, helping you analyze its success at a glance.
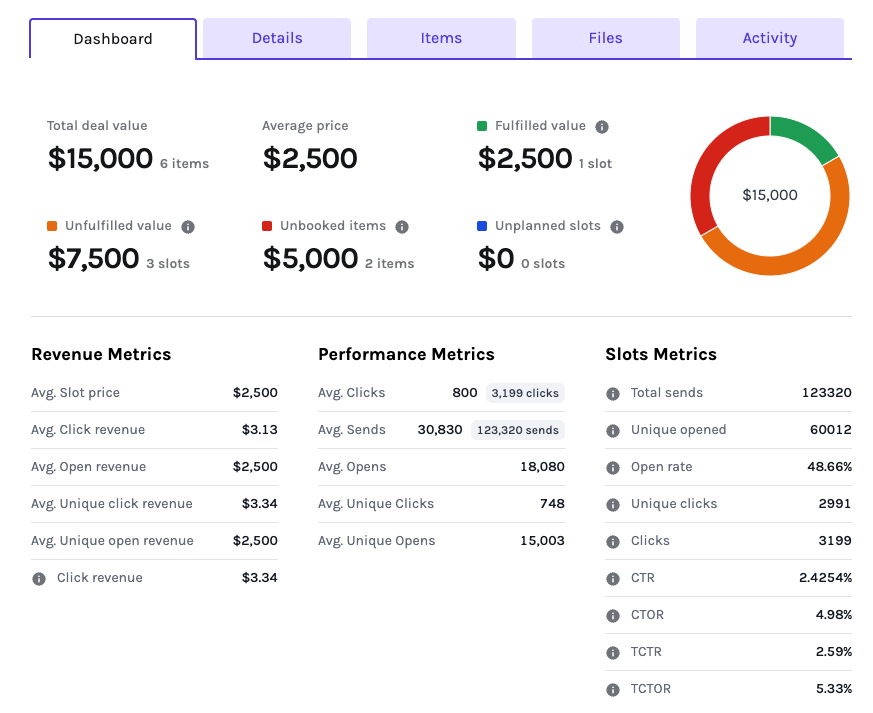
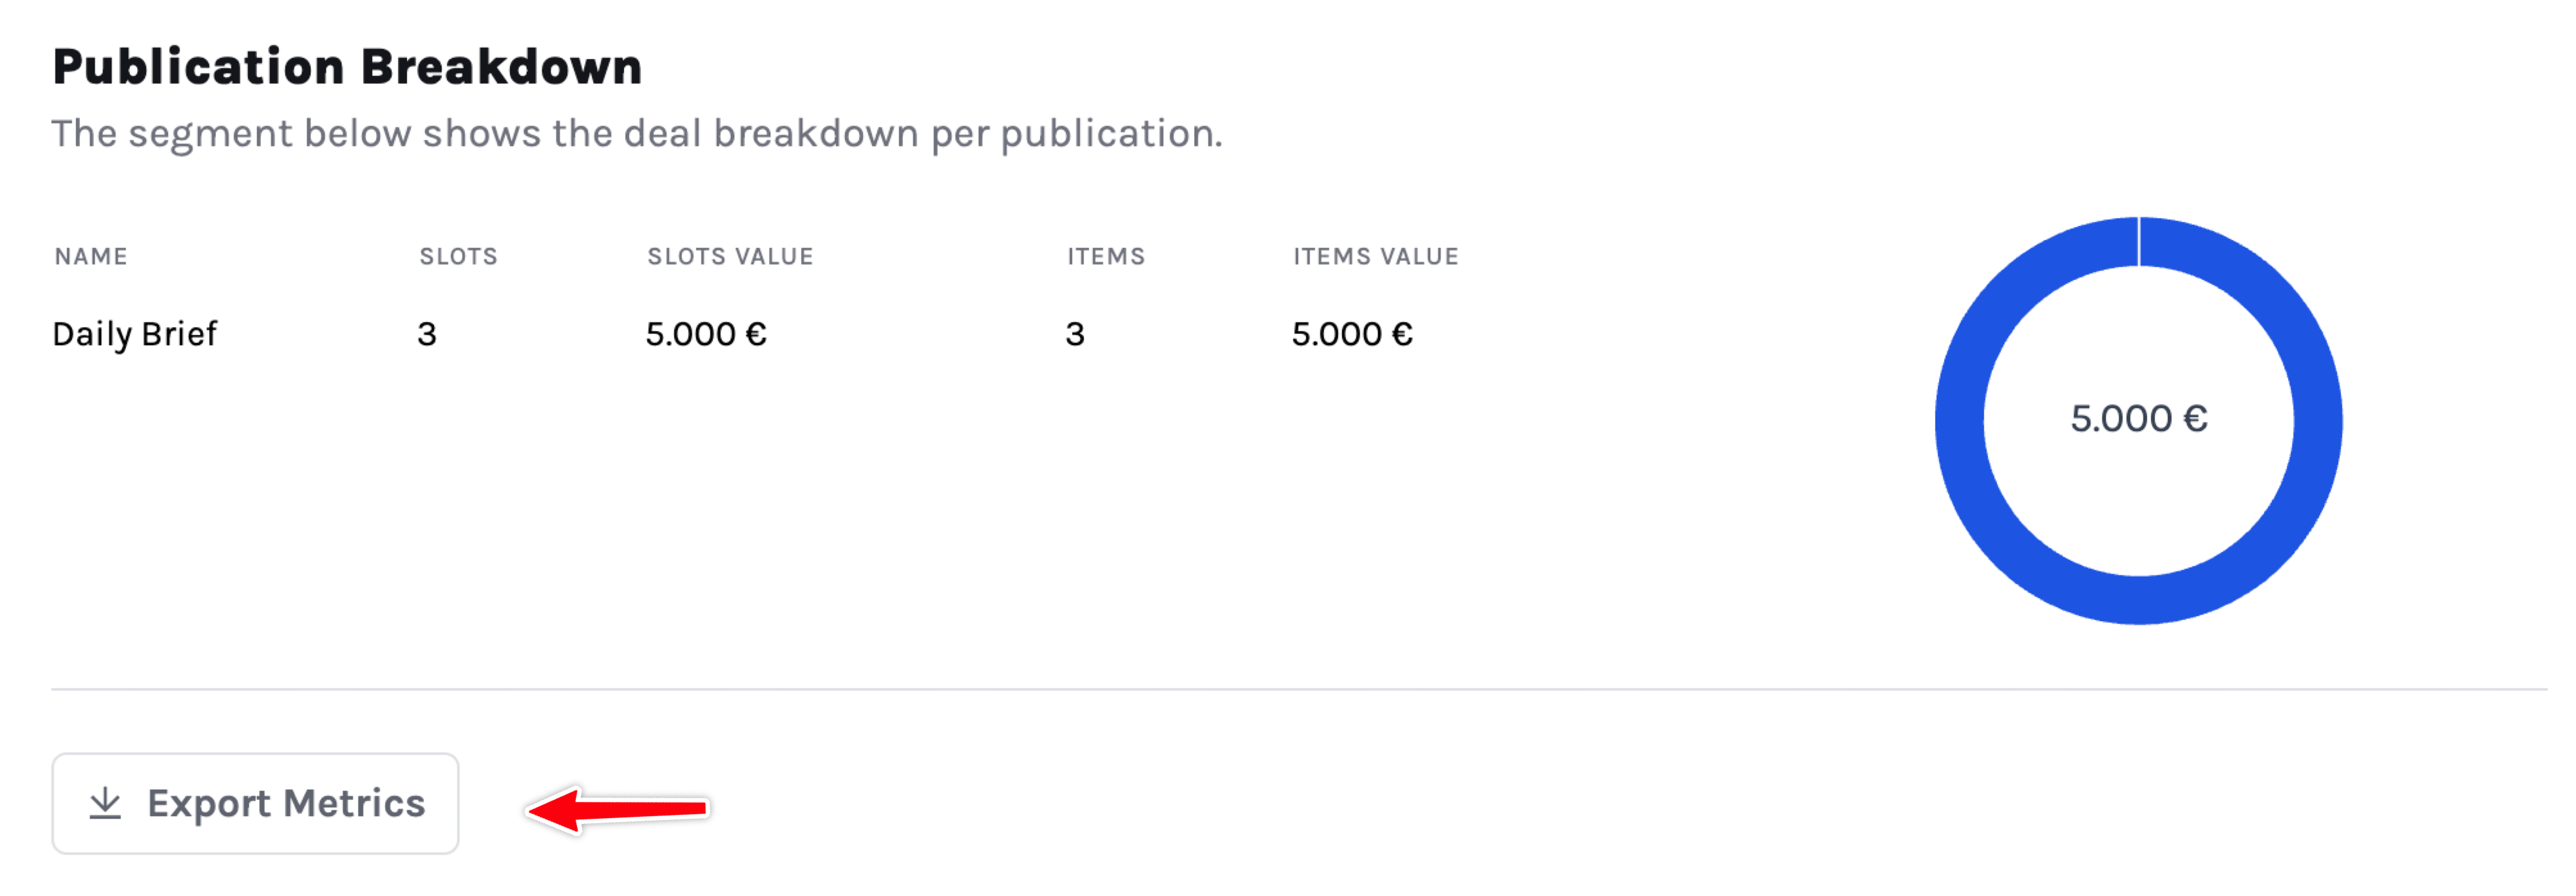
Deal metrics can be exported via the dedicated button at the bottom of the Dashboard page.
You can also export deal data from Analytics & Reports. Use the deal line-item export when finance, sales, or ad ops needs the deal broken down by individual booked and unbooked items.
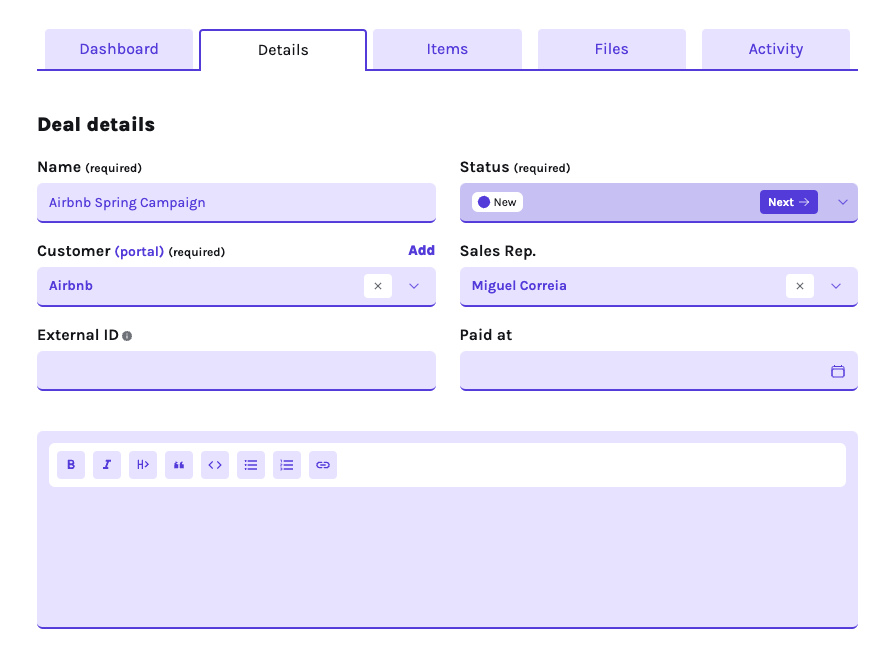
Details
In this view, you can:
- Edit the deal details, such as the name, customer, status, and price.
- Add notes to provide additional context or updates about the deal.
This section helps keep all key information organized and easily accessible for your team.
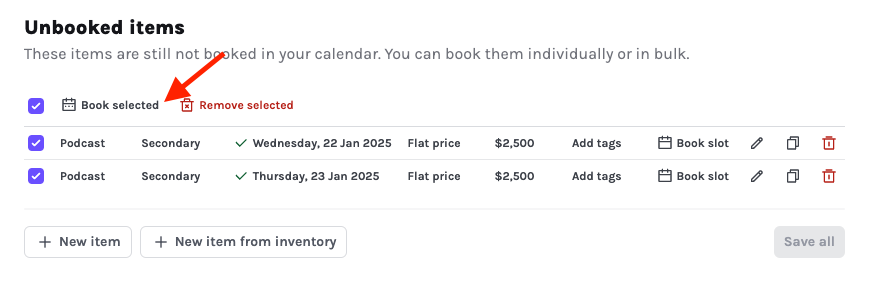
Items
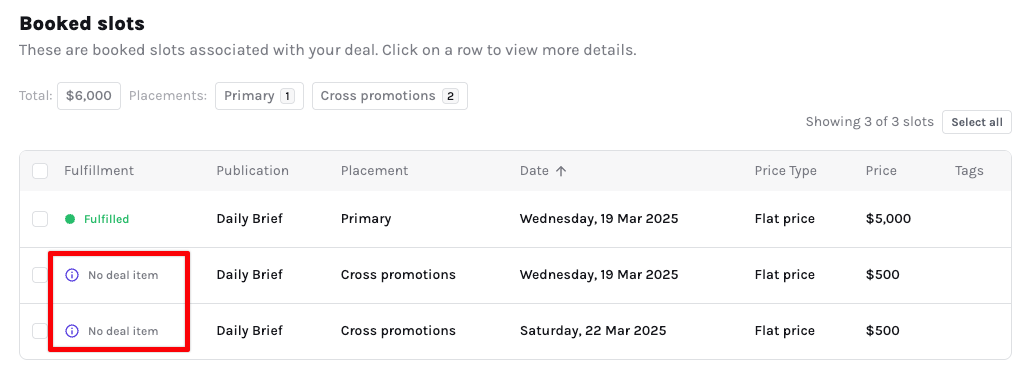
The Items tab is the working table for everything included in the deal. It shows booked slots, unbooked line items, unplanned slots, readiness status, dates, placements, publications, tags, prices, and related metrics in one place.
Use the search box and sortable columns to find specific items in larger deals. If a row is already booked, you can open the linked slot directly from the table.
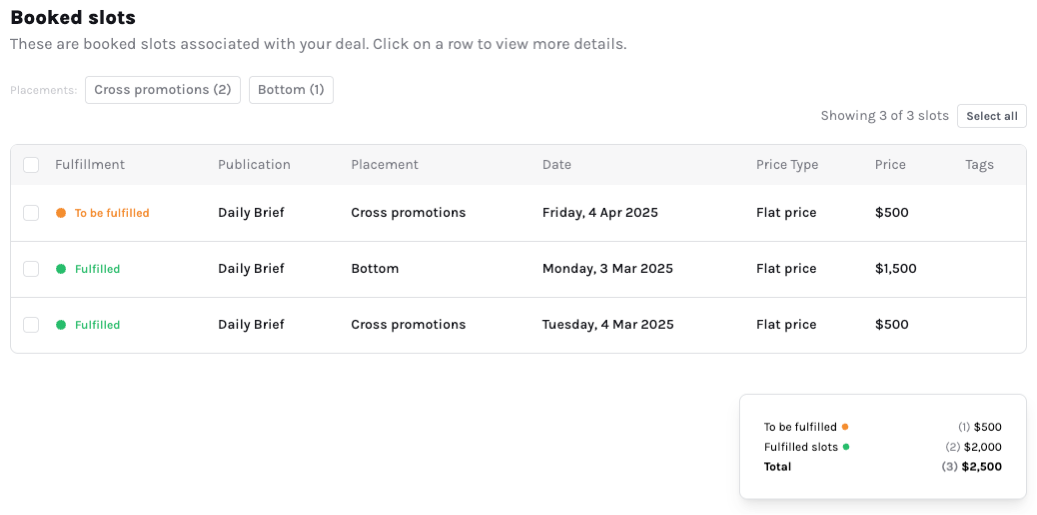
For unbooked items, you can add or edit dates, placements, prices, and content before booking them into the calendar. Use the Add content step when you want to fill in placement fields before the slot is booked.
Once everything is ready, you can book these items one by one or select multiple items using the checkboxes to book them in groups.
If the date of an unbooked item appears in red, it means another slot has already been booked for that date and placement. To resolve this, simply click on the date and choose a new one.
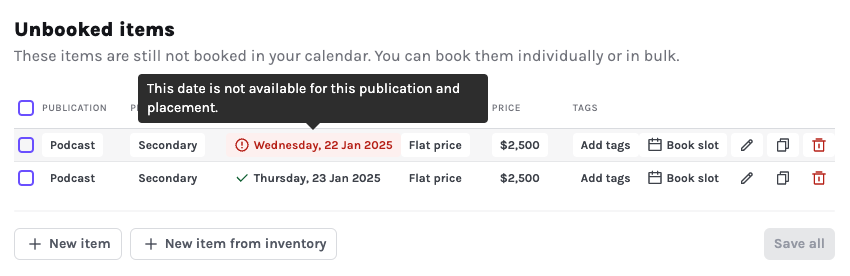
The table also highlights content readiness. Use these states to quickly see which items are ready, which still need assets, and which have date conflicts that should be resolved before booking or sending the campaign forward.
When you remove a booked deal item, Sponsy detaches the related slot from the deal instead of leaving a broken link. Use this when a line item no longer belongs to the campaign but the slot should remain in the calendar for separate handling.
Holds on Calendar
A Hold is an item with a defined date and placement. It signals that a sales rep is interested in booking that slot for a deal, but it is not yet confirmed. Think of it as multiple sales reps pitching the same date to different advertisers and waiting for confirmation.
Holds appear in your calendar as shown in the image, allowing you to see which sales reps are interested in that ad spot. Hovering on it provides additional information.
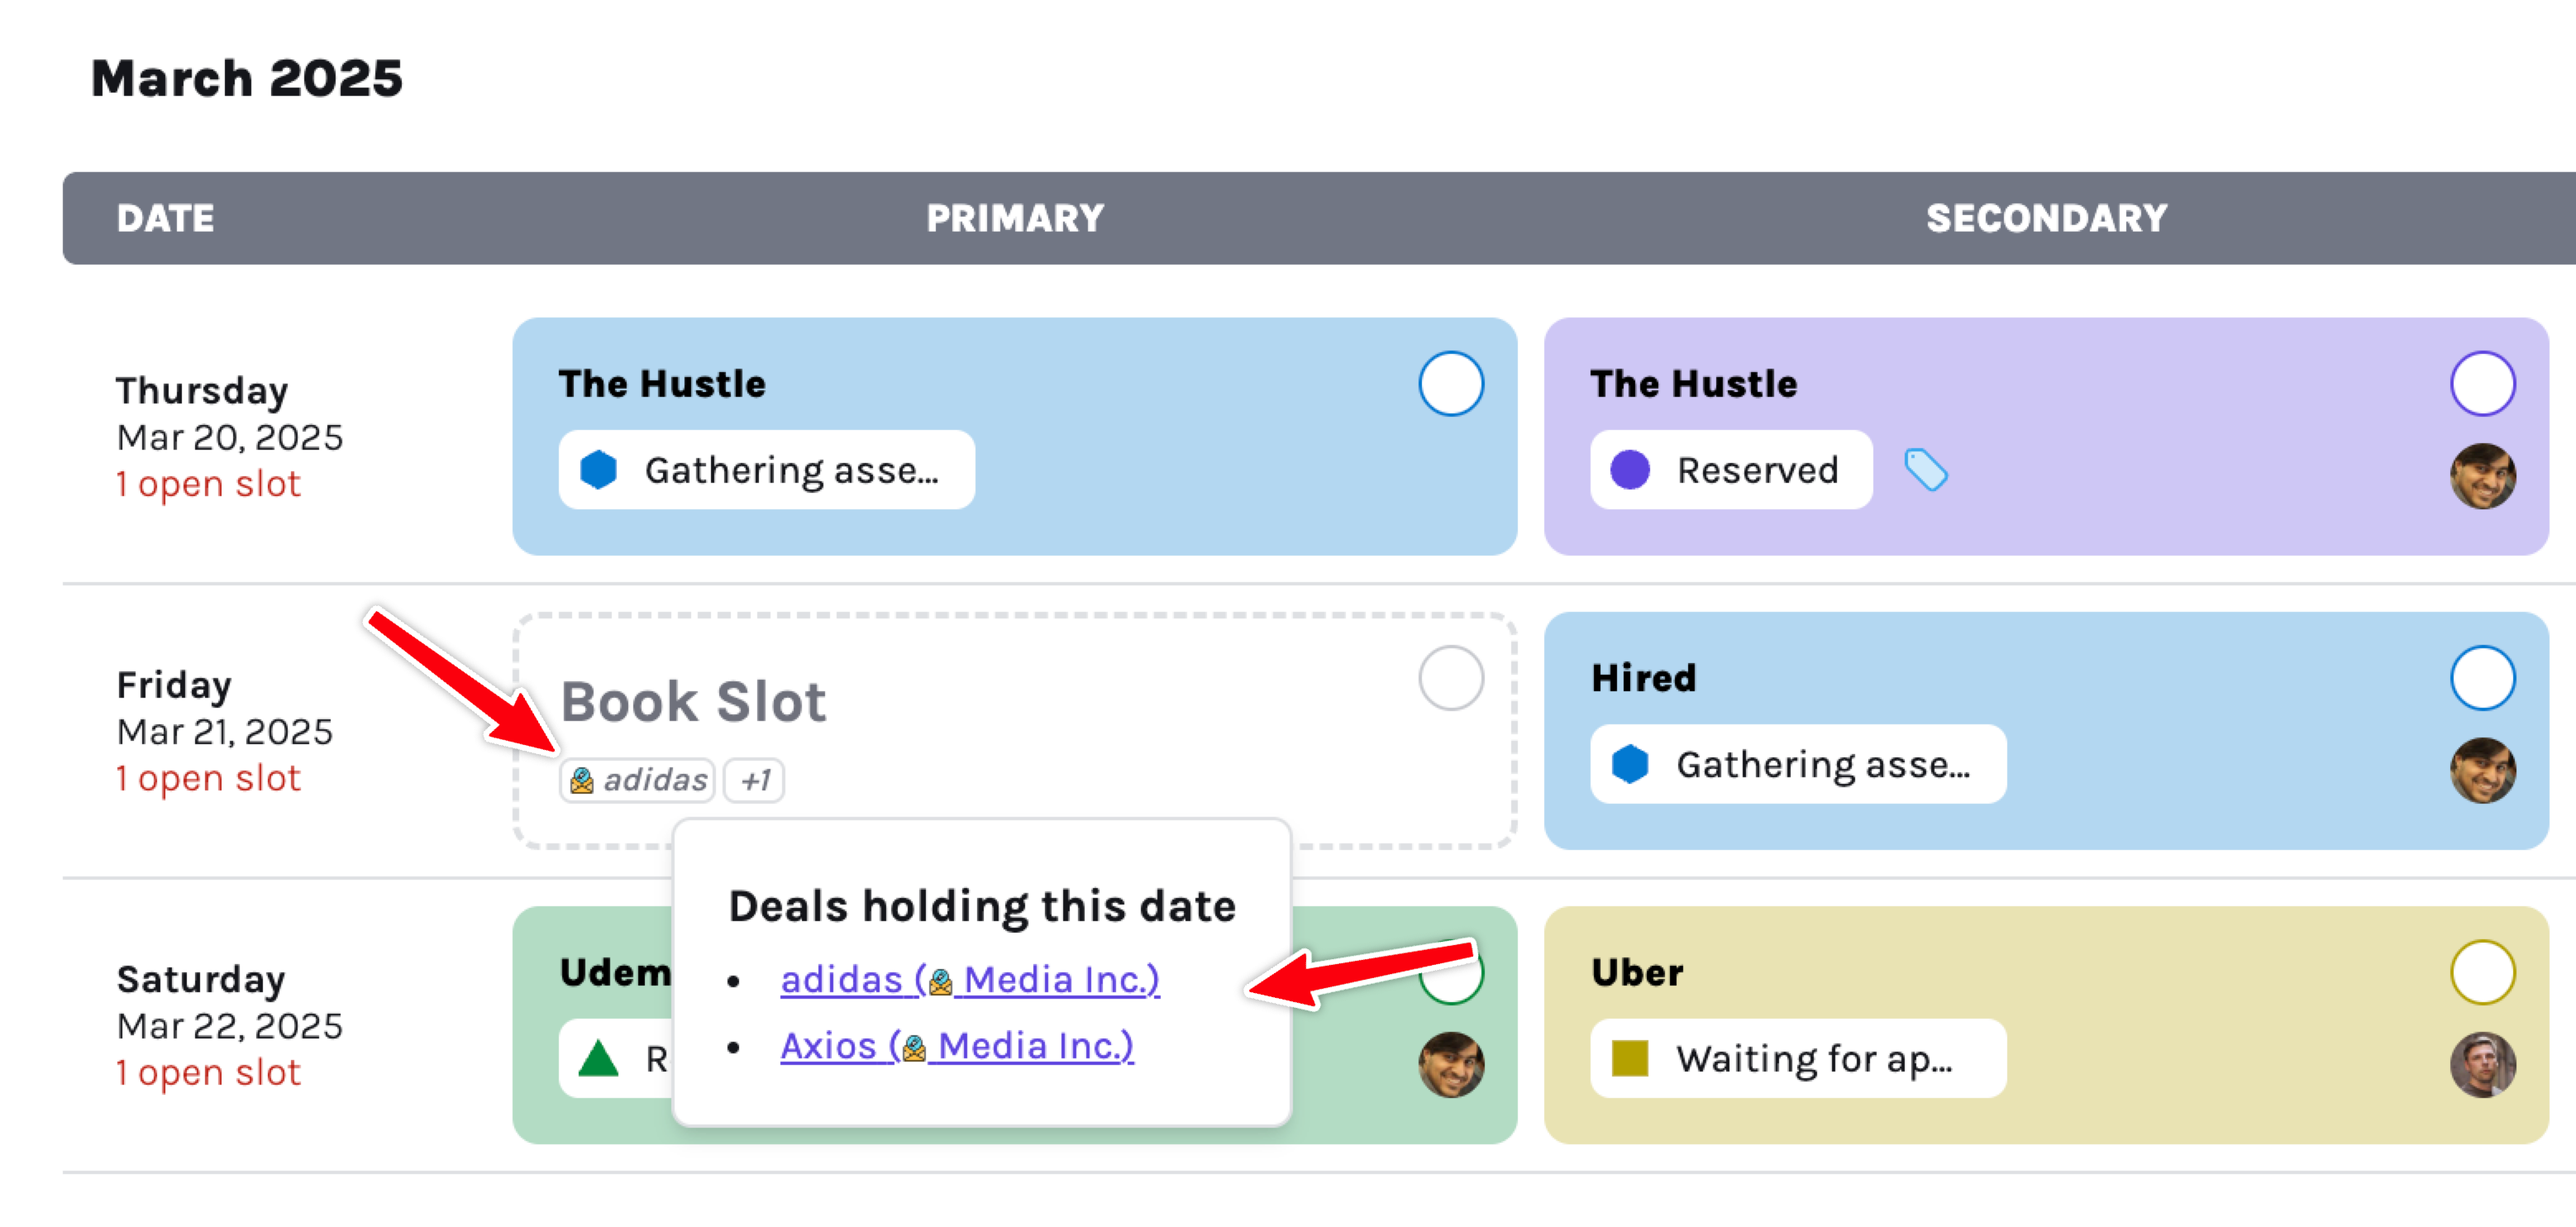
Unlike booking holds directly in your calendar, this approach allows sales reps to pitch the same candidate dates to multiple advertisers. Once a date is confirmed and booked in the calendar for a deal, the hold date will be marked as unavailable for other deals that were considering it.
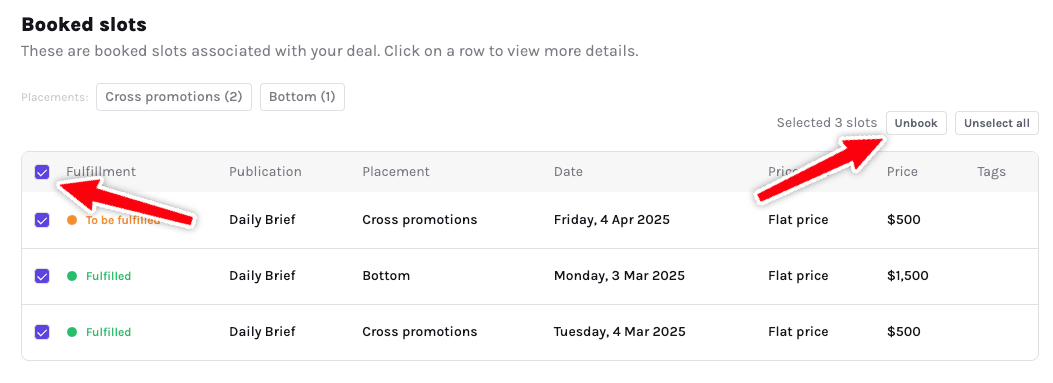
Un-booking Slots in Bulk
Need to reschedule a campaign and remove multiple ad slots from your calendar? You can easily un-book slots in bulk.
Simply select one or more slots, then click the “Unbook” button to convert them back into unscheduled items.
Unplanned Slots
From your Ad Inventory, you can assign existing slots to a deal using the appropriate dropdown.
When you do, Sponsy automatically matches the slot with any unbooked items in the deal. For example, if a primary item with an open date is available, the slot will be linked to that item.
If no matching item is found, the slot is marked as “unplanned”. This helps you track any extra slots added beyond the deal's original scope. Unplanned slots are clearly marked in your slots table.
Activity
This section allows you to track all updates and changes made to your deal over time. It’s a valuable tool for monitoring what actions were taken and who made specific changes, ensuring transparency and accountability throughout the deal's lifecycle.
Collecting Payments
If you have Stripe connected, you can send a unique payment link to your customer for a specific deal. This link will display all the deal items and information, allowing your customer to make the payment directly. Once the payment is completed, the deal will automatically be marked as paid.
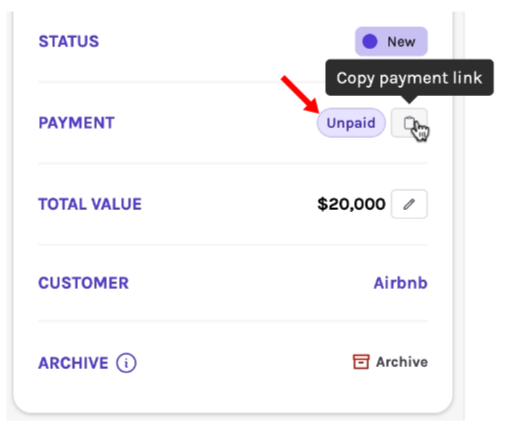
You can set up an automation to send the payment link automatically to your customer when a deal is created or moved to a specific status.
Sponsy does not charge any additional fees on top of Stripe’s. You’ll receive the full deal value after Stripe’s standard fee is deducted.
Public vs Private Deals
To share a deal with a customer and gather initial feedback on a proposal, you can mark the deal as Public.
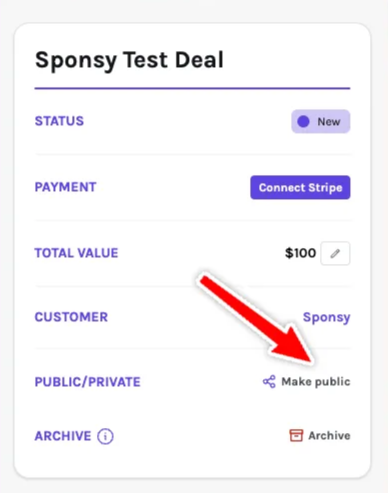
When a deal is marked as Public, the advertiser will be able to view it in the Deals section of the customer portal.
In order to enable the Deals tab in the customer portal you need to enable it in the customer portal settings.
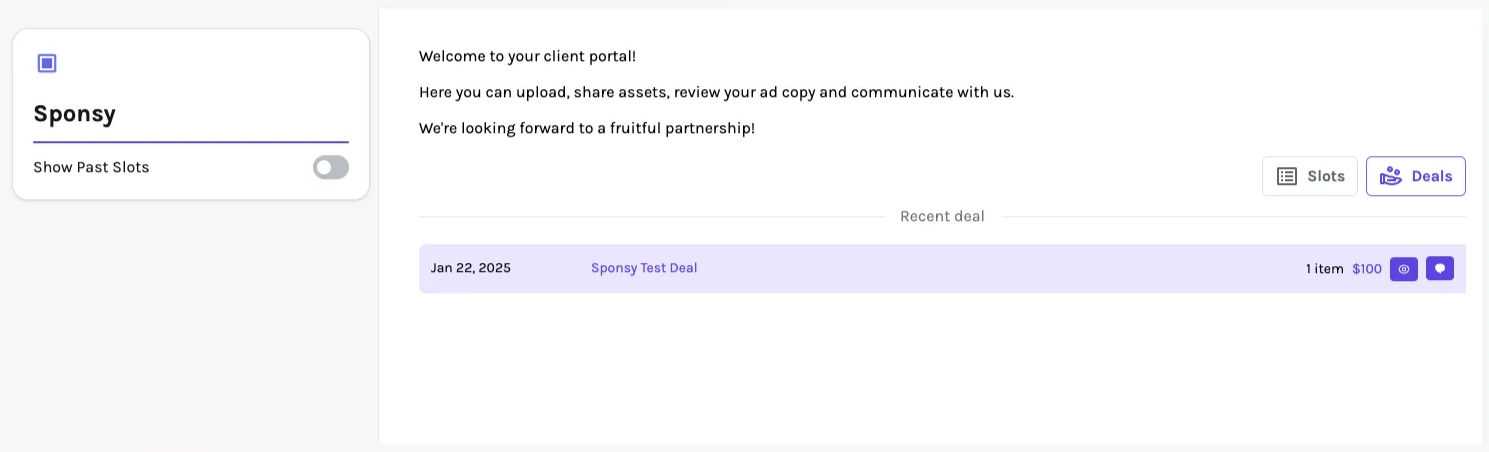
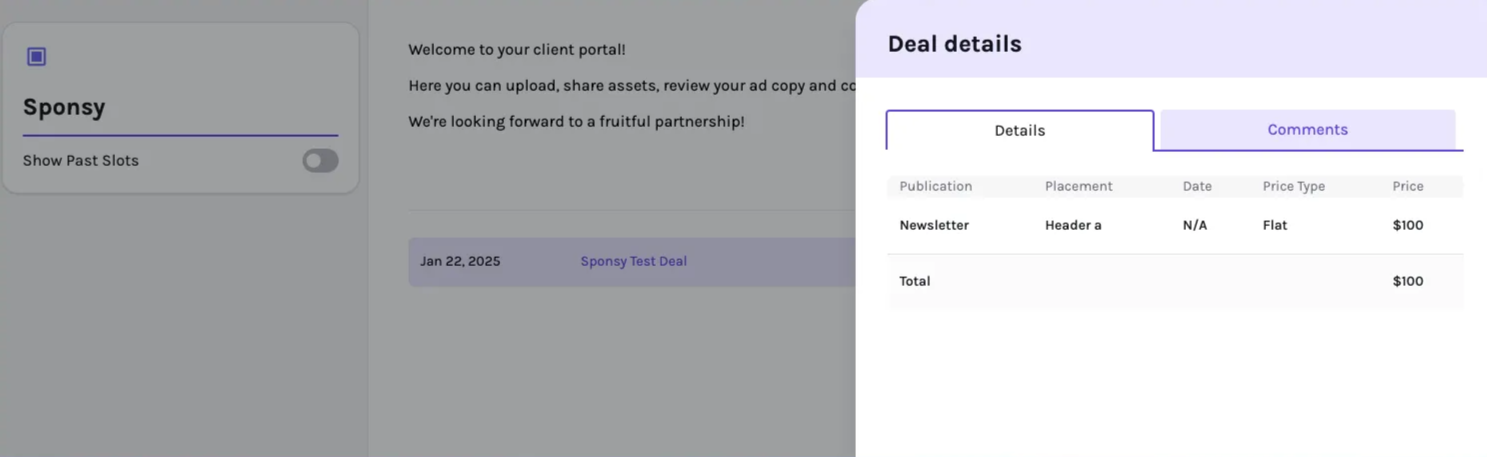
Within each deal, advertisers can view the included items and leave comments.
This allows you to use Sponsy Deals as interactive proposals, making it easy to collect and respond to customer feedback.
Deal and proposal contacts
Deals and proposals can have a main point of contact. This keeps communication focused when a customer has several contacts or when an agency manages the campaign for an advertiser.
For direct deals, choose the main contact from the advertiser's contacts. For agency-managed deals, choose either the advertiser contact or the agency contact responsible for coordination.
The selected contact is used in customer-facing workflows such as proposals, shared deal pages, and communication templates where a single contact needs to be referenced.
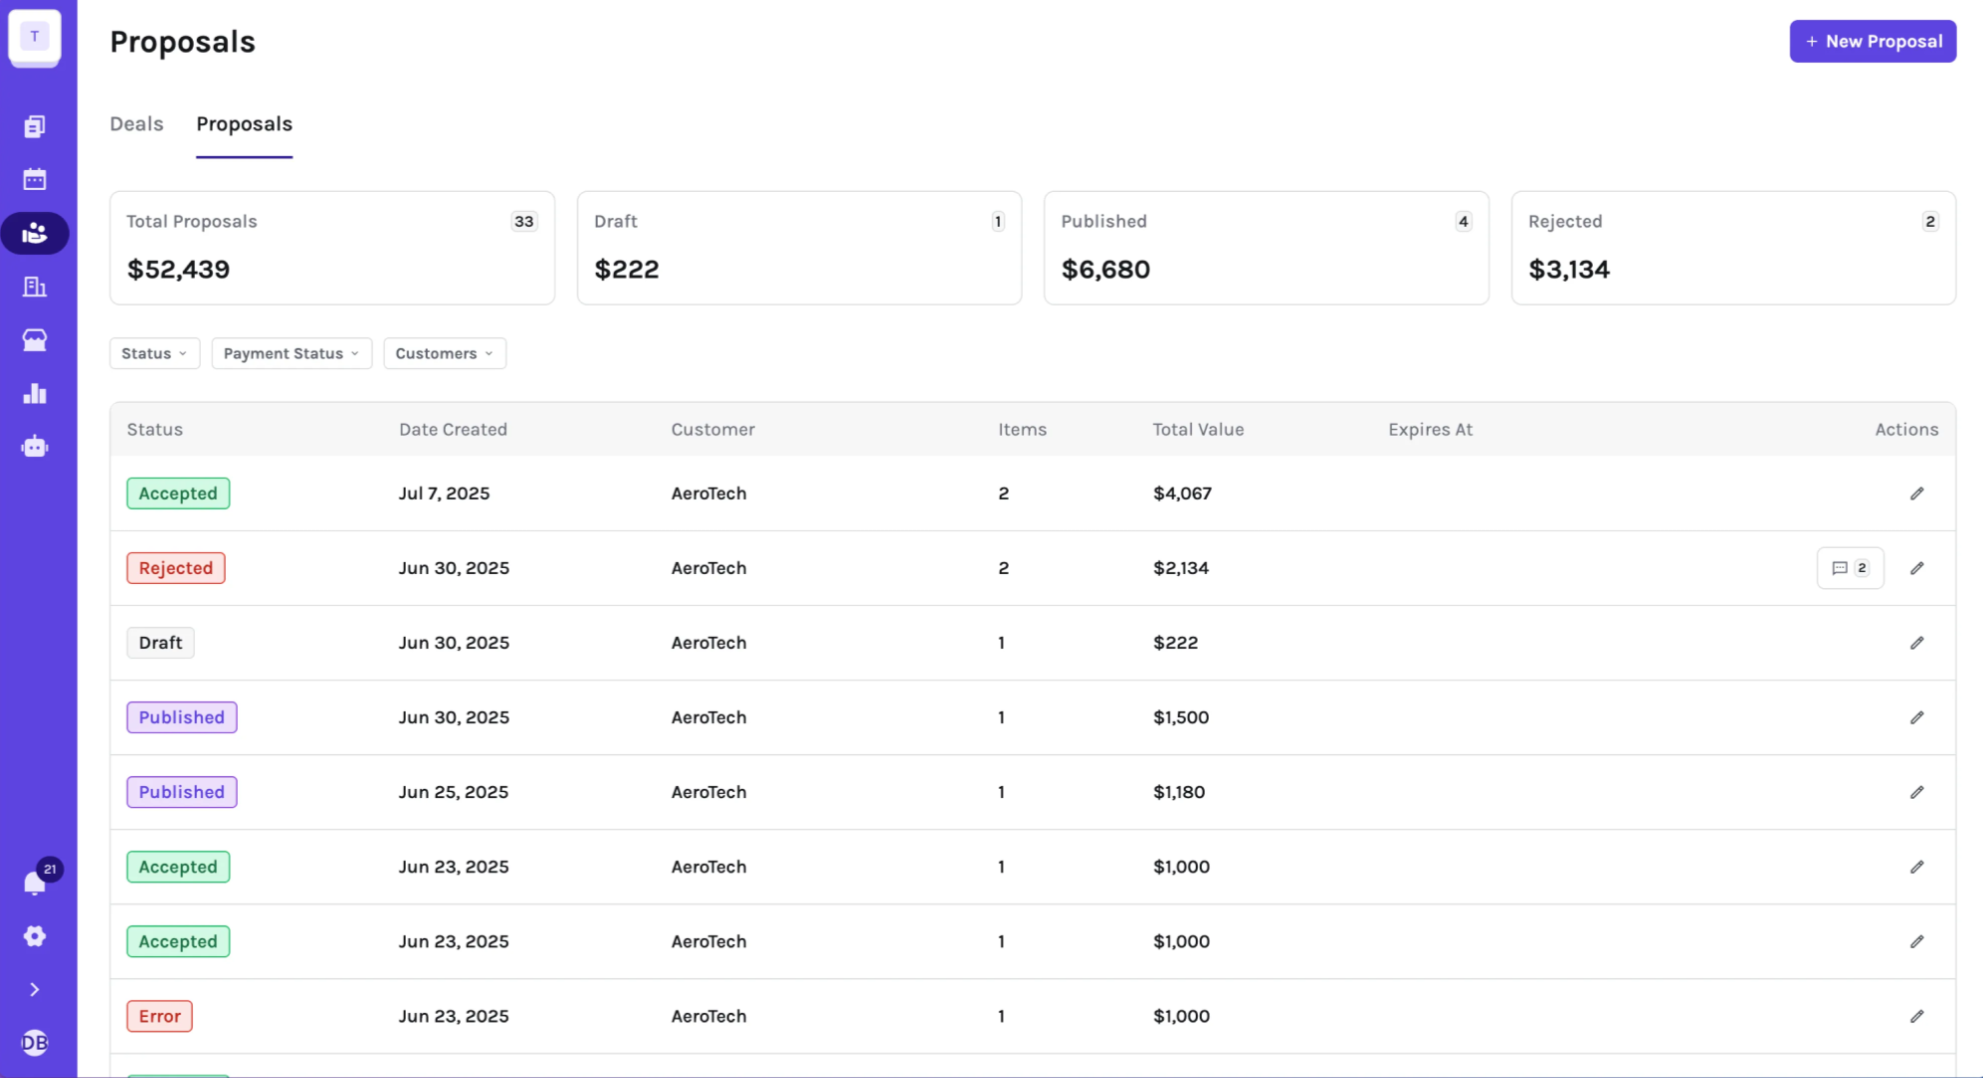
Proposals
The Proposals feature lets you package sponsorship opportunities into a polished offer that sponsors can review, discuss, and accept—without ever leaving Sponsy.
At a glance, here’s how it works:
- Draft your proposal
- Publish and share it with the sponsor
- The sponsor reviews the offer
- Once accepted, the deal is created automatically
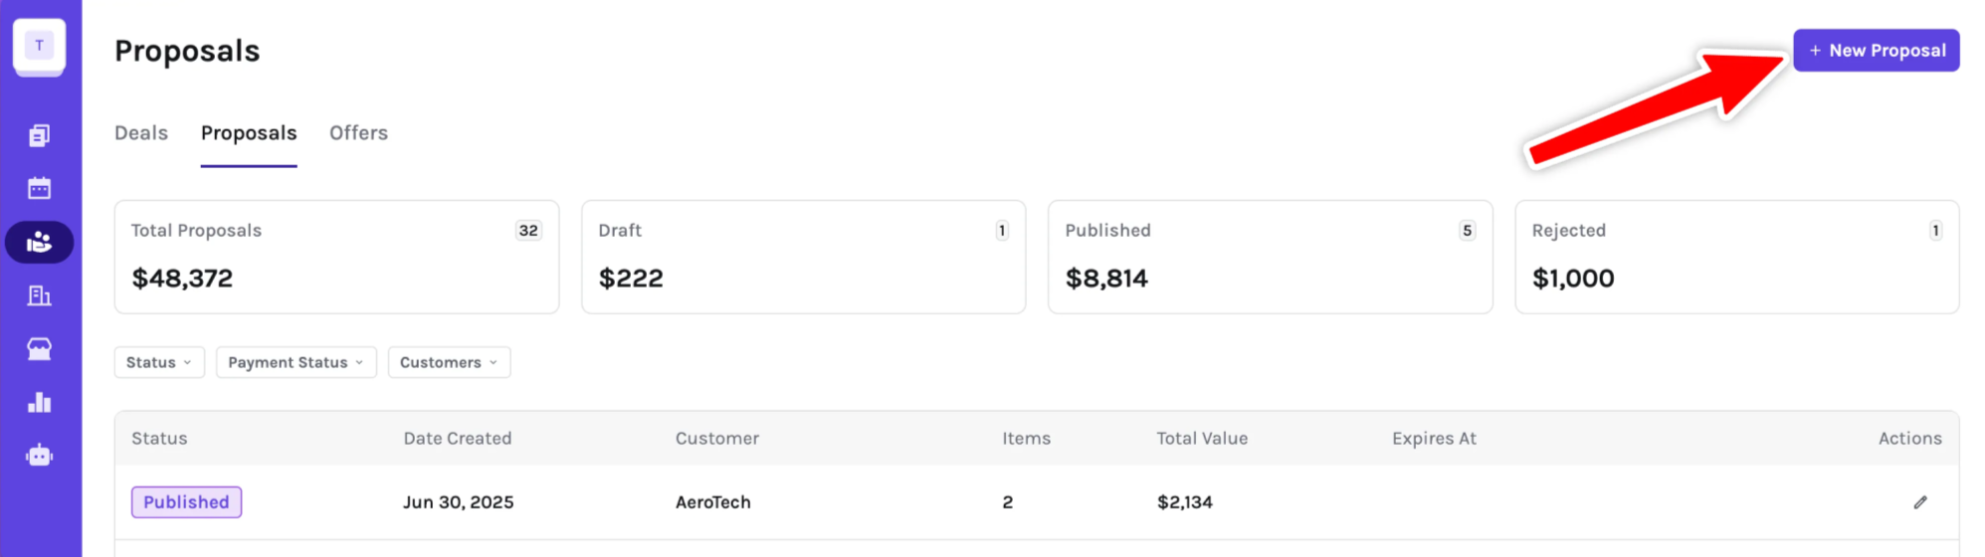
To get started, open Deals → Proposals from the sidebar.
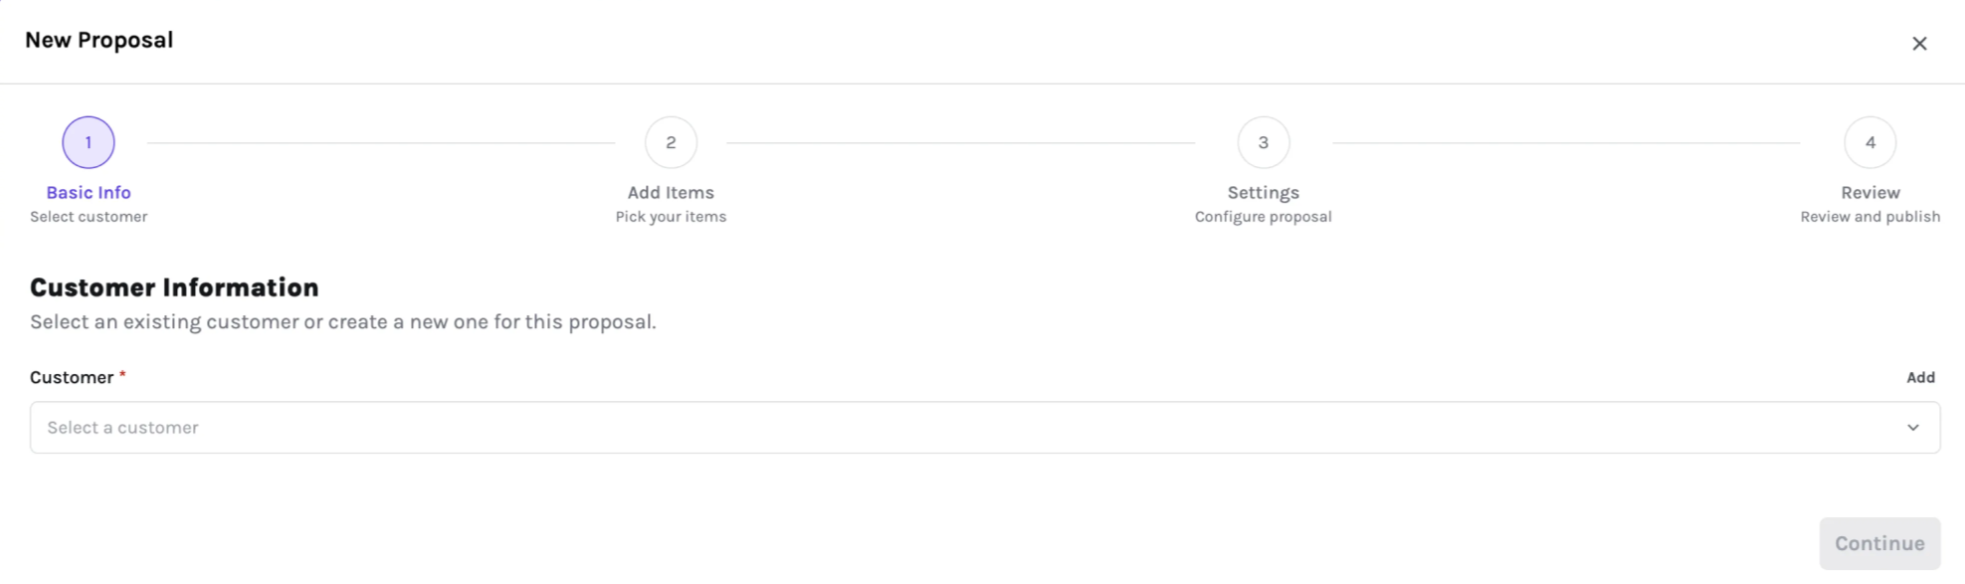
Creating a New Proposal
Start the flow
- Click New Proposal in the top‑right corner.
Choose the sponsor
Begin typing the sponsor’s name to pick from your Customers list.
Need to add someone new? Click + Create customer.
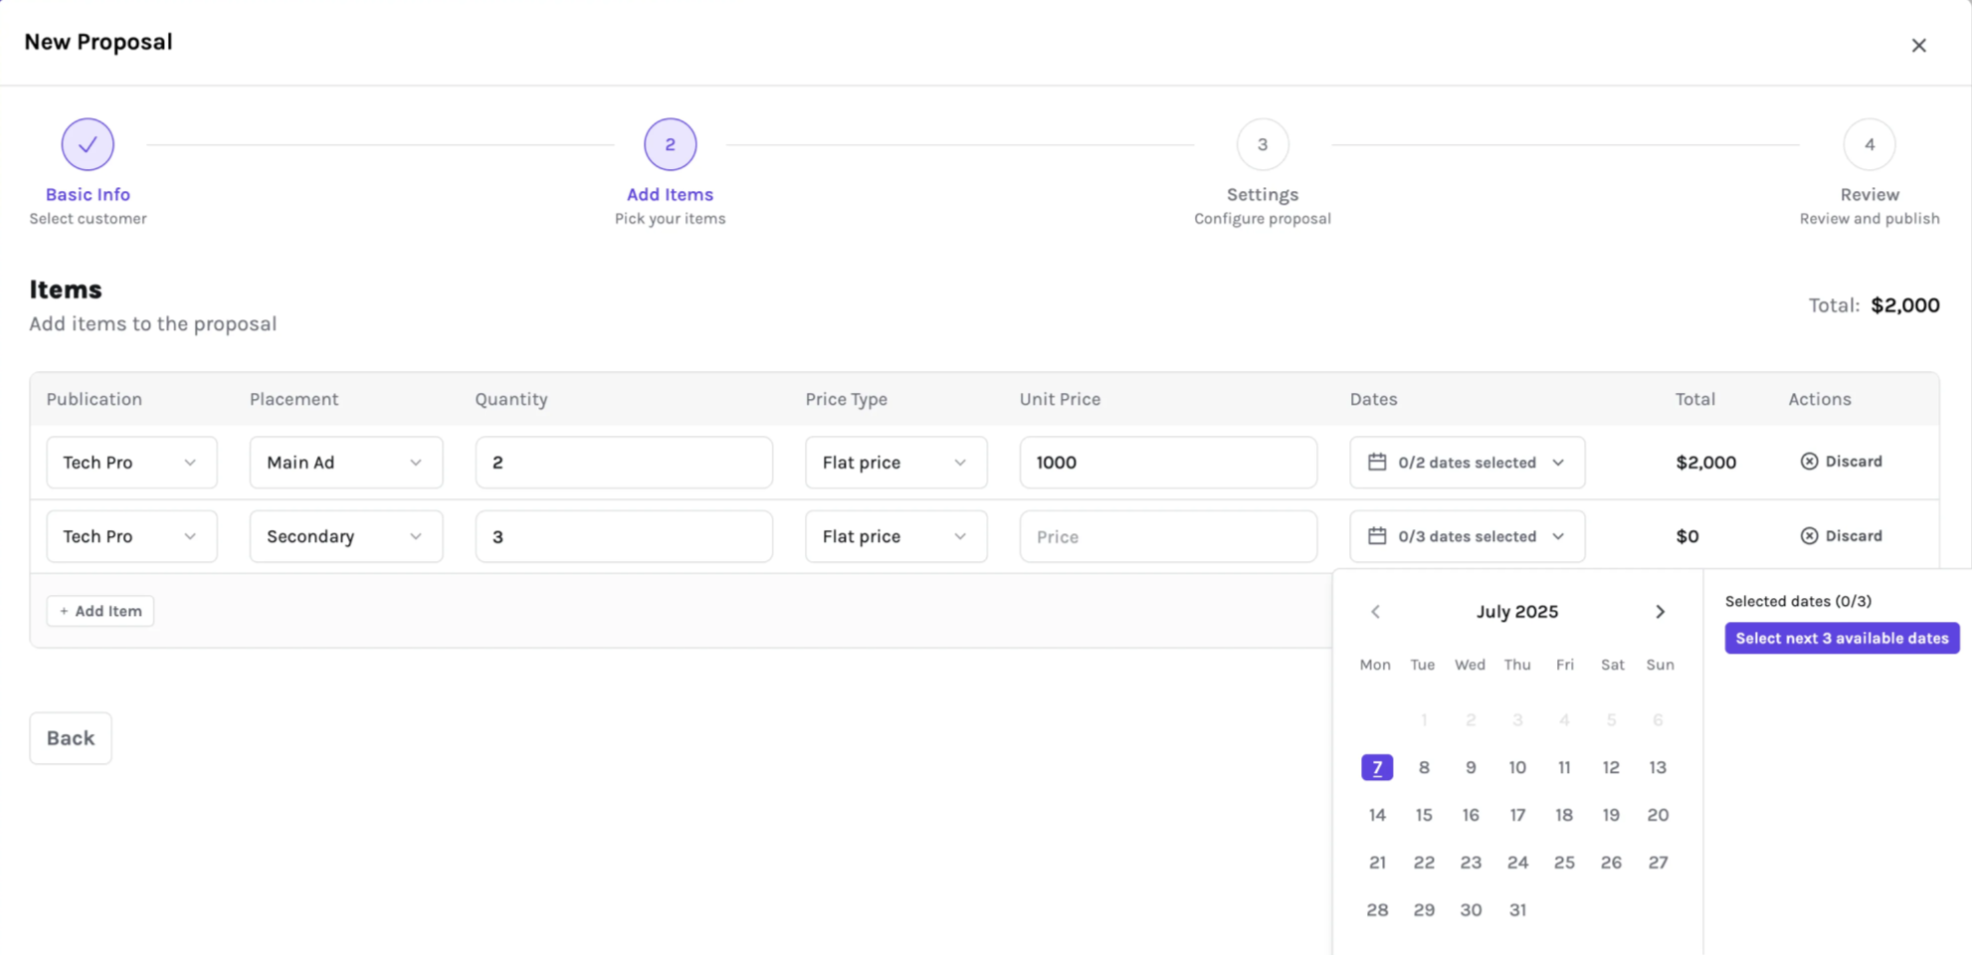
Add inventory & pricing
- Select one or more Ad Placements.
- Enter a Price per placement or bundle.
- (Optional) Add Suggested dates so the sponsor can pick what works.
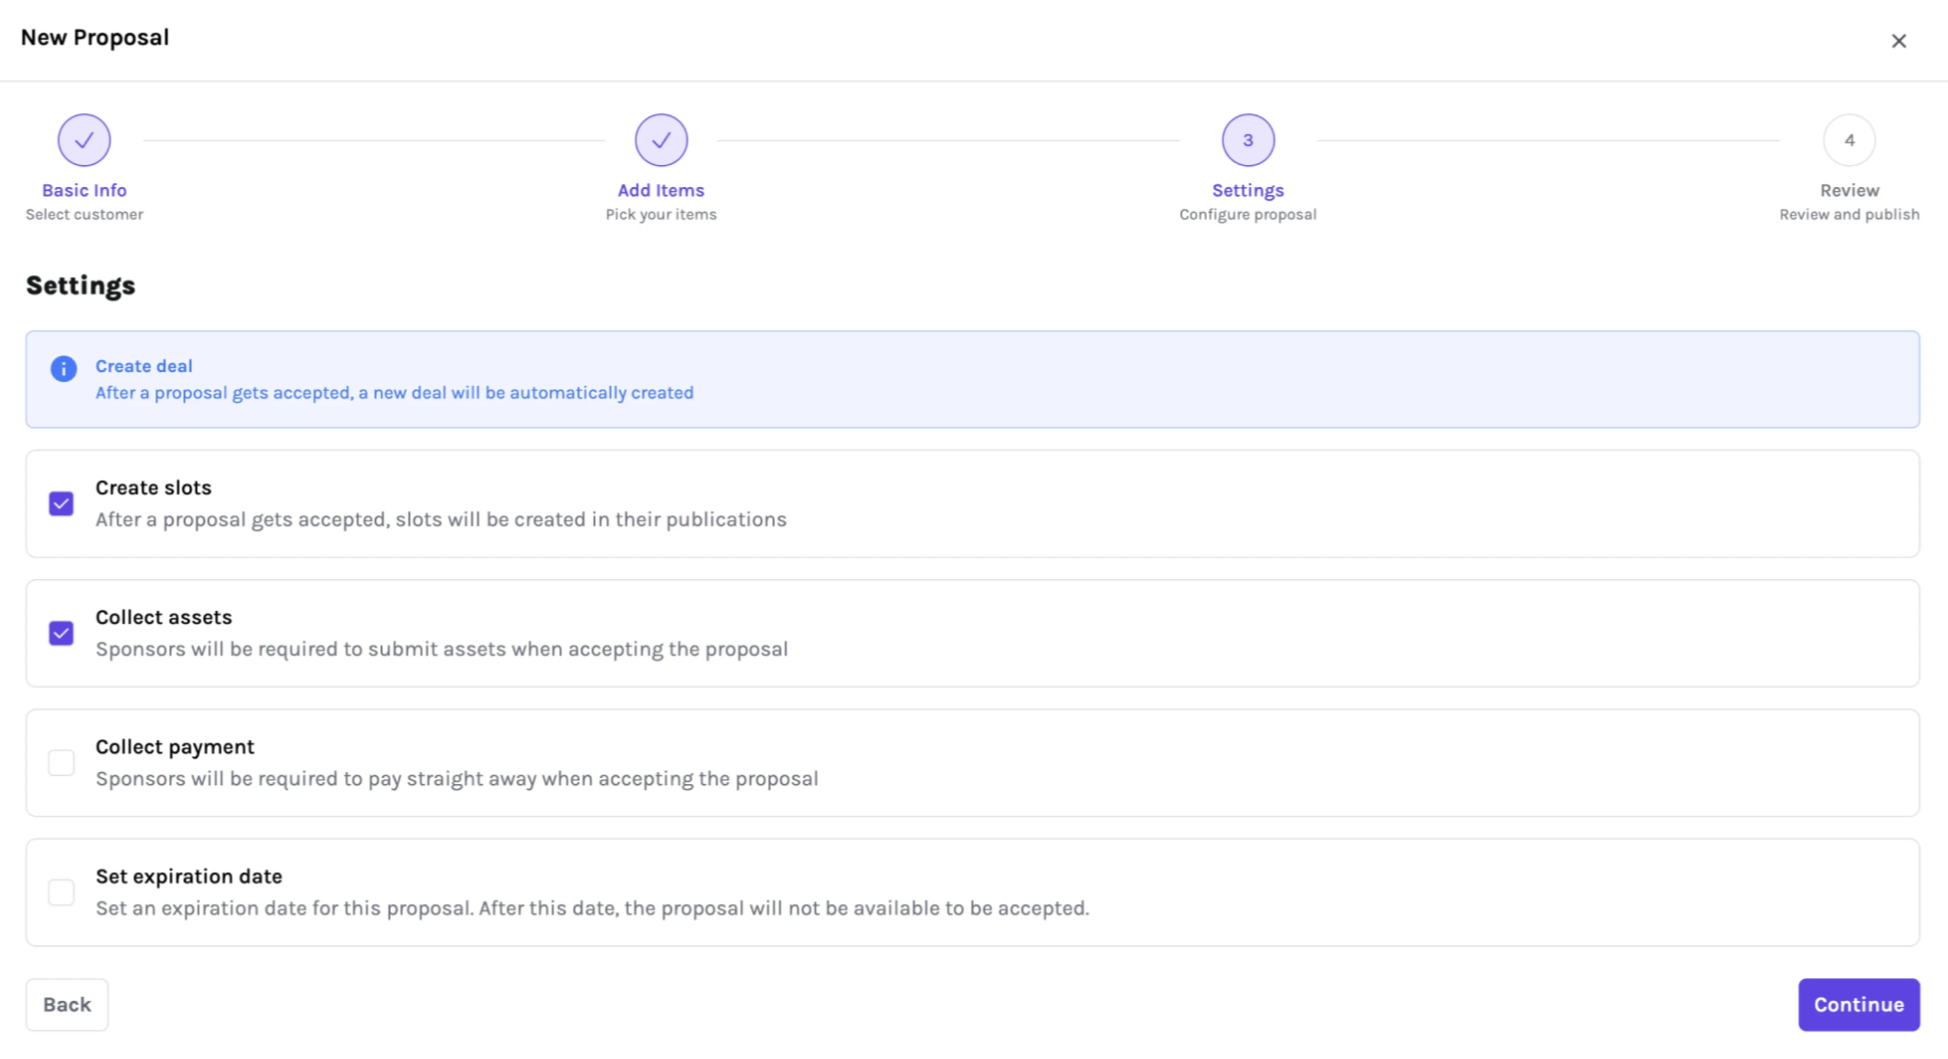
Configure options
A Deal is always created the moment a proposal is accepted.
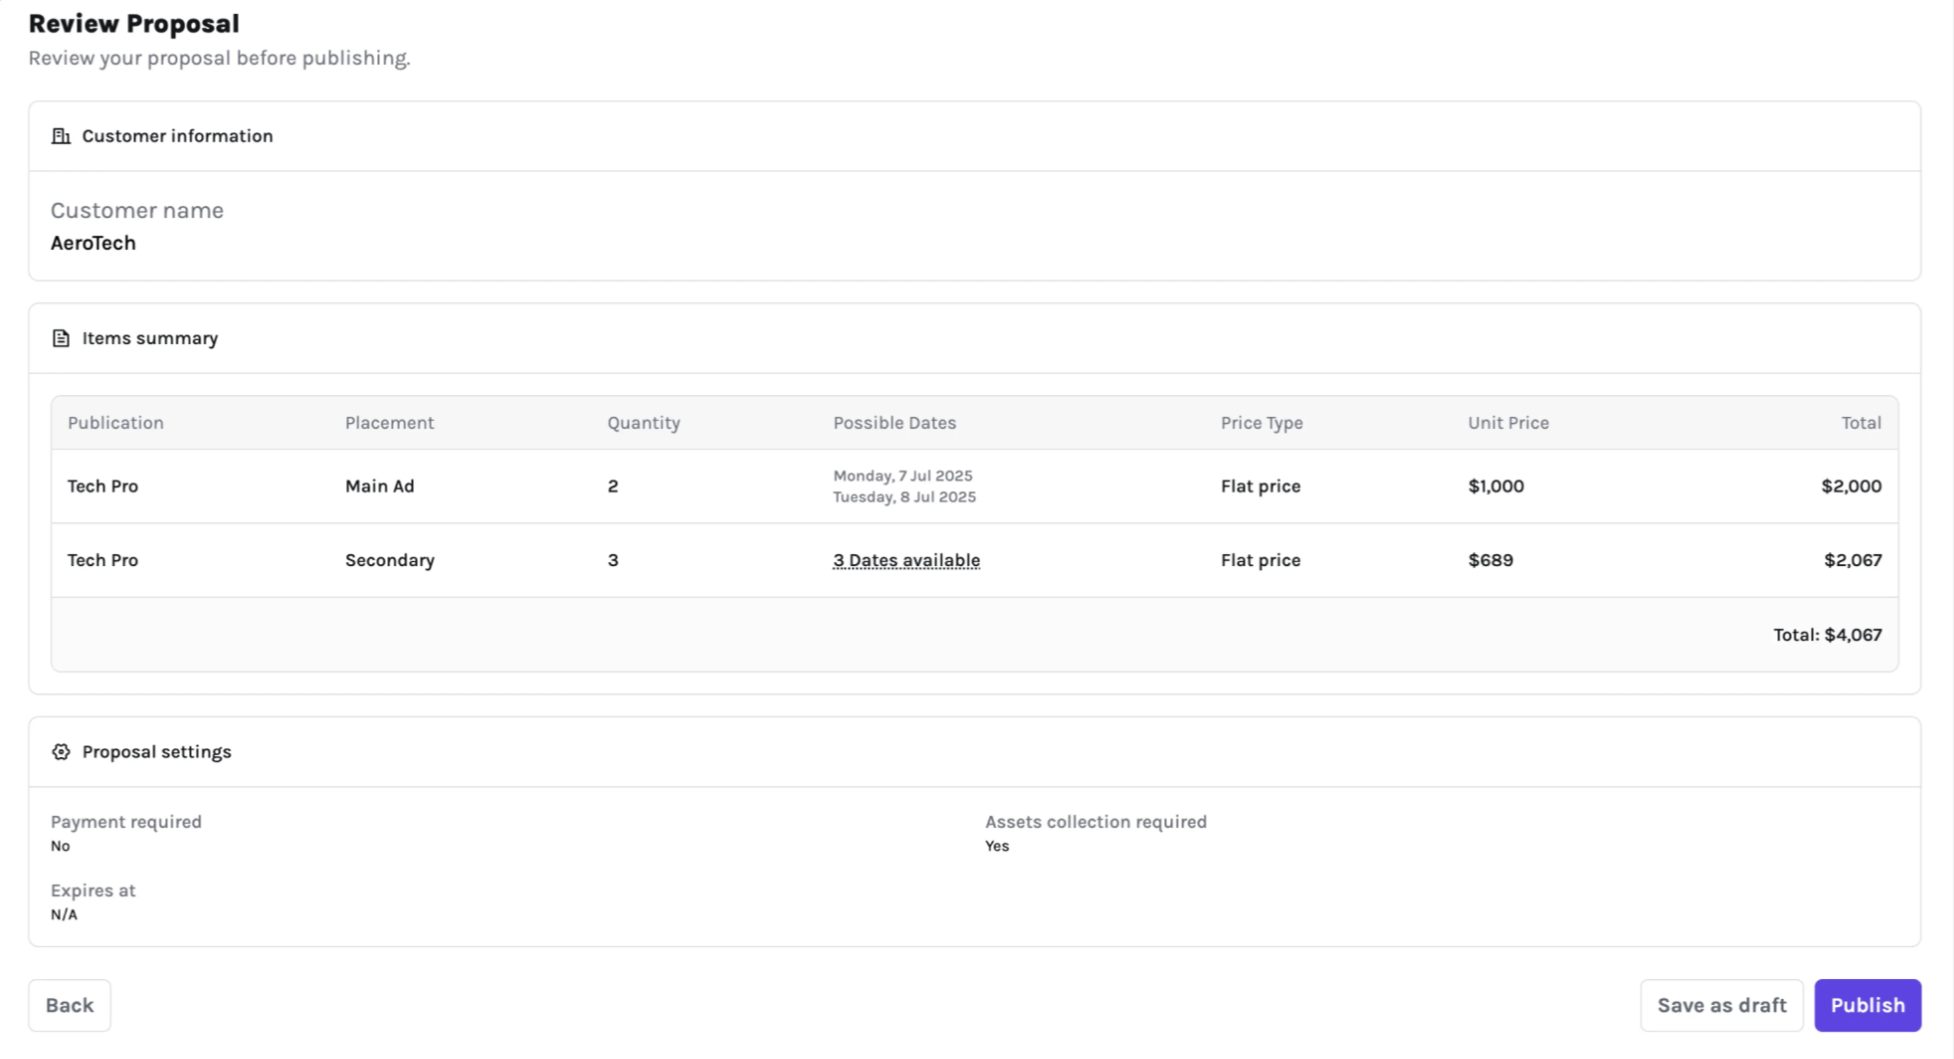
Review & Save/Publish
Save as Draft to revisit later, or click Publish to make it live.
Publishing does not notify the sponsor automatically—you control when and how to share it.
Sharing a Published Proposal
After publishing, Sponsy generates a unique, read‑only URL.
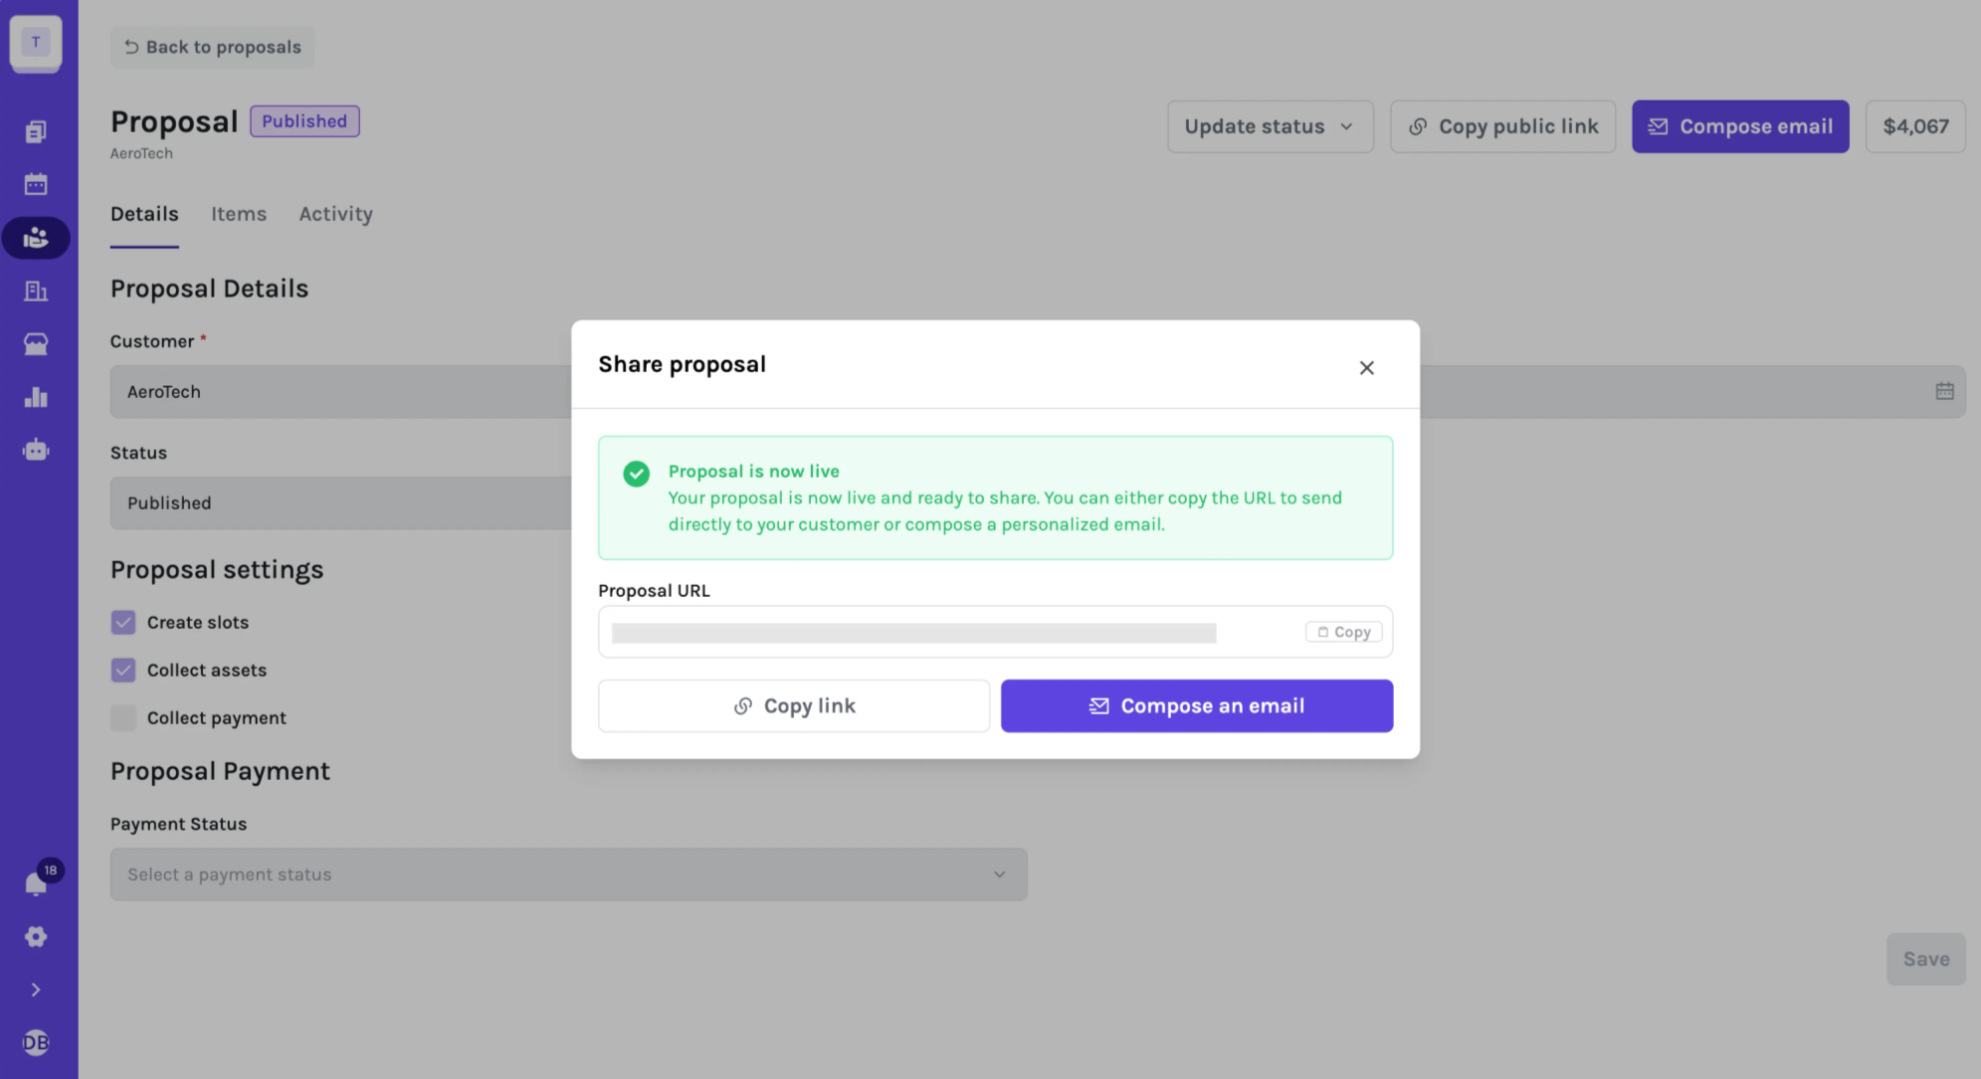
Send via Sponsy (recommended)
- Open the proposal and click Compose email.
- Pick recipients and edit the message body.
- Hit Send—the link is inserted automatically.

Share manually
- Copy the public URL and paste it into any channel—CRM note, Slack thread, etc.
Sponsor Experience (Public Page)
On the public page a sponsor can:
- Review all placements, pricing, and terms.
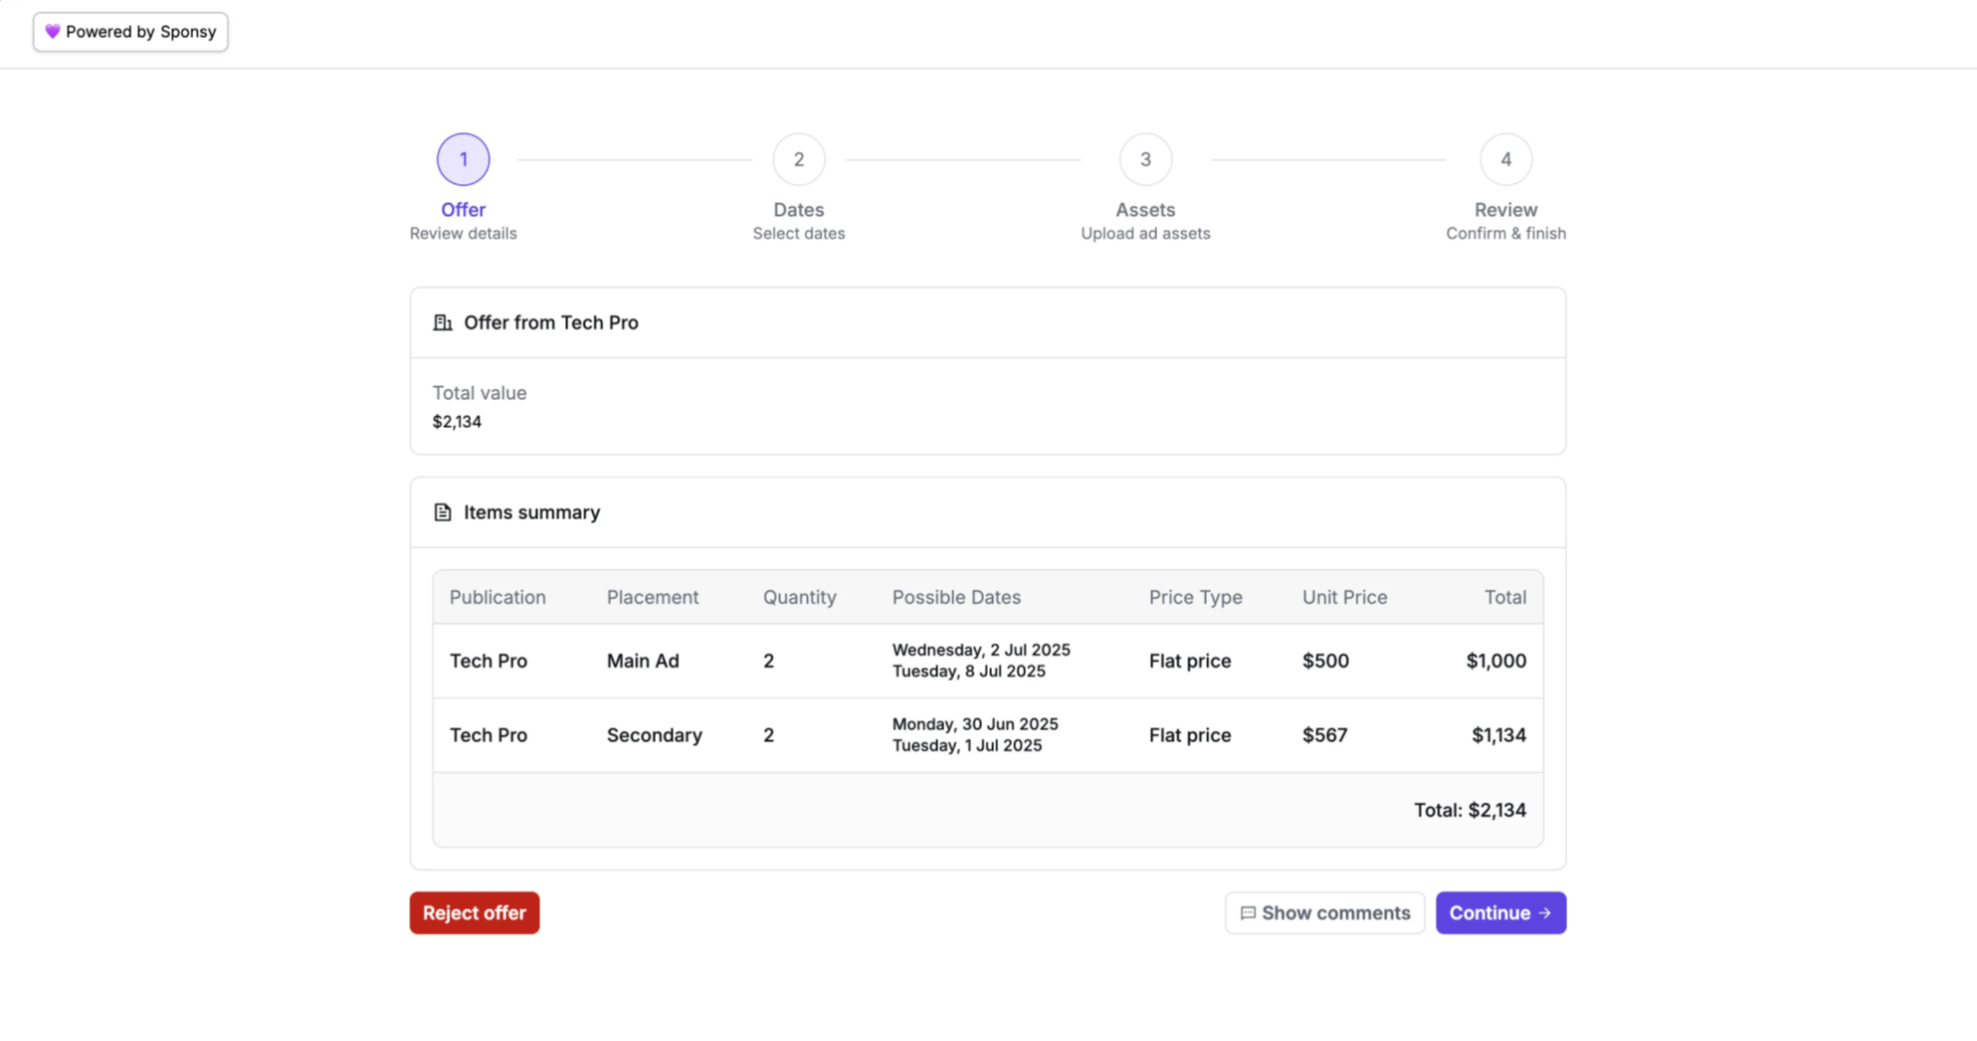
- Select dates if multiple options are offered.
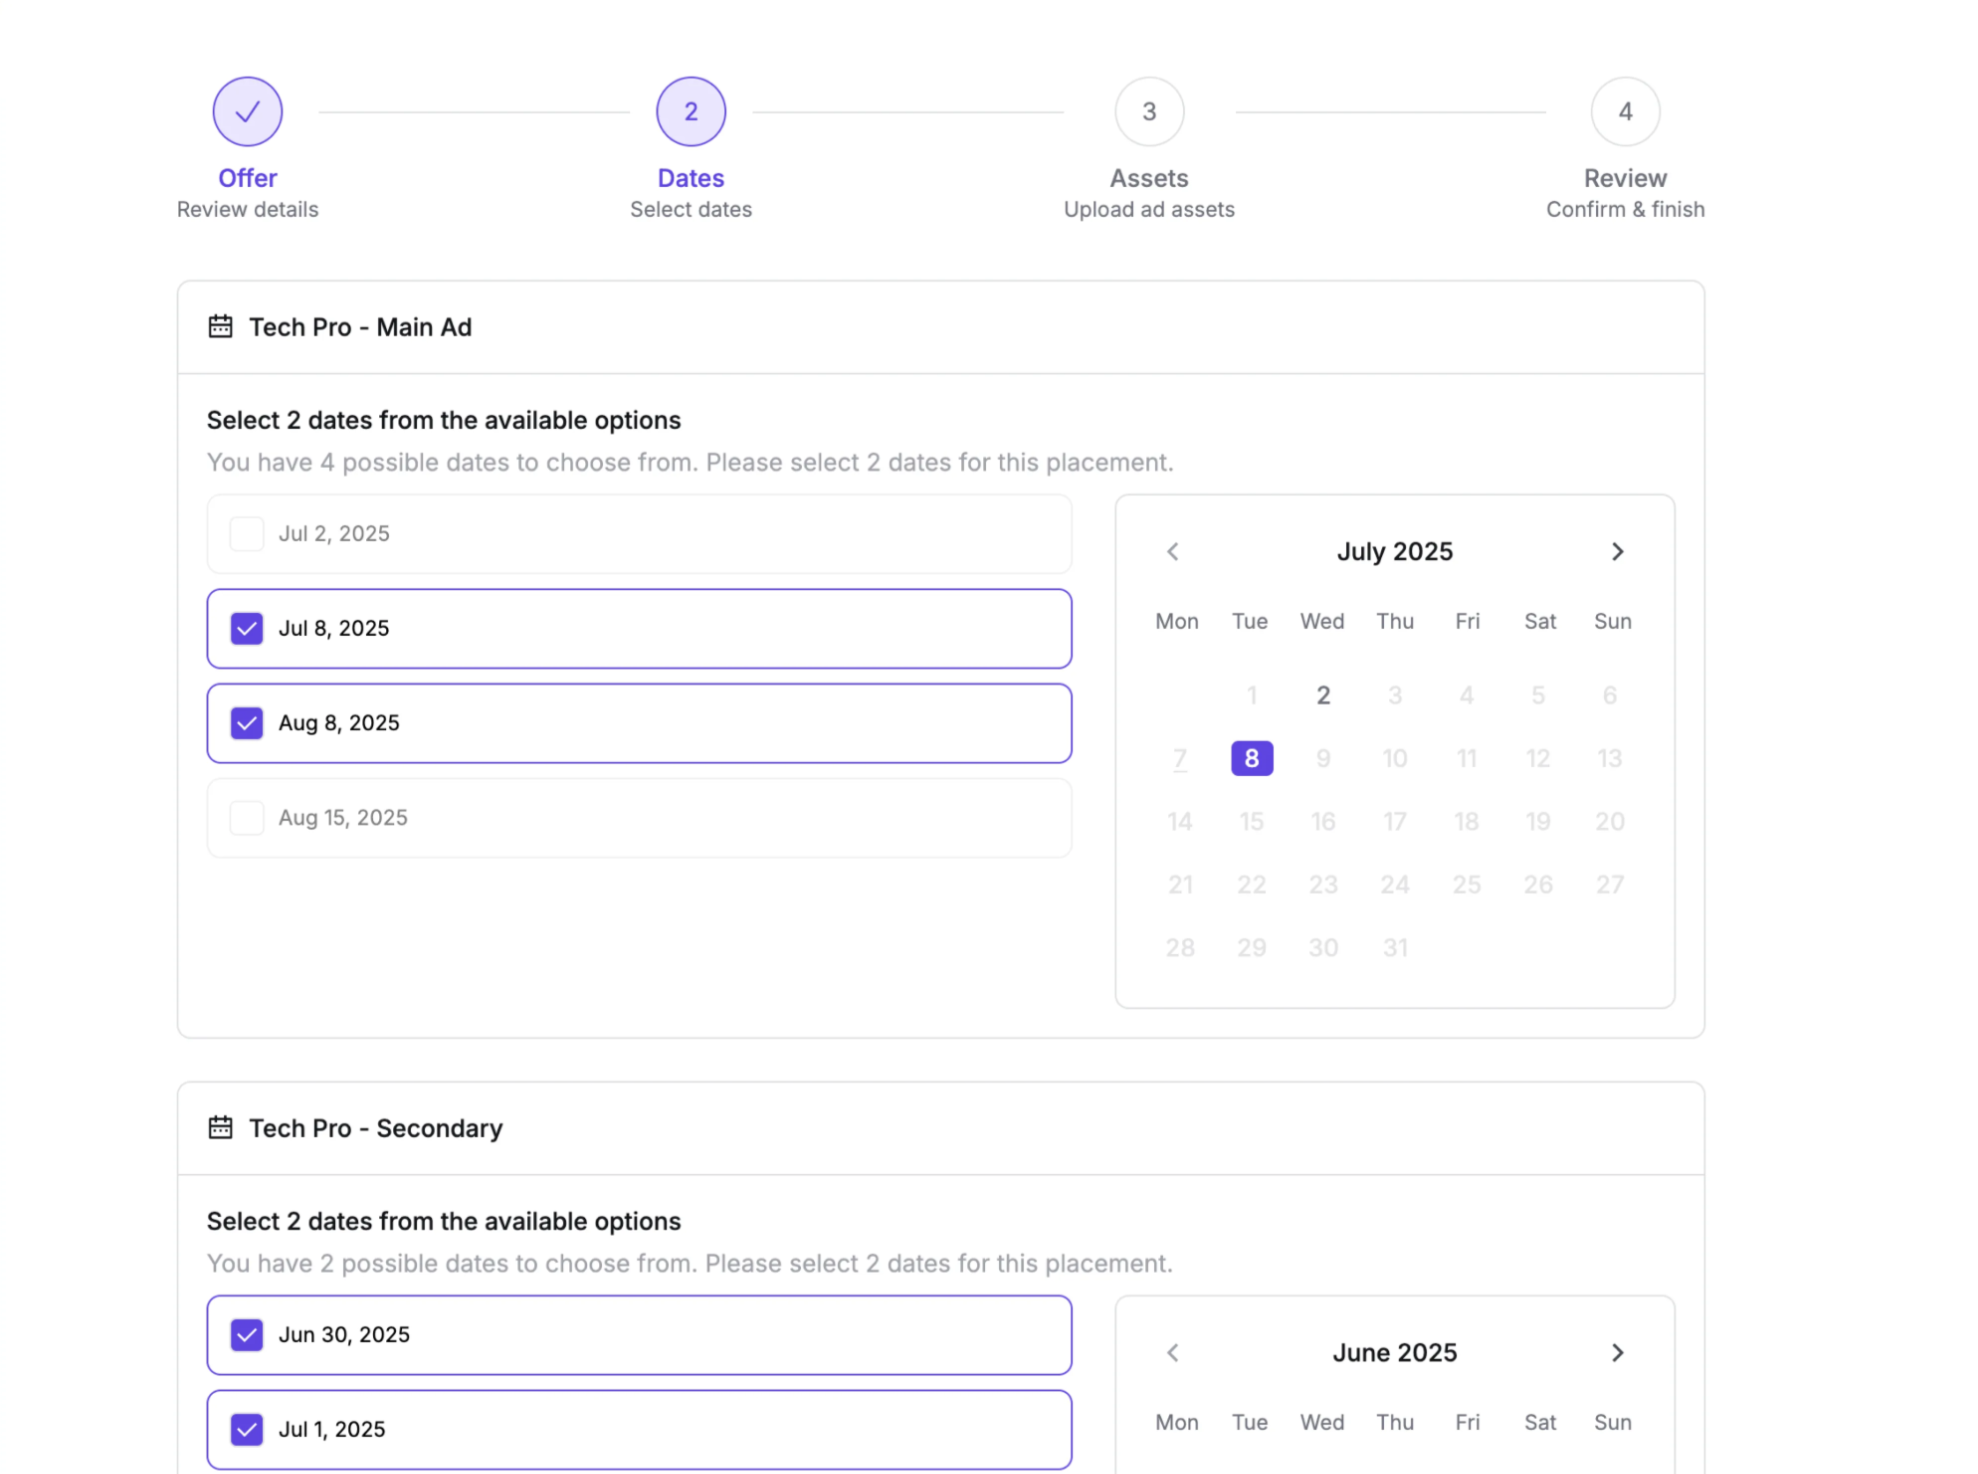
- Upload assets per placement (if enabled).
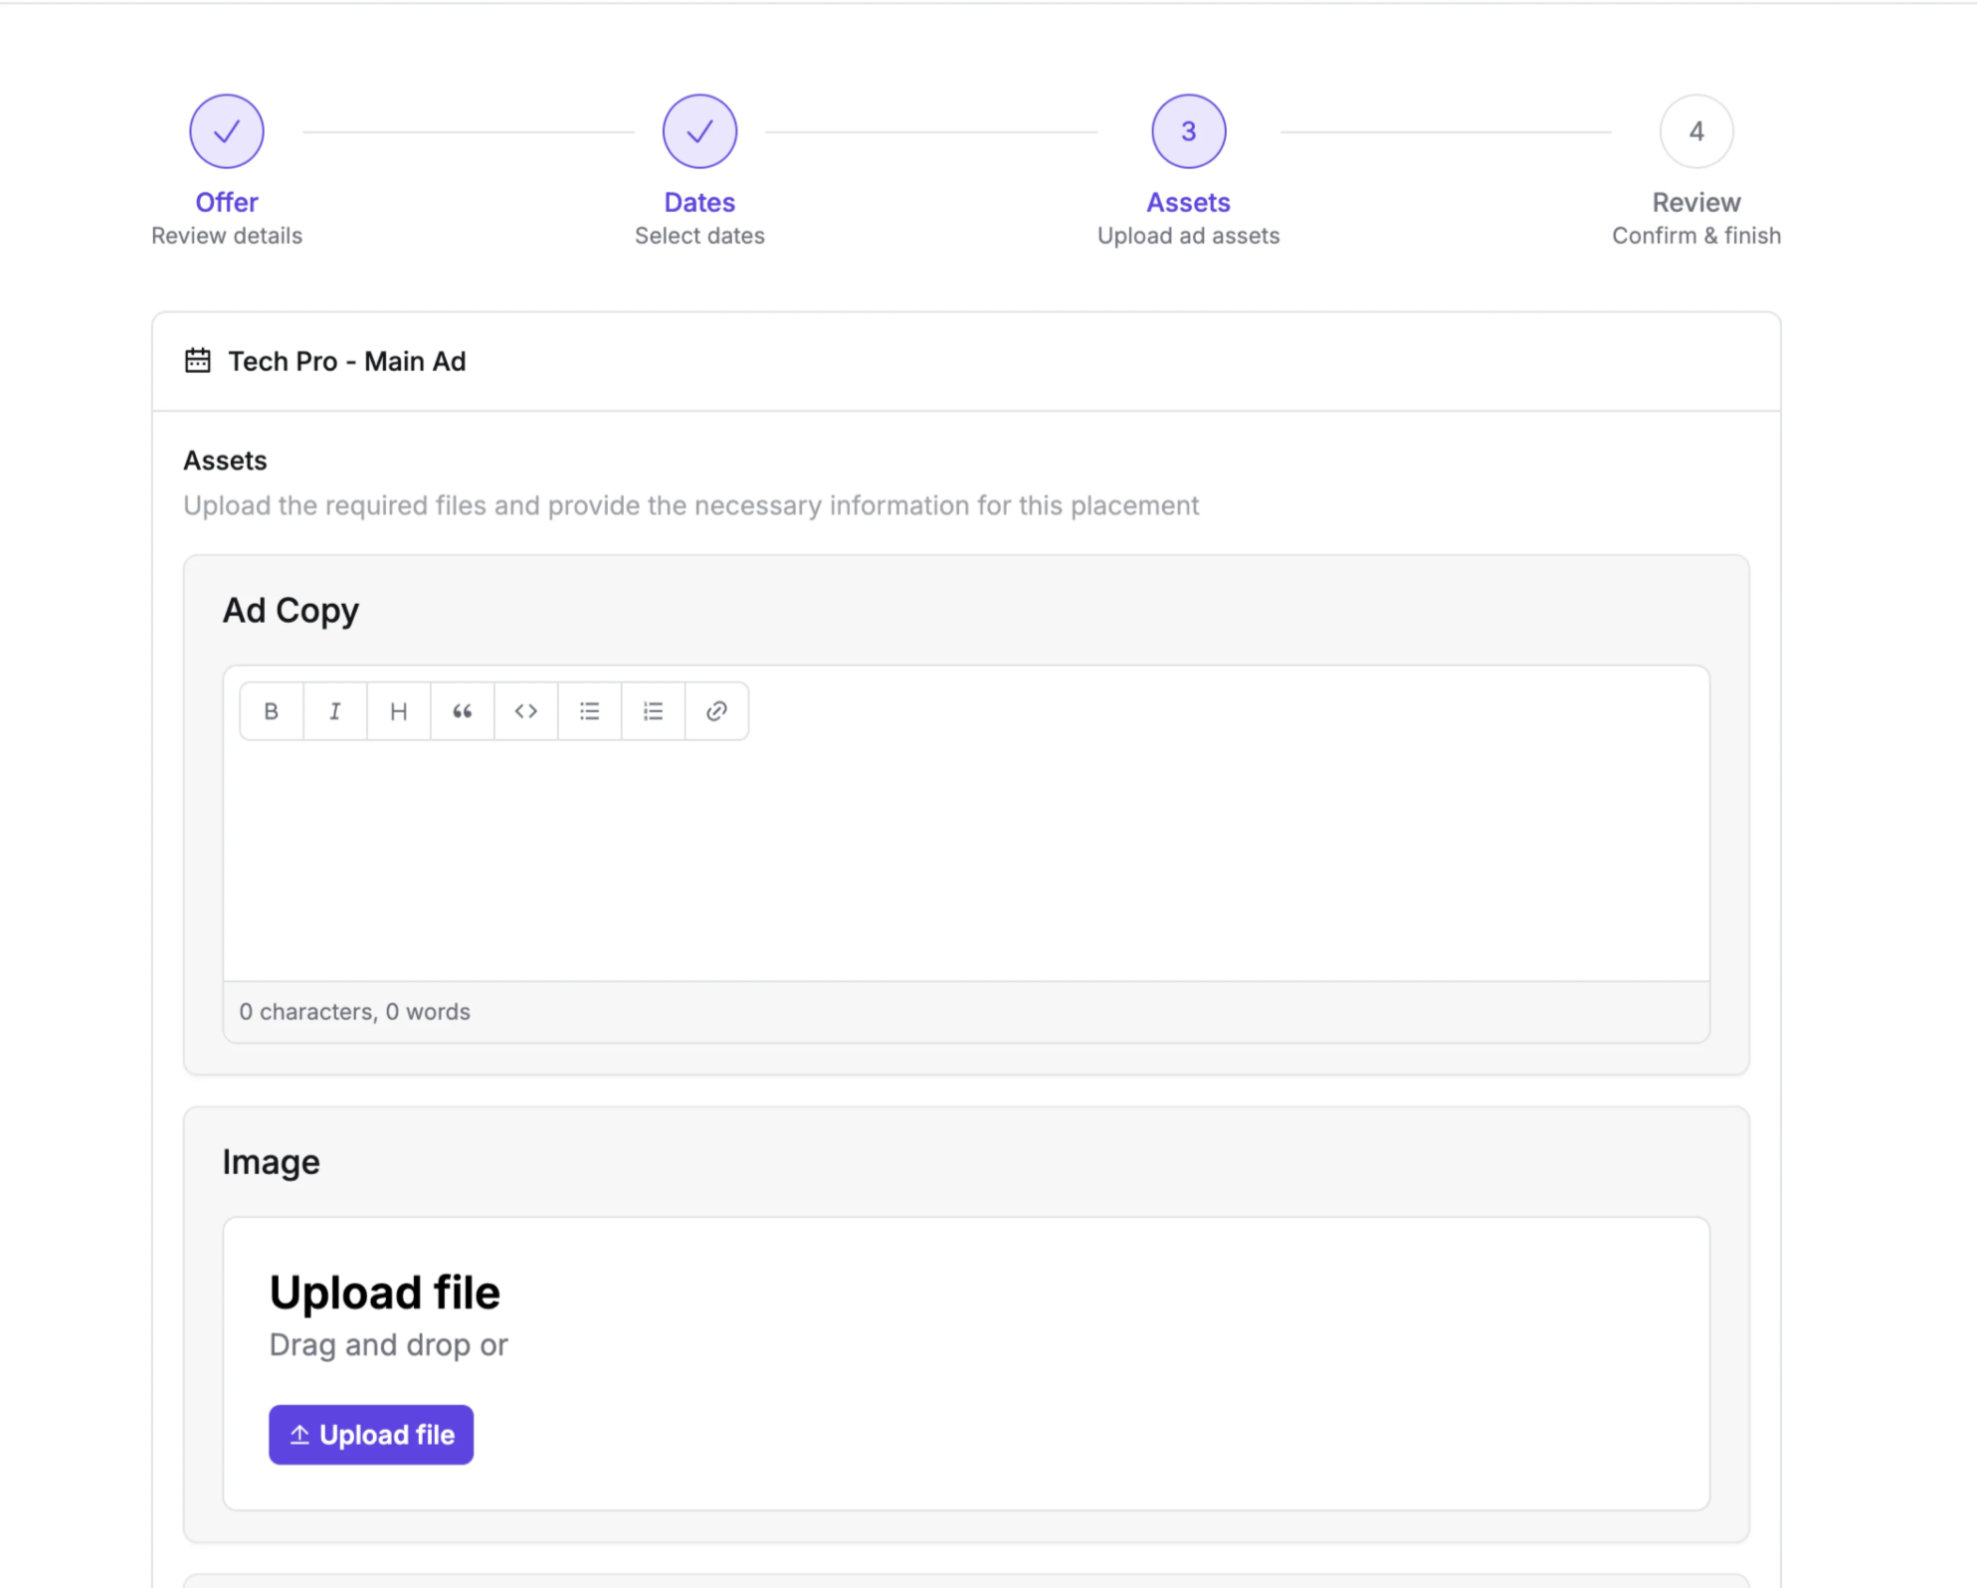
- Accept & pay in one step (if Stripe collection is enabled).
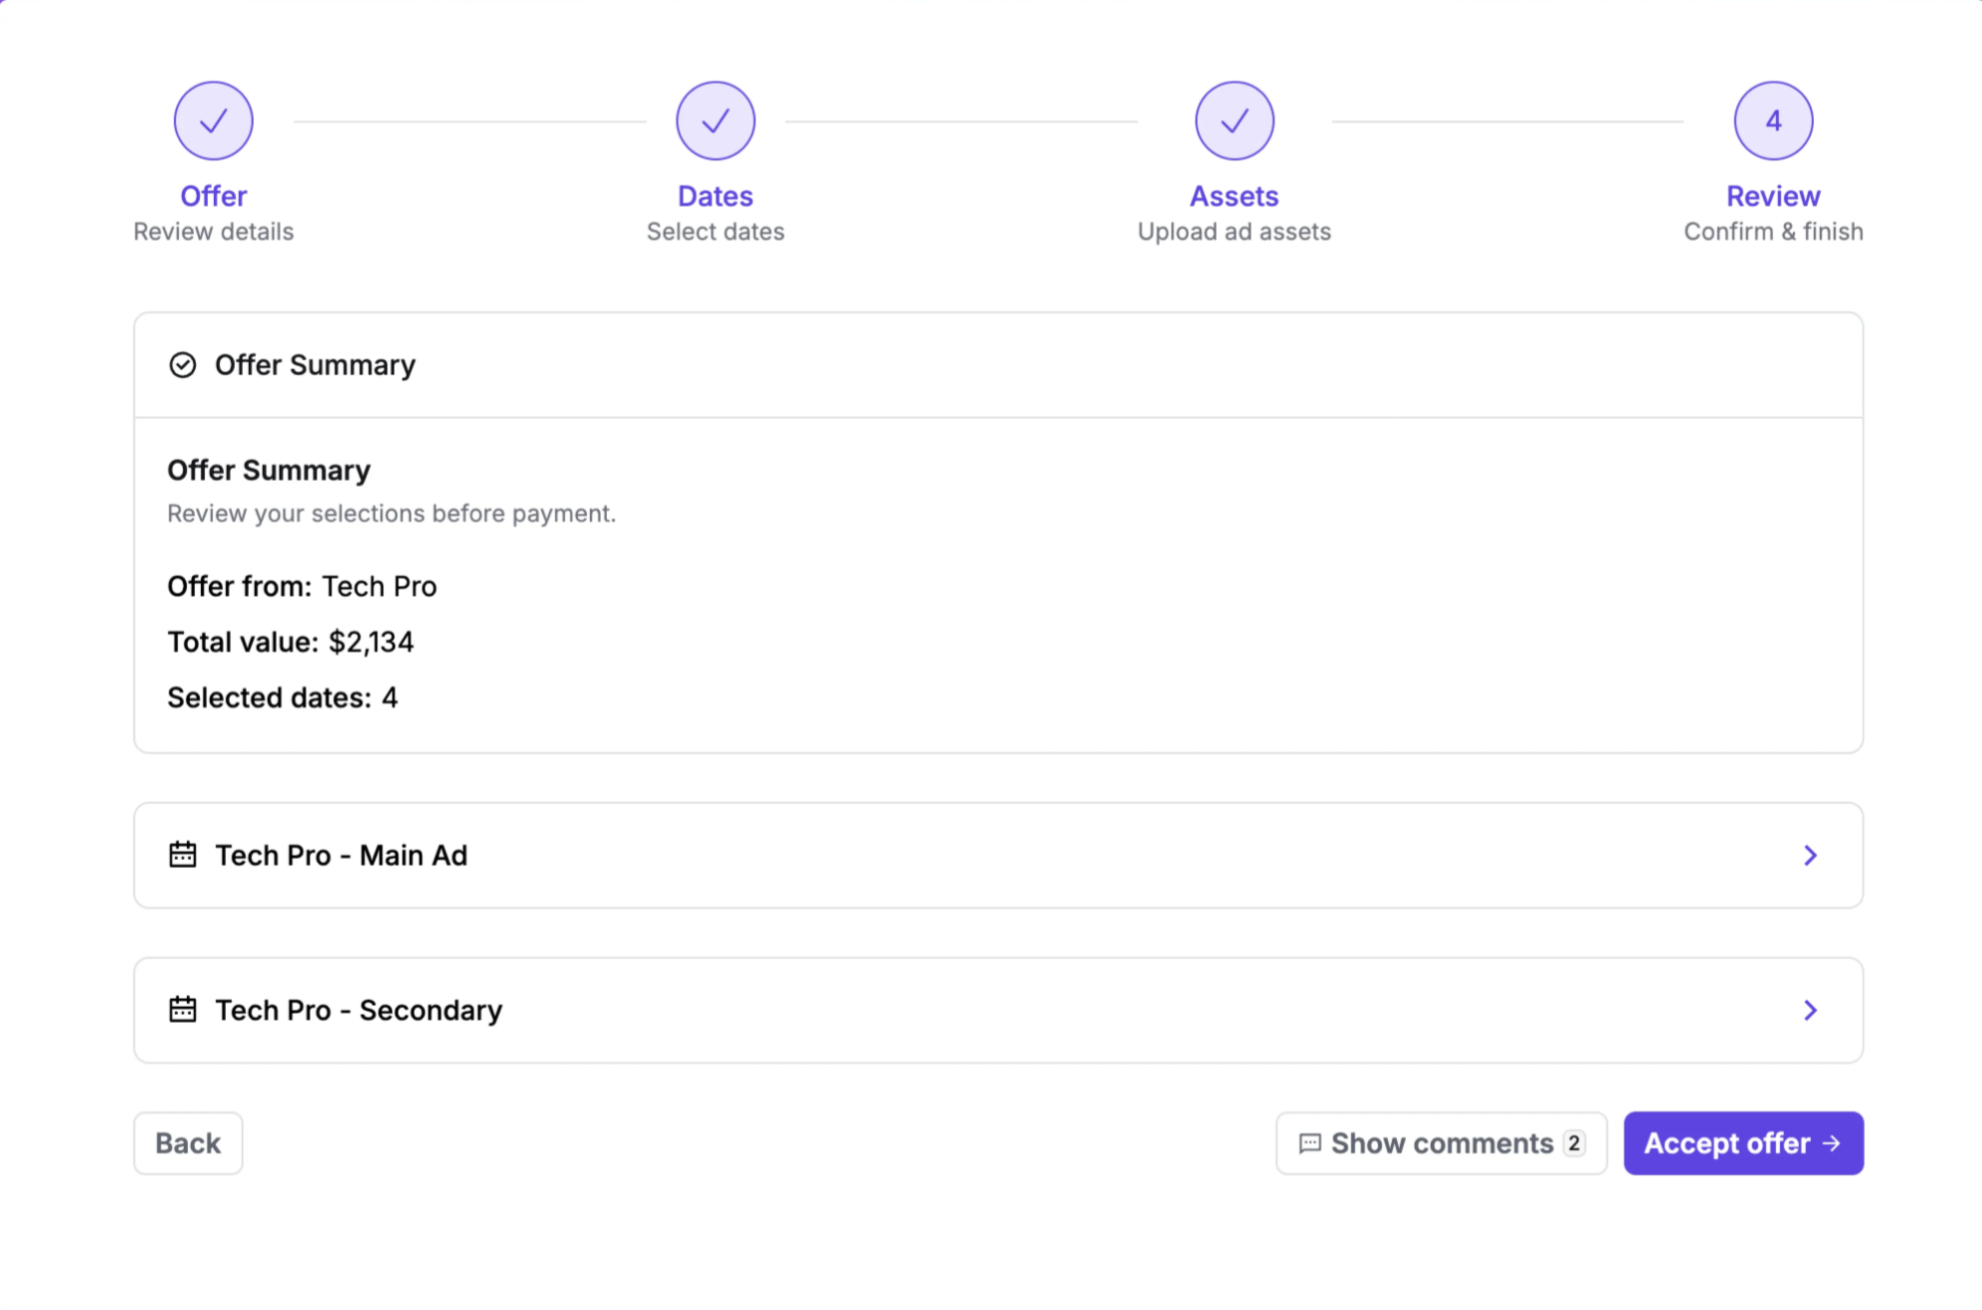
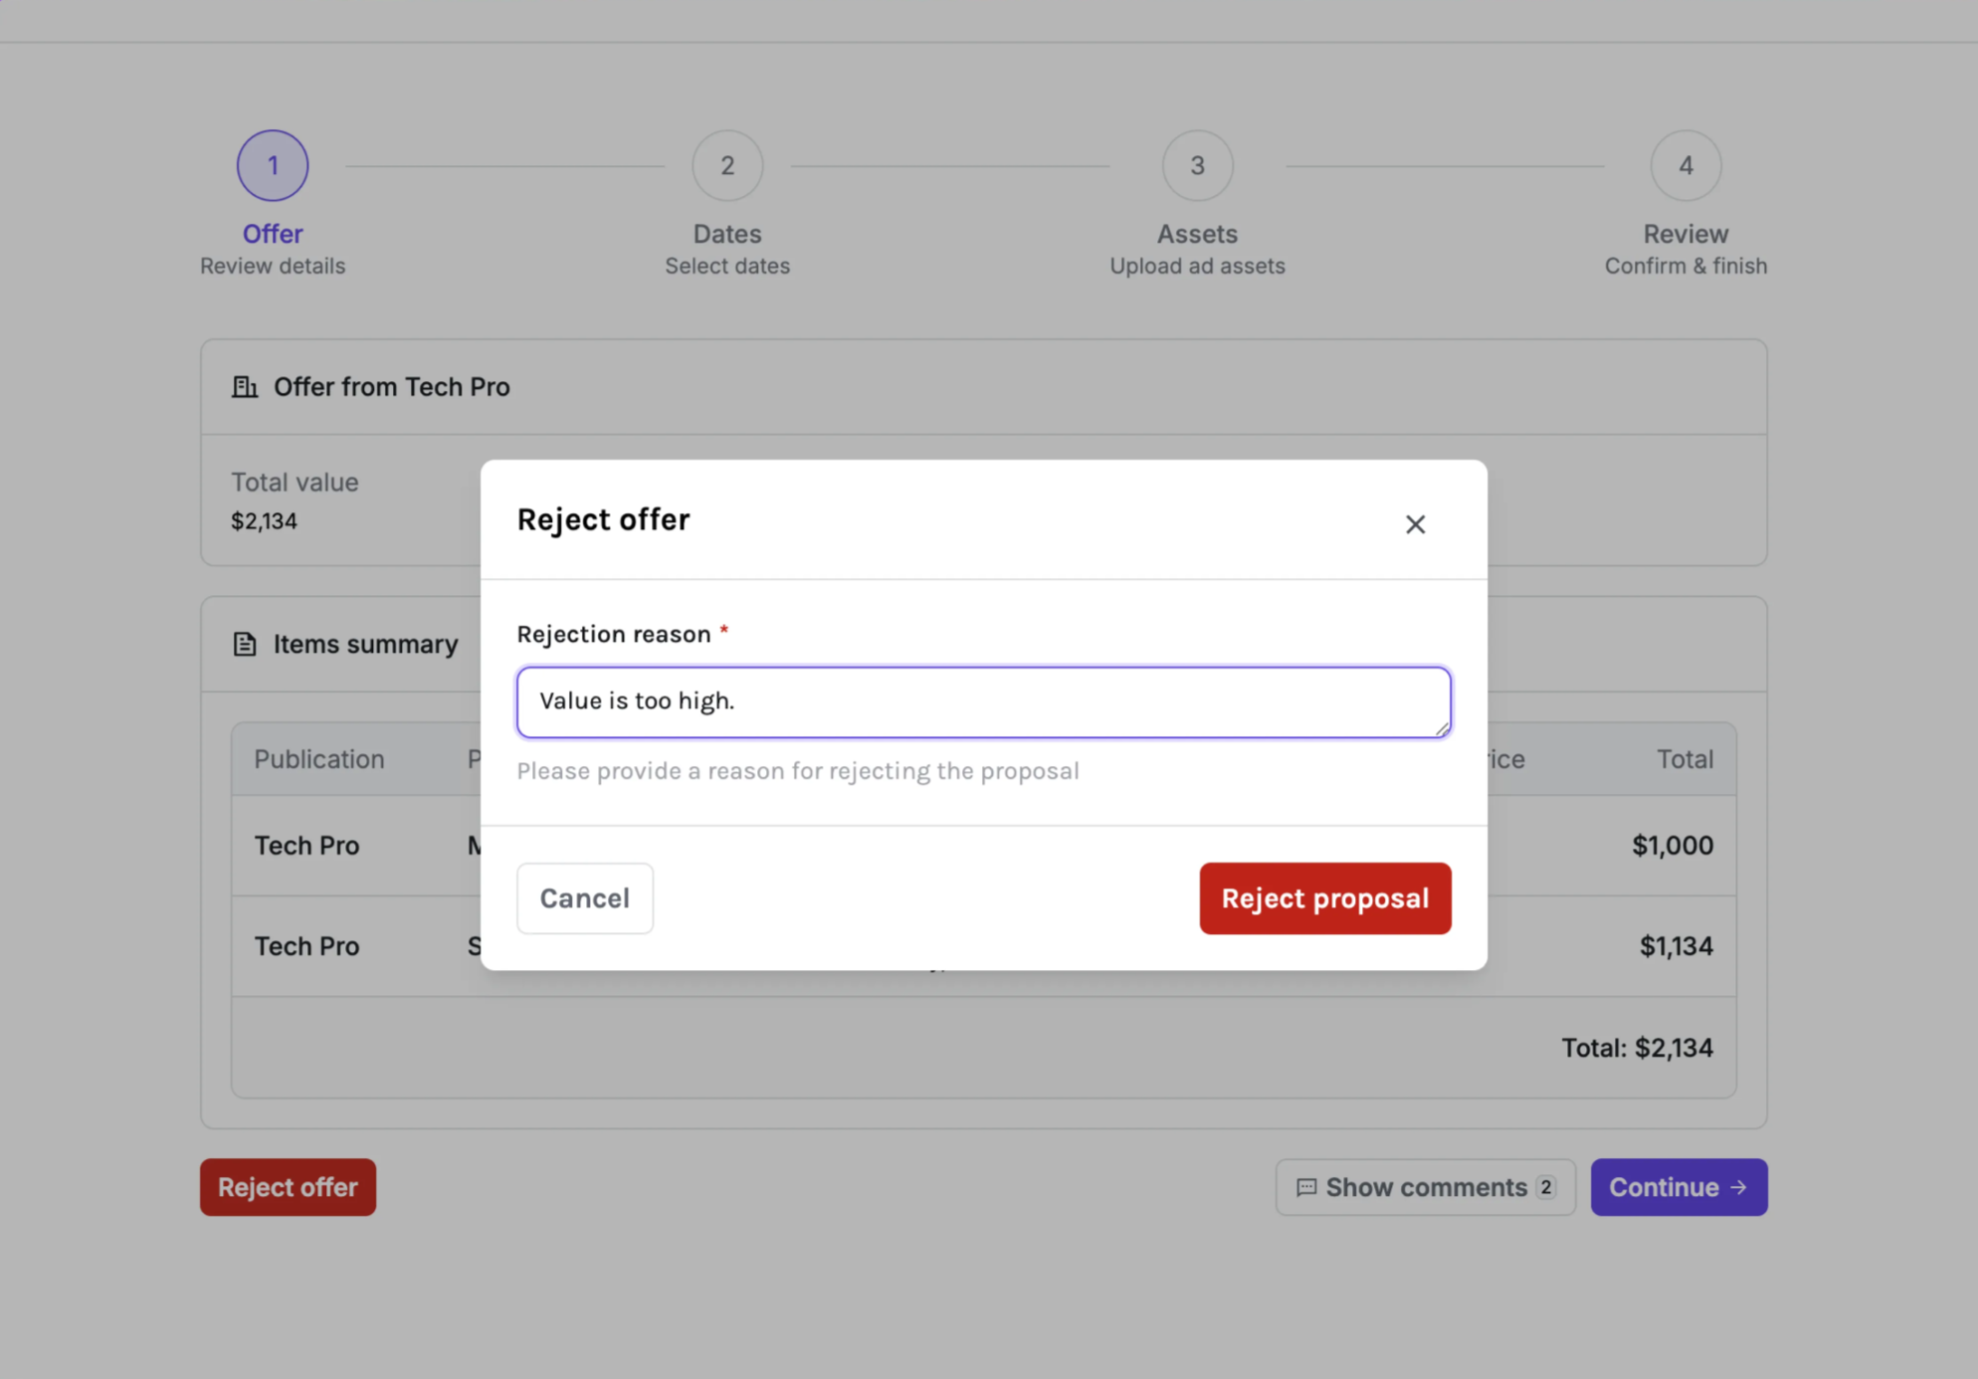
- Reject and optionally leave a reason.
- Comment for clarifications.
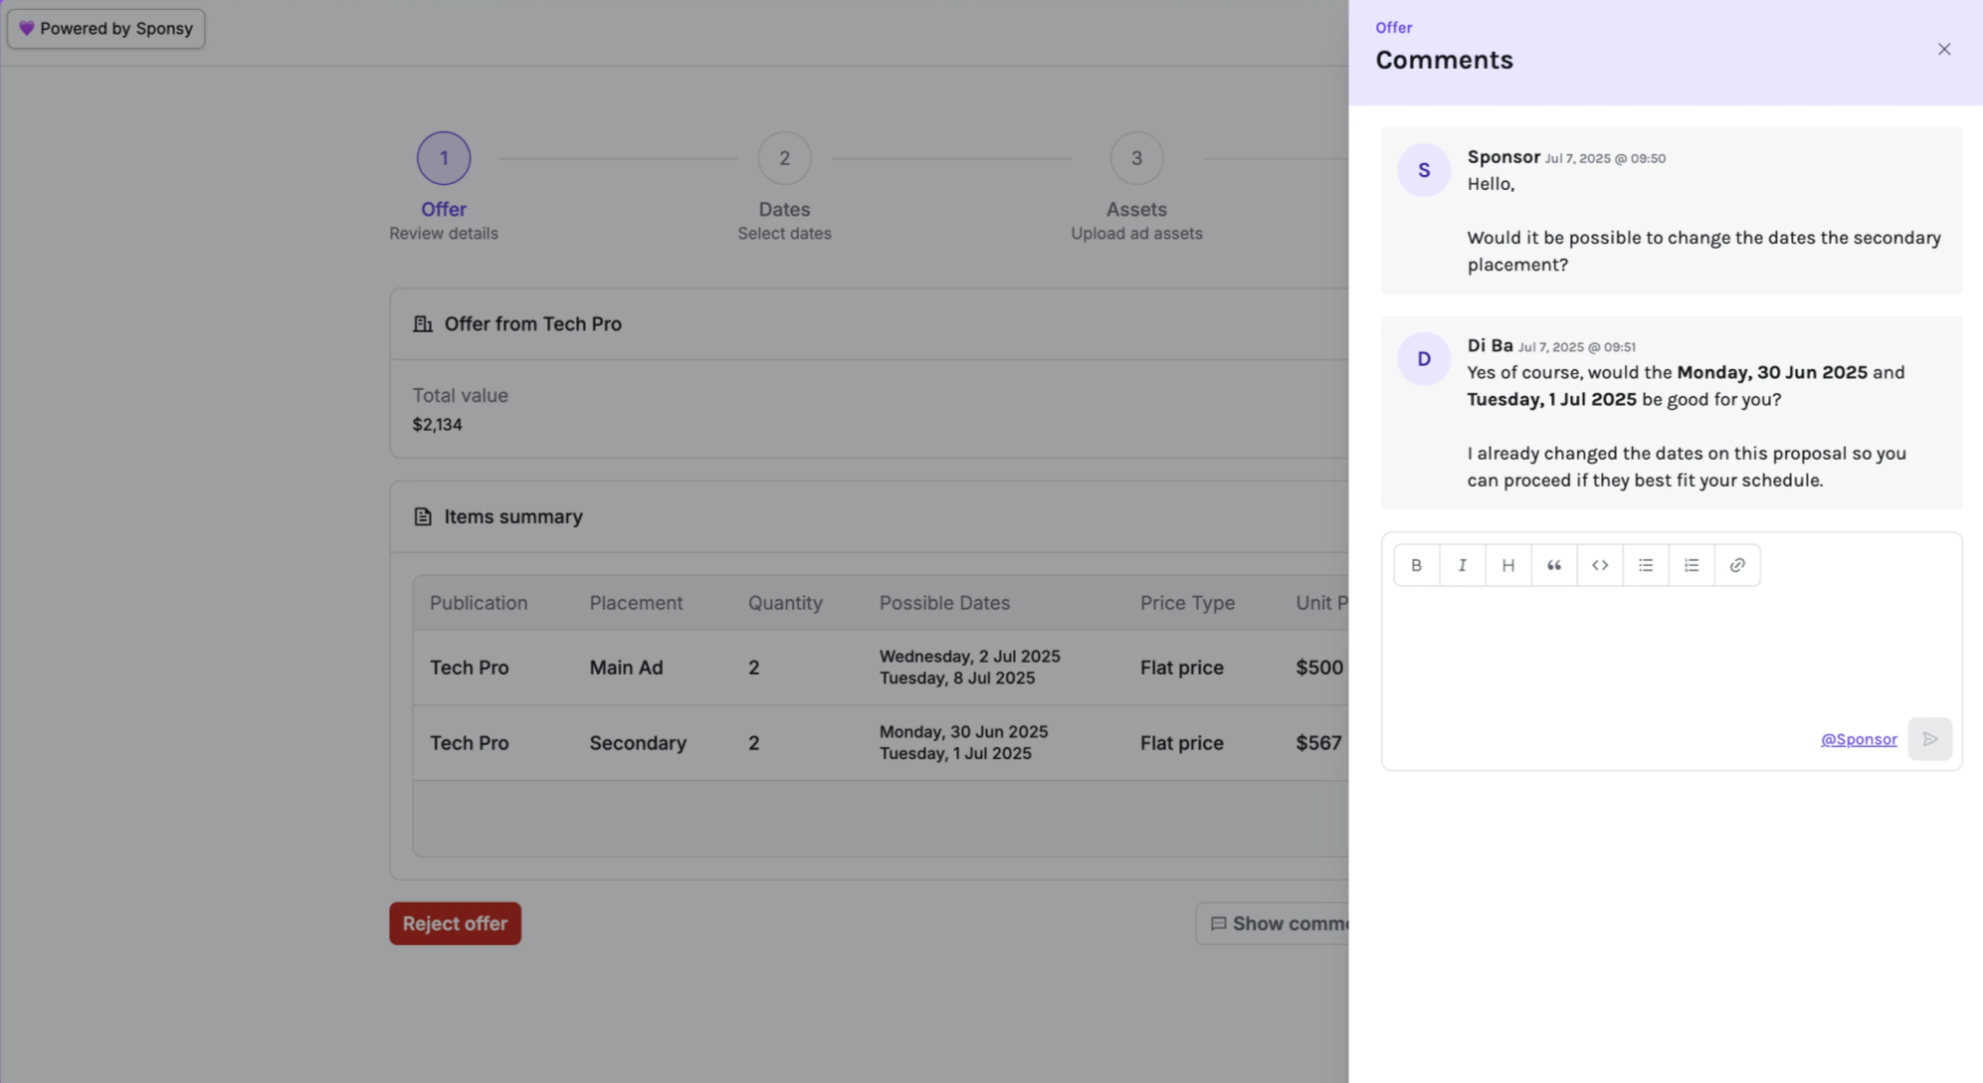
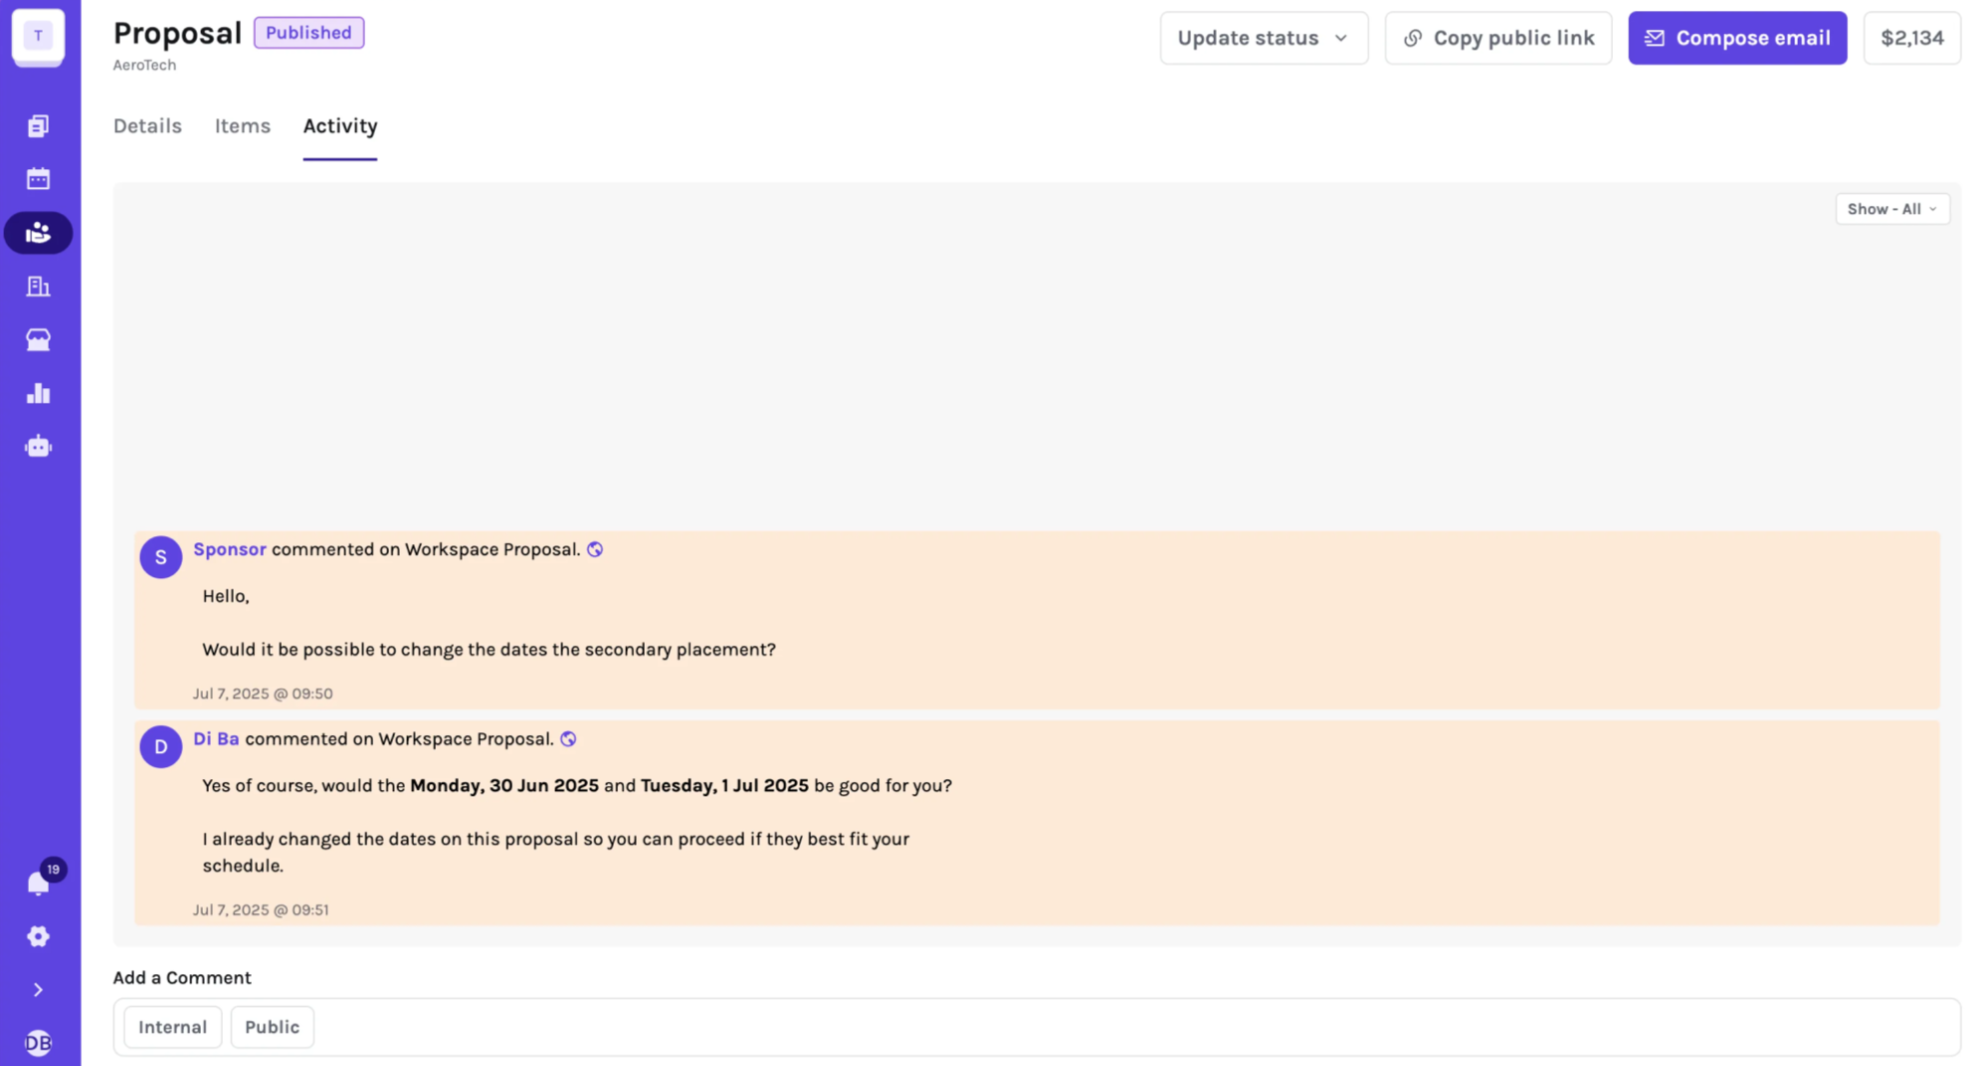
Managing Comments
- New sponsor comments appear in the proposal’s Activity tab.
- Reply to keep the discussion tied to the proposal.
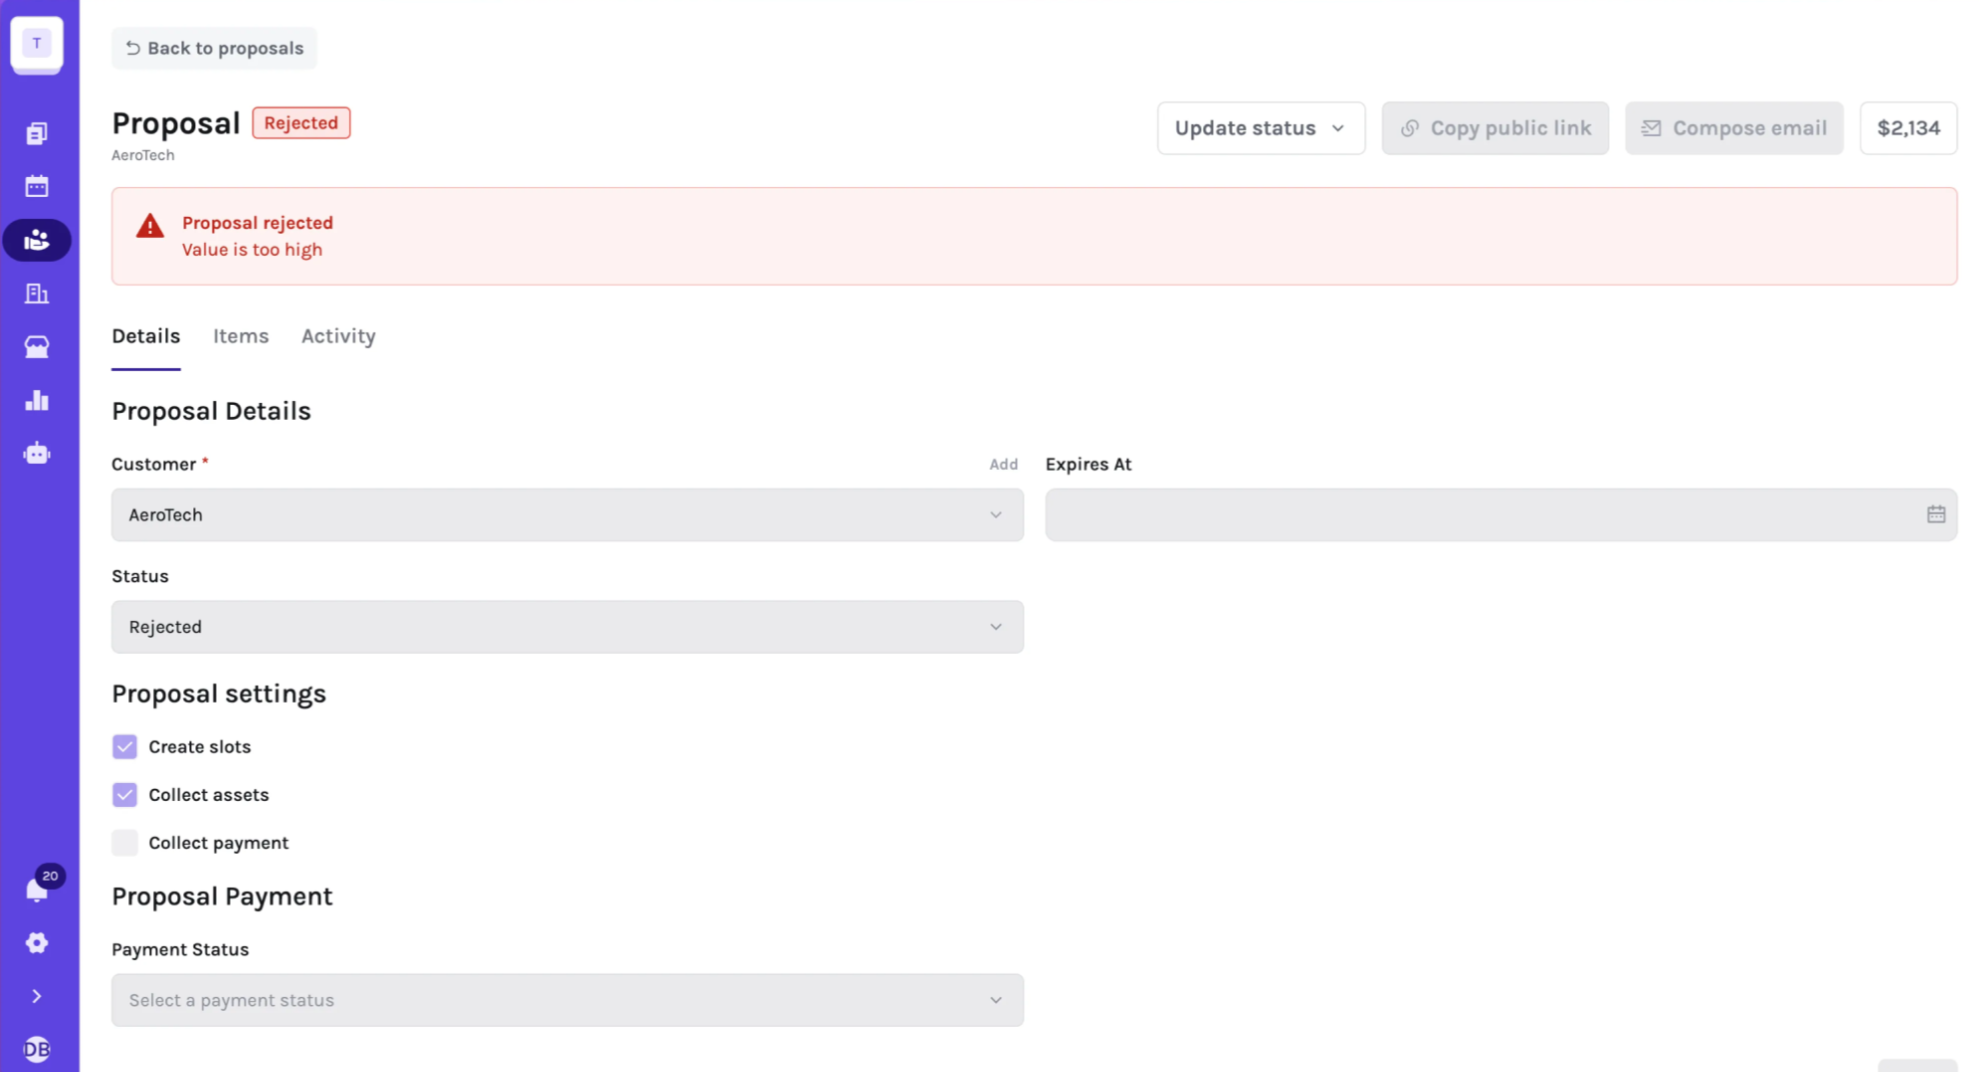
Handling Rejections
If a sponsor clicks Reject, the proposal status turns Rejected and the provided reason is displayed. Edit the existing proposal or duplicate it to iterate quickly.
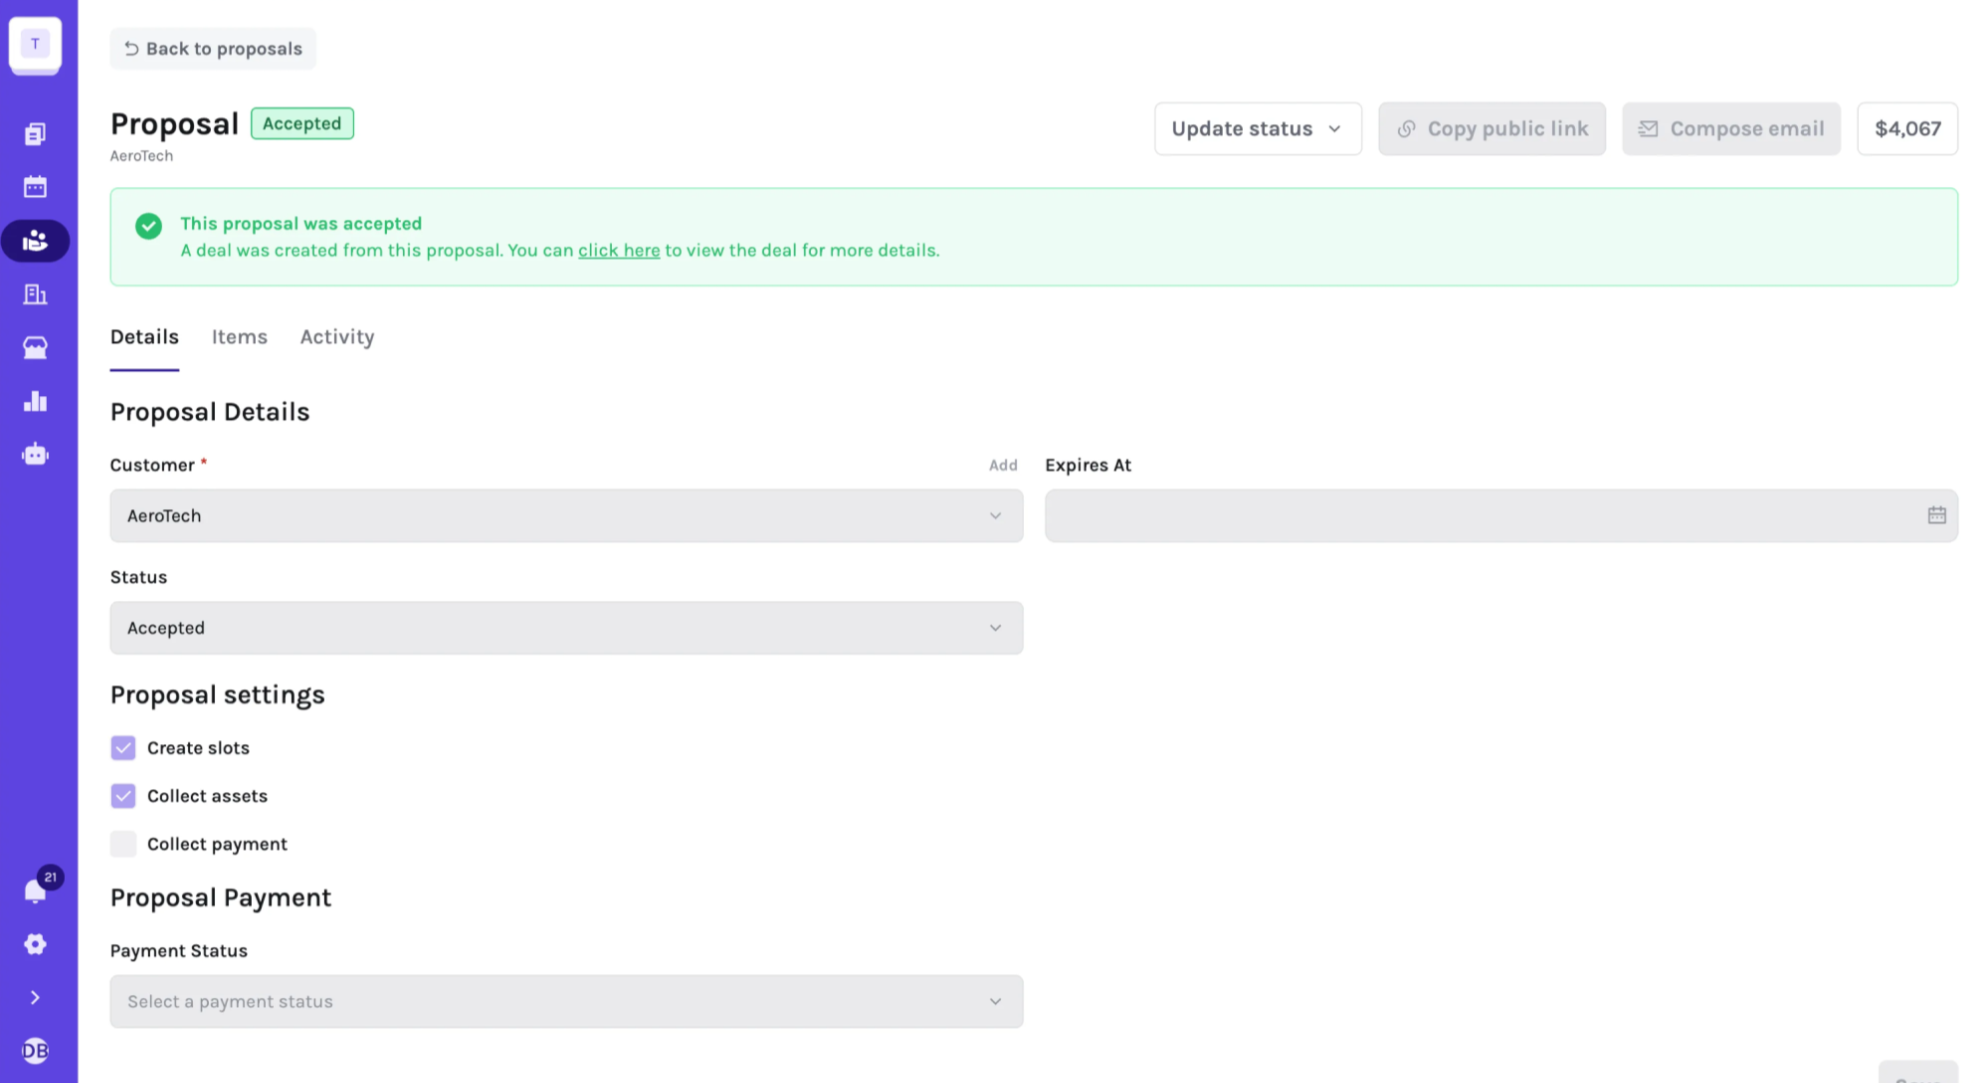
What Happens on Acceptance?
- Deal auto‑creates in the Deals module.
- If Create slots was enabled, all placements populate the Ad Calendar.
- If Collect assets was enabled, assets flow straight into each slot.
- If Collect payment was enabled, a paid invoice is logged automatically.
Proposals FAQs
Can I edit a published proposal?
Yes, but you’ll need to change its status back to Draft first. Once it's in draft mode, you can make edits. When you're done, republish the proposal. The public page will update the next time the sponsor opens the link.
What happens when the expiration date passes?
The proposal link will display that the proposal is expired and the sponsor will not be able to accept/reject or comment.
How do I resend a proposal?
Open the proposal, click Compose email, and send again—no need to duplicate it.
Tips and best practices
- Keep deals organized: Use clear names and consistent tags for easy tracking.
- Leverage filters: Use filters to monitor specific campaigns or team performance.
- Utilize automations: Set up automations to send payment reminders or notify teams when a deal progresses.