Storefront
Welcome to the Storefront module, your gateway to simplifying sales and managing inventory in a self-service model. With storefronts, you can create personalized online spaces to showcase and sell your offerings.
Welcome to the Storefront module, your gateway to simplifying sales and managing inventory in a self-service model. With storefronts, you can create personalized online spaces to showcase and sell your offerings.
This chapter will guide you through setting up and customizing storefronts, ensuring a seamless sales journey for your clients.
Dashboard: Your Storefront Command Center
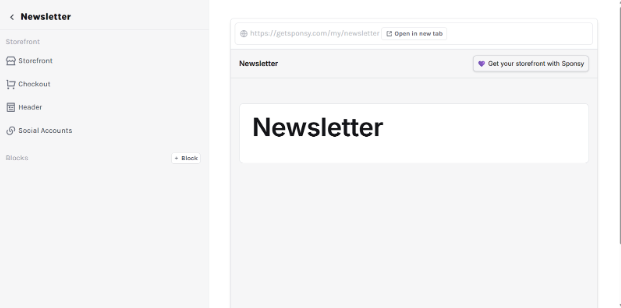
The dashboard is where it all begins. Access it by clicking the store icon on the left sidebar.
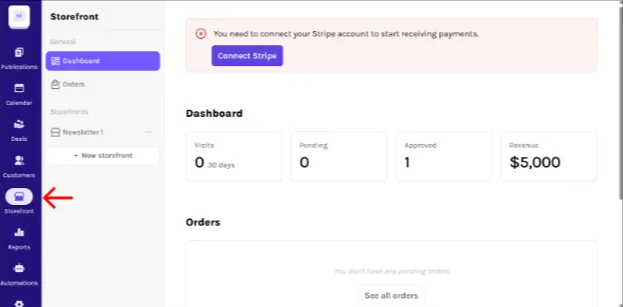
This area brings a snapshot of your activity:
- Metrics overview: See how many visits your storefronts received, pending and approved orders, and revenue in the last 30 days.
- Order management: Track pending orders at a glance.
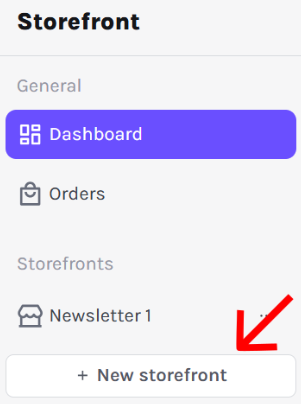
- Your storefronts: Access each of your storefronts.
Creating and Customizing a Storefront
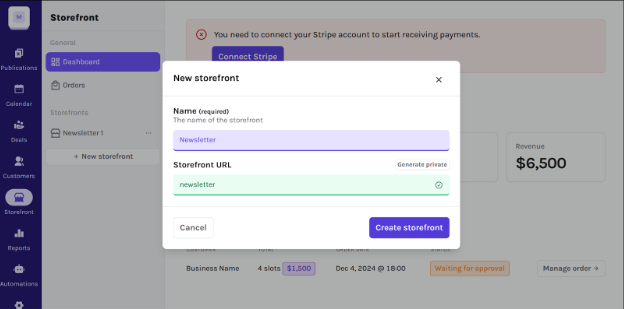
To create a new storefront, click the button New storefront.
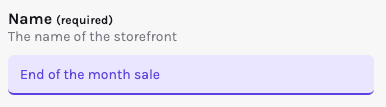
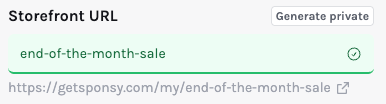
When you are creating a storefront, start by giving it a name. A URL is generated automatically, but you can change it.
Then, click Create storefront.
You can also generate a private URL composed of random letters and numbers.
Welcome to your newly created storefront. Let's set it up!
Storefront
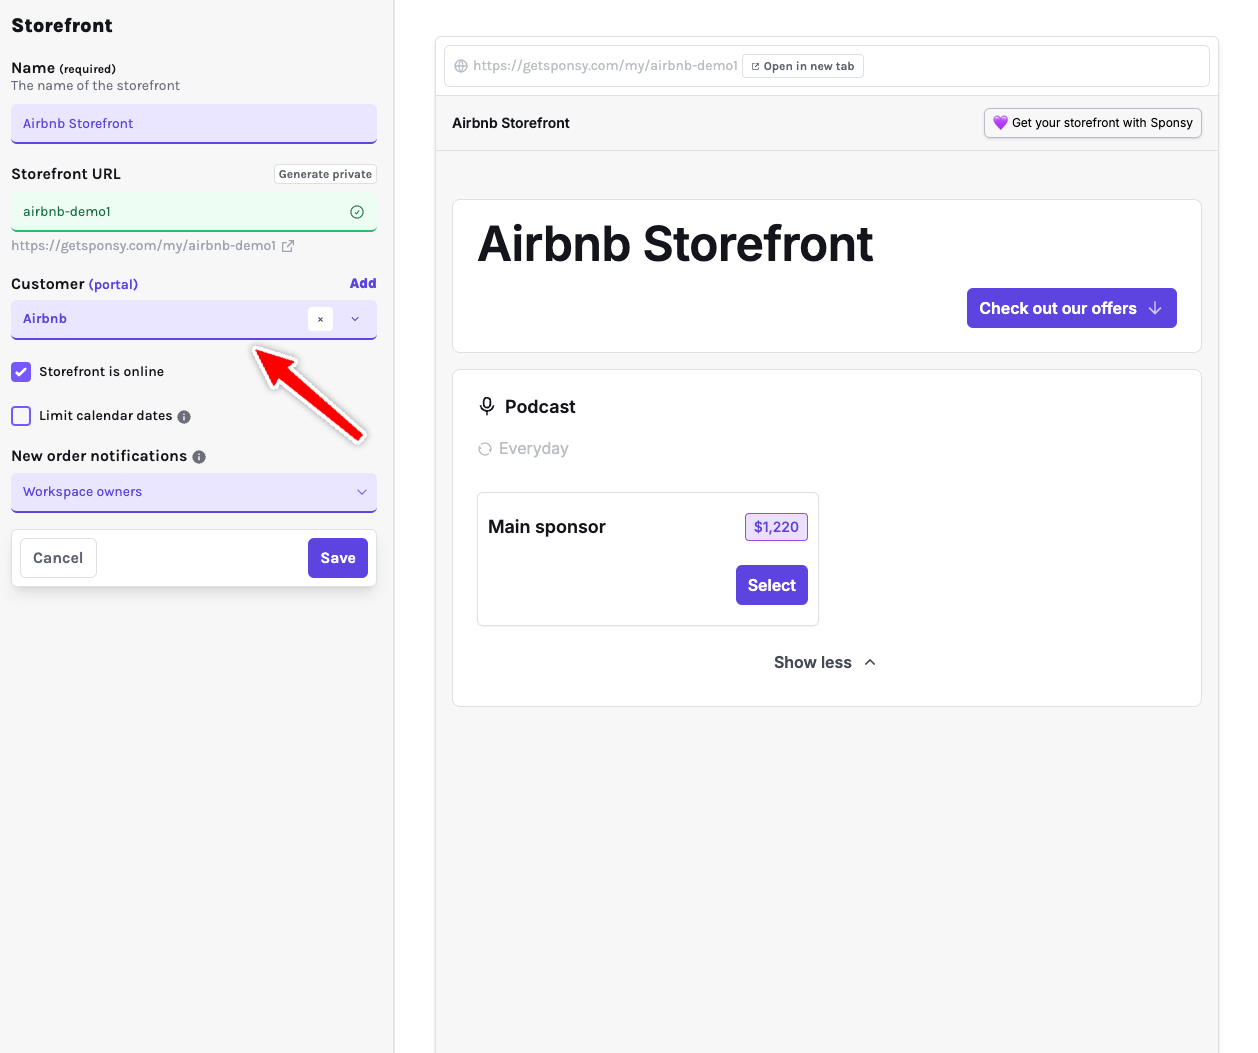
The Storefront settings allow you to configure essential options for your storefront, including its name, URL, availability dates, online status, and notification preferences.
Storefront Name
Edit your storefront's name.
Storefront URL
Customize your storefront URL with a short, memorable path. Storefront URLs must be unique.
Changing the storefront URL will make the previous URL unavailable. Be cautious when updating the URL if you've already shared it.
Need a temporary URL? Click the Generate Private button to create a unique, random URL — perfect for temporary storefronts.
Online Status
By default, your storefront is online. Uncheck this option to take your storefront offline — useful for testing or making updates without public access.
Customer Storefront
Customer Storefronts allow you to assign a unique storefront to a specific customer. This is particularly useful when pre-established pricing tables or customized offerings are in place.
To configure this, select the appropriate storefront for the customer. You can also do the same in the CRM
Customer Storefront settings will always take priority over the Global Storefront for a specific customer.
Limiting calendar dates
When limiting calendar dates, you control how the storefront operates:
Allow bookings after– Set a minimum delay before advertisers can book. This can be a fixed date (e.g., allow bookings only from July 20) or a relative delay (e.g., allow bookings only after a certain number of working or calendar days). This provides a buffer to review and manage the sponsorship before it goes live.Allow bookings until– Similar to the previous setting but defines the latest date advertisers can book.Custom dates– Offer tailored availability, such as December 24–26 for Christmas specials.
Use specific dates to create urgency and exclusivity. For example, a "Black Friday Special" storefront could only allow bookings on November 24.
You can combine these settings to precisely control the booking window.
Custom dates outside the defined booking window will be excluded. For example, if your booking window is March 10–20, a custom date on March 30 will not be available.
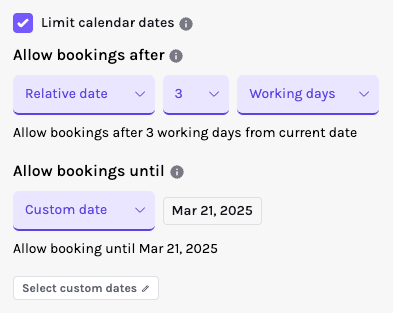
After editing dates, click Save to apply the changes to your Storefront.
New Order Notifications
By default, workspace owners receive notifications for new bookings. Use this setting to assign additional recipients for order notifications.
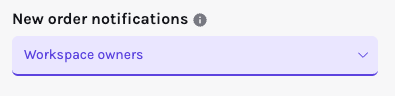
You can also send new order notifications to Slack. Connect Slack in Workspace Settings > Integrations, then choose the Slack channel for each storefront. New order messages include the company, contact, order summary, notes, storefront URL, and a direct link to the order in Sponsy.
Show placement intro
You can choose to display the placement introduction you set in the placement settings. This allows users to see a customized introduction for each placement. To customize the text, go to the Placement Settings.

Edit approval defaults
When an order is approved, you can customize status of deal and slots.
This can get repetitive and prone to errors, that’s why you can set some defaults directly in the Storefront settings.
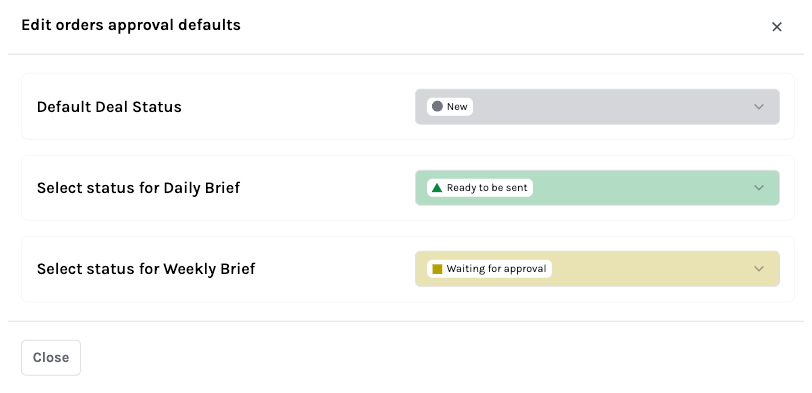
Approval defaults can also include the sales rep responsible for approved orders. Use this when storefront orders should be routed to a specific person by default. If the selector is enabled for the storefront, Sponsy applies that sales rep when the order is approved and converted into a deal.
Checkout
Now, it's time to configure Checkout by clicking the second option on the sidebar.
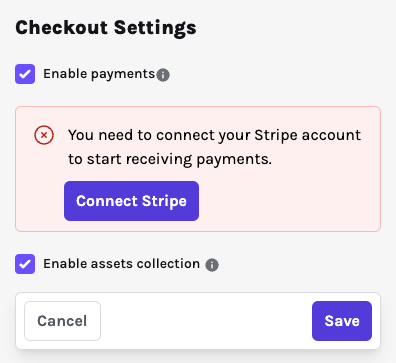
You can enable payments in the checkout by checking the first box. If you’d rather invoice and receive payments directly from your advertisers, simply leave this option unchecked.
To automate payments in the storefront, keep this option checked and connect your Stripe account.
The next checkbox lets you disable asset collection. When enabled, clients will be prompted to submit ad assets during checkout.
Once you’ve made your selections, click Save.
Terms and thank-you page
Use Checkout settings to customize the terms customers agree to before submitting an order. This is useful for payment terms, cancellation rules, creative deadlines, or any process-specific expectations.
You can also customize the thank-you page customers see after checkout. Use it to confirm next steps, tell customers when your team will review the order, or link them to additional onboarding materials.
Header
The third option is the Header. Let's take a look at it.
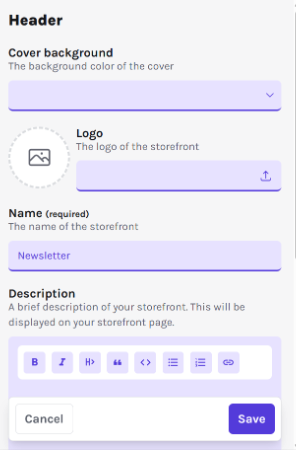
This area allows you to personalize the storefront header and make it visually appealing.
Choose a color for the cover, update a logo, edit your storefront's name, and add a description below the name.
You can also create a tagline, select categories, and include a link to your Terms & Conditions here.
After configuring the header, click Save.
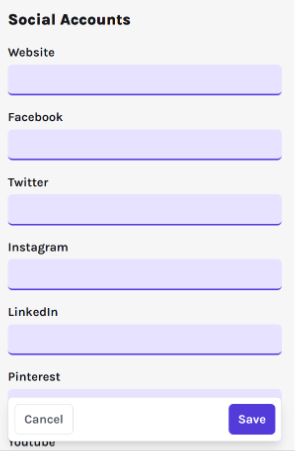
Social Accounts
You can add your social media accounts, allowing your clients to access your profiles on Instagram, Facebook, LinkedIn, and more.
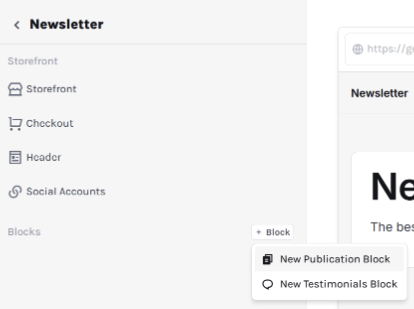
Blocks
Next, let's add blocks to the storefront. There are two types: New Publication Block and New Testimonials Block. You can add as many blocks as you want to customize your storefront.
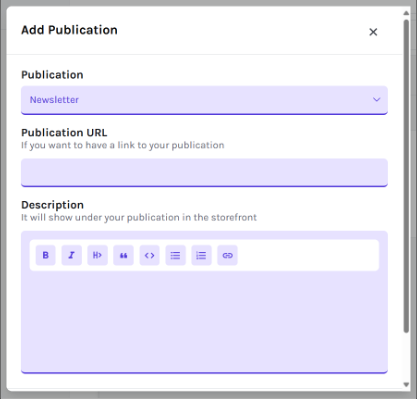
When you click New Publication Block, the following screen shows up.
Select the publication this block belongs to, add a URL linking to your publication homepage (optional), and include a description (also optional). Finally, click Add Publication.
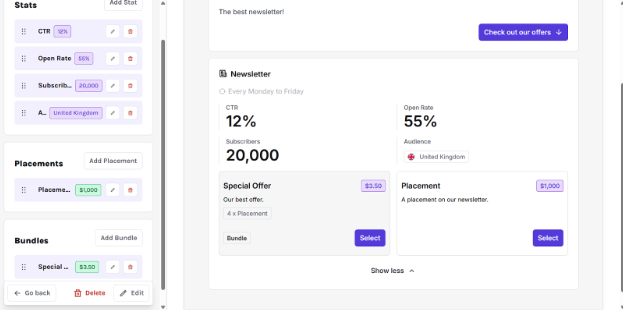
Now, you’ll see a section where you can include the details of your offer for your publication.
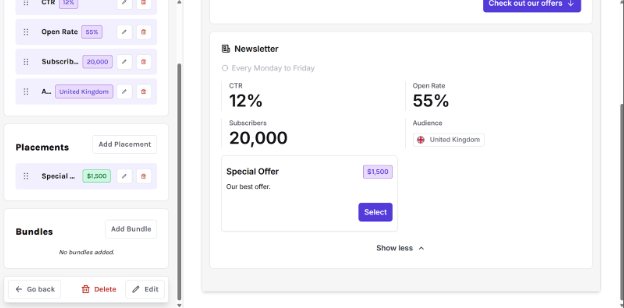
By clicking on Add Stat, you can provide information about your publication, such as subscribers, open rate, CTR, and more. Currently, there are up to four types of stats available:
Value: Accepts any value.Categories: Choose from a list of categories (great for describing your audience).Countries: Select from a list of countries (ideal for showcasing your readership's location).Live: Select from a list of available options which updates daily based on your publication’s Integration
The Live Stat option is only available when the publication has a configured ESP integration.
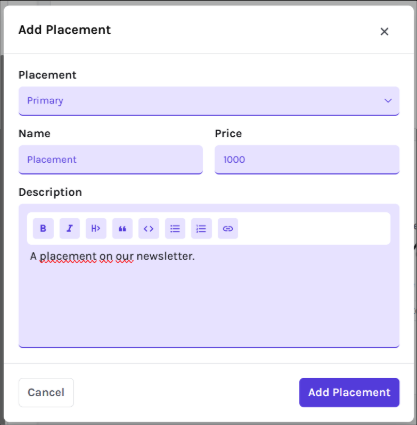
Next, click Add Placement. This option lets you choose which placements to offer from your publication. You can select from your publication placements, give them a public name, set a (optional) price, and include a description. The name, price, and description are specific to this storefront, allowing you to apply discounts or set different prices than in your backend.
Your placement is now on your storefront and your storefront is ready to go live. If you want to add new placements, feel free to do so.
Placements use the same Content Fields defined in your Ad Inventory.
Use Content Fields Options to set requirements like maximum word count, helper text, or to hide specific fields to your customers.
Structured content fields, field groups, and collection fields render in the storefront checkout when they are enabled for public use. Use these field types when you need customers to provide organized answers instead of free-form notes.
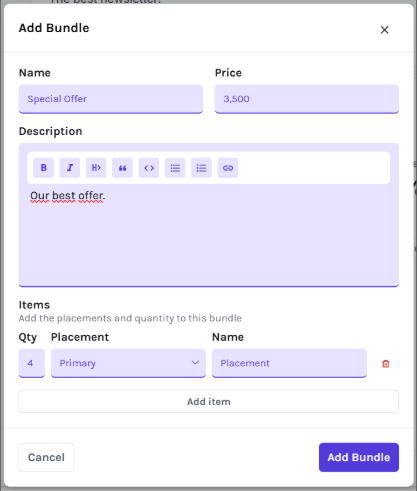
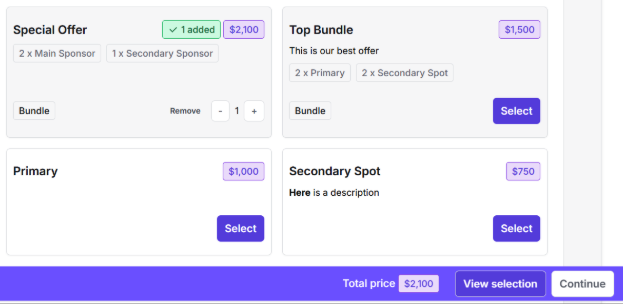
You can also create bundles with customized pricing. To get started, click Add Bundle in the left menu. Add a name, price, description, and select placements with their quantities. Then, click Add Bundle. This lets you create a mix of placements to sell together as a package and offer them at a special price.
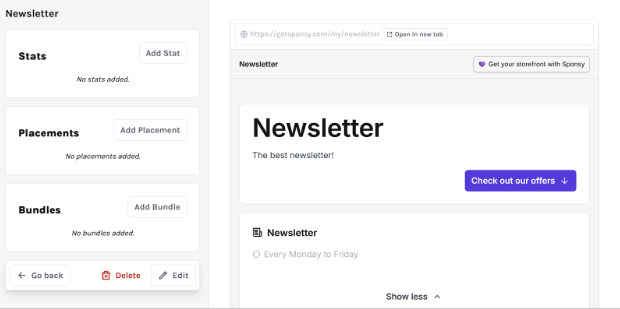
Look, your customers now have options to choose from - your storefront is almost complete!
By going back to the previous screen, you can add testimonials to provide social proof for your publication.
To create a testimonial, fill in the required fields: Author Name and Testimonial. You can also upload the author’s image, job position, and their company’s logo to make the page even more appealing.
Coupons and storefront pricing
Use coupons to offer discounts on eligible storefront orders. Coupons can be configured for the storefront and applied during checkout when the order matches the coupon rules.
If payments are enabled, Sponsy sends the discount to Stripe so the customer pays the discounted amount. When you approve the order, Sponsy applies the discounted prices to the resulting deal and slots.
Storefront placement and bundle prices can differ from your internal placement prices. This lets you build public packages, promotional pricing, customer-specific pricing, or bundle discounts without changing your backend rate card.
Sharing Your Storefront
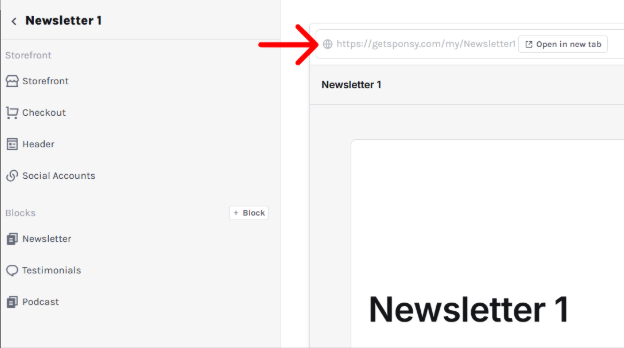
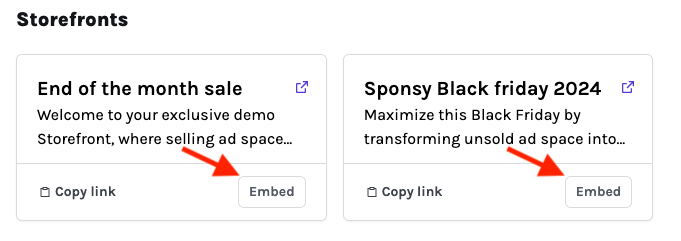
Now that your storefront is ready, simply share the link with your clients. You’ll find it at the top of your storefront. Open it in a new tab and copy the URL from the browser’s address bar.
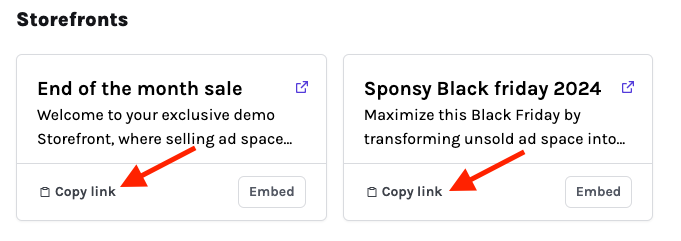
You can also find the storefront cards on your Dashboard and copy the link from there.
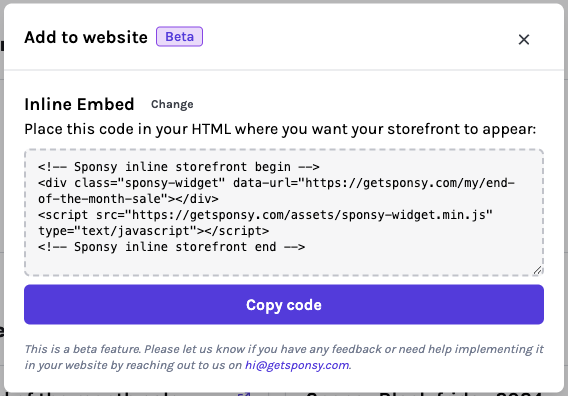
Embed Your Storefront
You can easily add your storefront to your website to provide a seamless experience for potential advertisers. You can choose between Inline Embed or Popup Text.
Inline Embed: Add a custom HTML snippet to your website, and the storefront will render directly on the page.
Popup Text: Add a text that triggers the storefront to open as a modal. This is the preferred method, as users won’t leave your site while browsing and booking your offers.
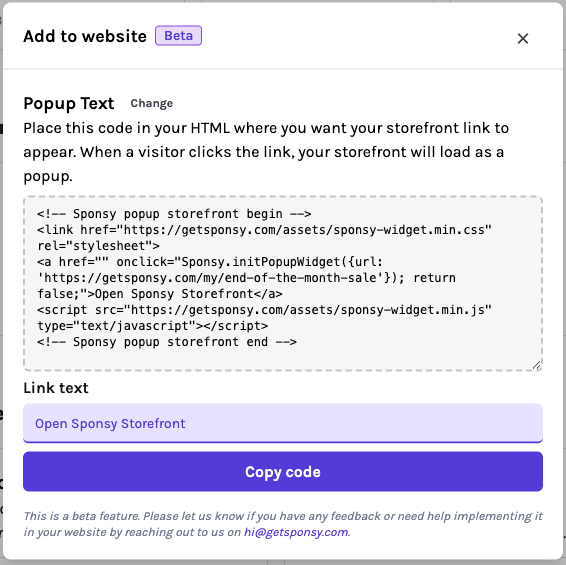
This feature is still in beta. Let us know if you have any feedback or need help implementing it on your website.
Storefront walkthrough
When your clients visit your storefront, they can shop just like in any online store. They can easily add items to their cart and adjust the quantities as needed.
Once they’ve selected everything, they can click View the selection to review their choices and proceed to checkout by pressing Continue.
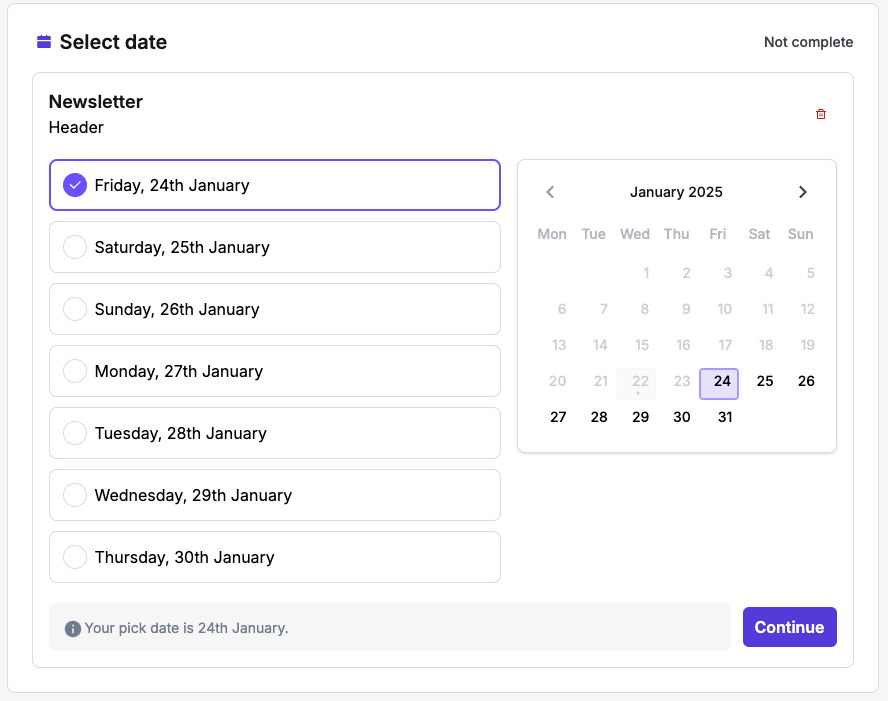
The checkout process will prompt clients to pick a date for each selected placement. These dates are directly linked to your inventory, ensuring no double bookings. On the left, they’ll see the next 7 available dates, while on the right, they’ll have a calendar view of your inventory.
After selecting the dates, they’ll need to provide their contact details. If this company is new to your CRM, it will automatically be created in the backend.

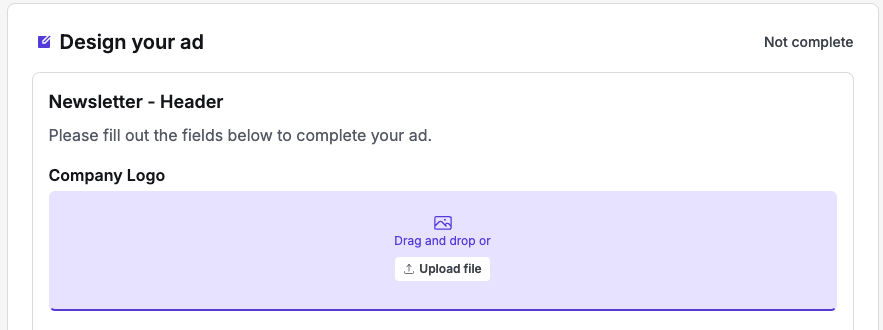
If asset collection is enabled for this storefront, the next step will be to submit assets for all selected placements. Clients can reuse the same assets for similar placements, making it easier to fill out the form for multiple selections.
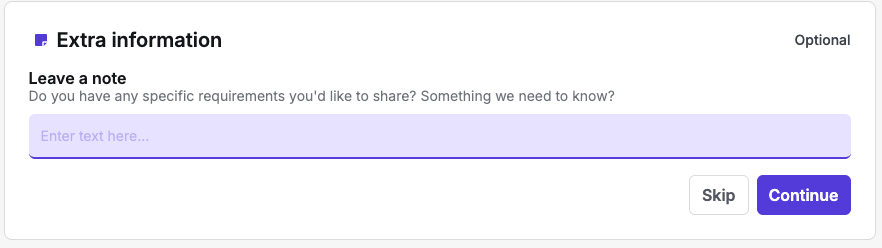
Next, there’s an optional field for clients to add any notes they’d like to share with you.
The final step: if payments are enabled, they’ll be redirected to Stripe to complete the purchase. If payments are disabled, the order will be processed immediately, and the new order will appear on your storefront dashboard.

The confirmation order button will only be enabled once all the required fields are properly filled
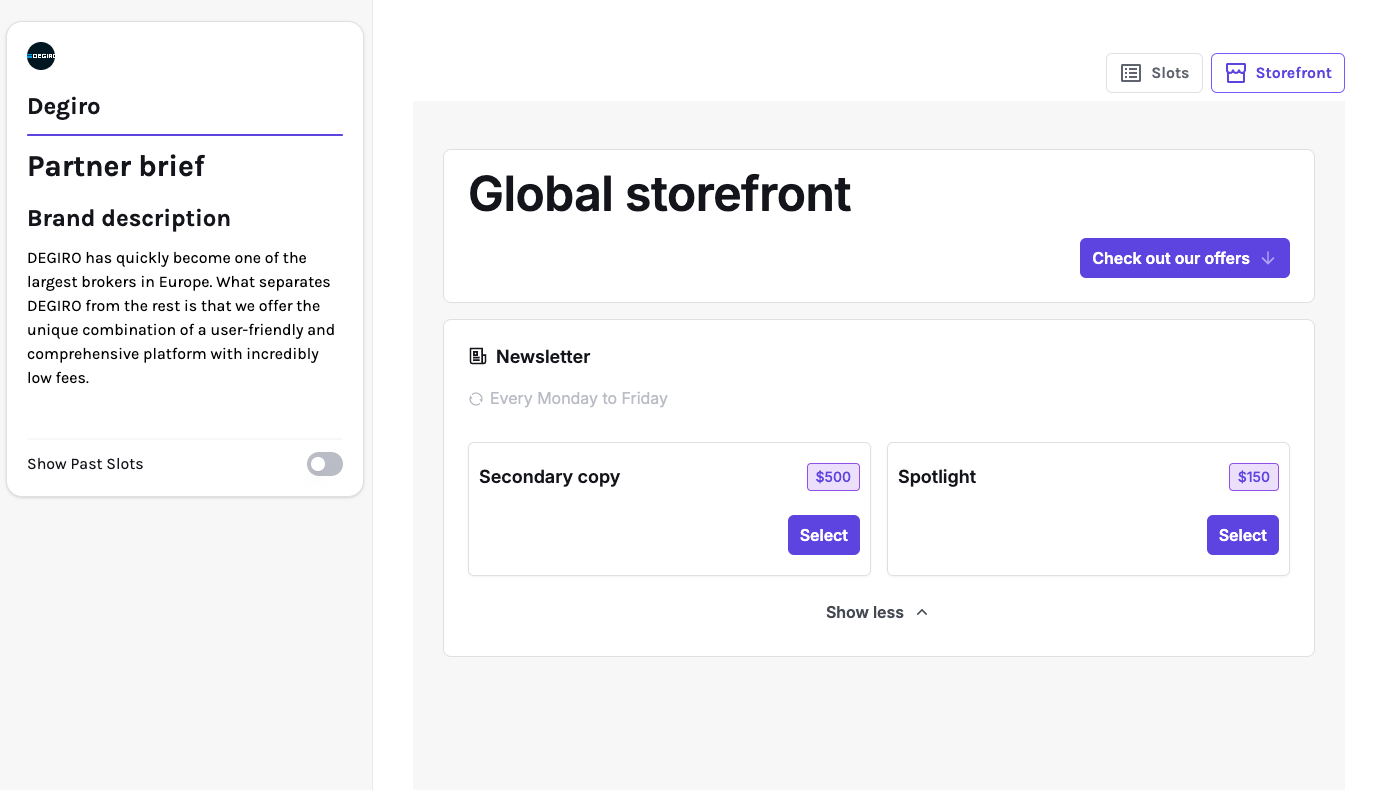
Global Storefronts
Global Storefronts let you designate a single storefront to be used across all your Customer Portals.
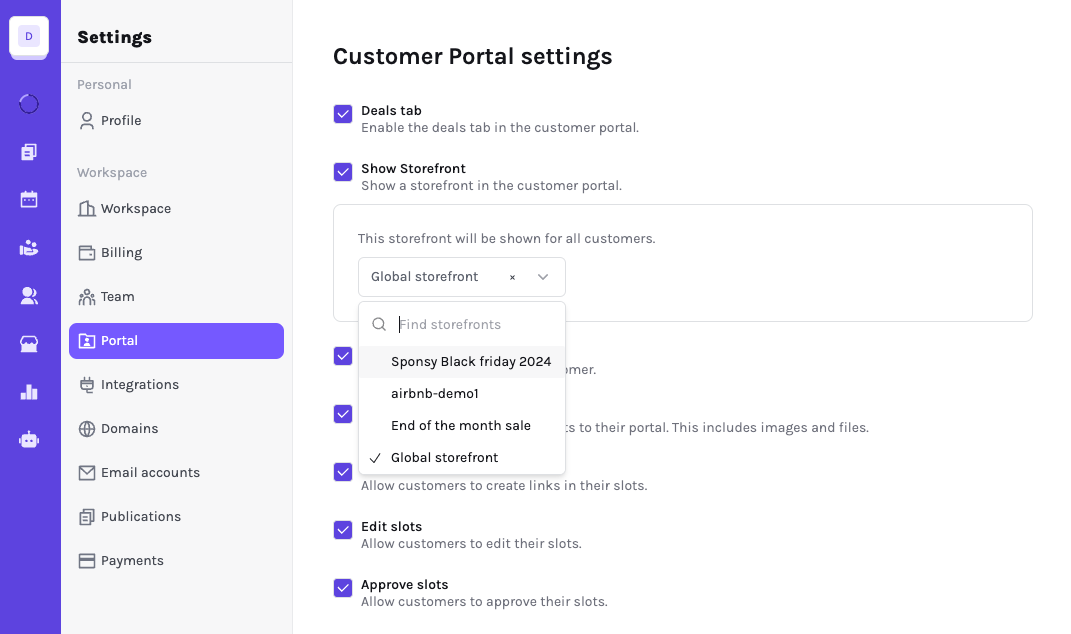
When this option is enabled, sponsors visiting any Customer Portal will have access to view and purchase your sponsorship placements.
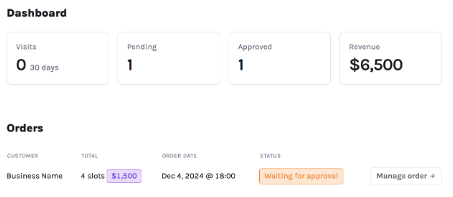
Handling Orders: Accept or Reject
Managing orders is simple: click Manage Order to open the order sidebar, verify the details and content, and then choose to Reject or Approve.

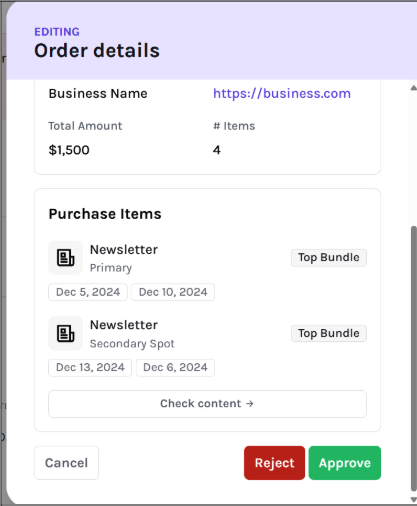
Order approval
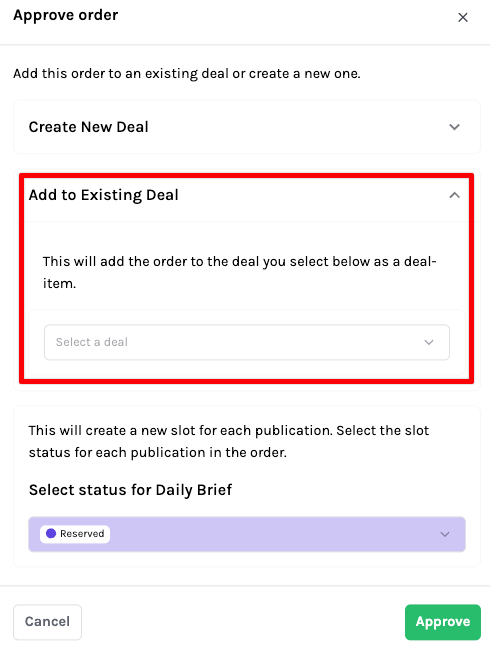
When you approve an order, you can both create a new deal or add it to an existing deal.
Sponsy matches customers by name. If a customer with the same name already exists, a duplicate won’t be created. If the contact used in the order isn’t already part of that customer, it will automatically be added.
If the order used a coupon, review the discounted price before approval. The approved deal and booked slots use the final storefront price after discount.
If approval defaults are configured, Sponsy preselects the deal status, slot status, and sales rep so the order is routed consistently.
Create New Deal
By selecting this option, a new Deal will be created for the order.
You can customize the deal name, deal status and slots status which will be booked in your publication(s).
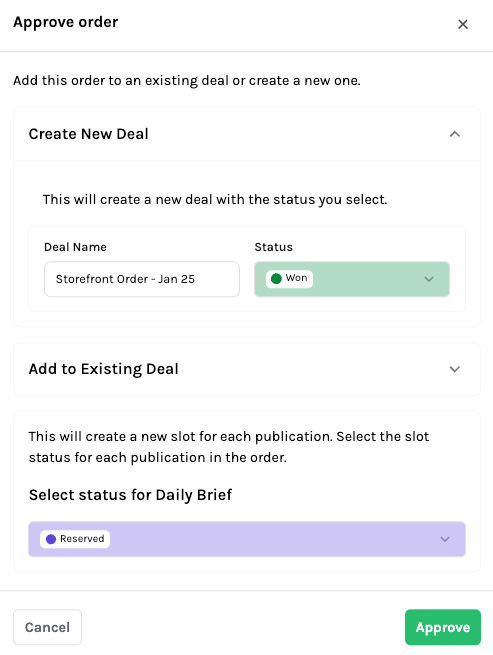
Add to Existing Deal
Use this option to add the order to an existing Deal. This is useful when using CRM Integration such as HubSpot and leveraging the Storefront to define run dates later.
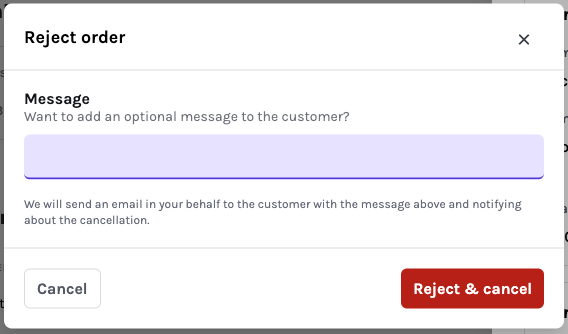
Order Rejection
When you reject an order that was paid through Stripe, your client will automatically receive a refund. You can optionally add a message to clarify the reason for the rejection
Tips and Best Practices
- Experiment with custom dates: Limit the availability per quarter so you can revise prices and optimize revenue from your storefront
- Create multiple storefronts: You can create many versions of a storefront that you can share in different channels with different prices.
- Offer bundles: Combine products or services into value packs to drive higher sales.
FAQ
Can I create a Storefront without prices?
Of course! Simply set the price as 0 in the placement/bundle configuration.