Inventory Hub
The Inventory Hub replaces the retired Publications and Ad Inventory & Calendar pages. Use it to view availability and manage slots across publications.
The Inventory Hub is the main place to plan and operate inventory in Sponsy. It combines every publication, placement, open slot, booking, block, and deal hold in one workspace.
The Inventory Hub is available on every plan. Starter includes three active publications and five placements per publication. Pro includes 10 active publications and unlimited placements; Custom has an agreed publication allowance and unlimited placements. A placement group counts as one placement toward the limit.
What happened to the old Inventory and Calendar pages?
Deprecation notice: The legacy Publications page and the old publication-specific Ad Inventory and Calendar page were retired on August 1, 2026. Their links were removed from the left sidebar, the old pages are no longer accessible, and there is no option to restore or switch back to the previous Calendar view.
If your calendar looks different or the Calendar link has disappeared from the left sidebar, this is expected. Open Inventory from the left sidebar instead. Your publications, placements, schedules, slots, bookings, and availability were not deleted; they are all available in the Inventory Hub. Use the publication selector to focus on one publication, then choose List, Calendar, Timeline, or Table for the view you need.
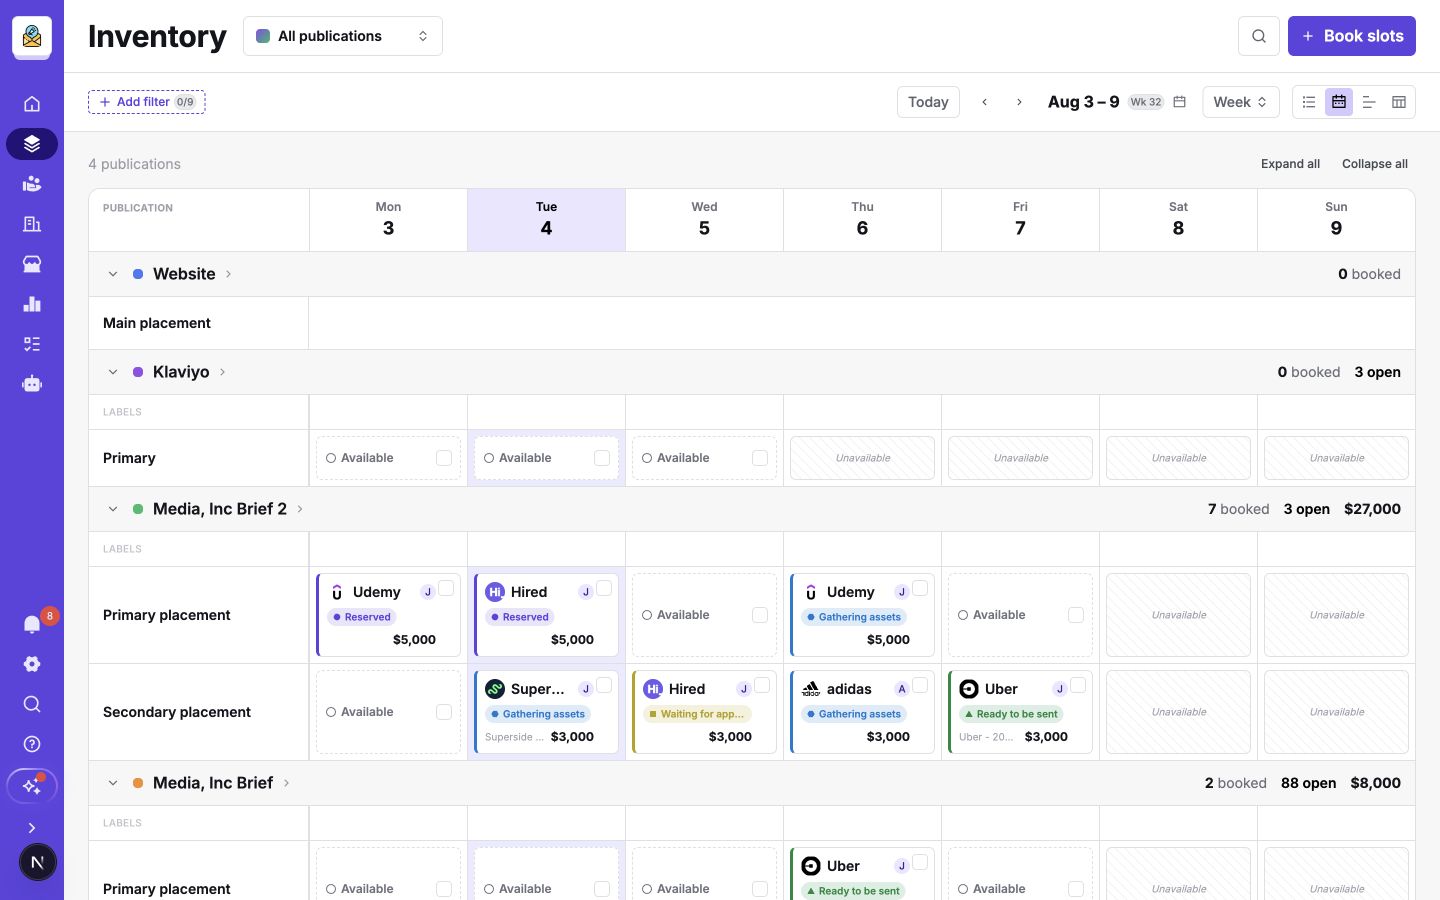
Understand the inventory model
- A publication is a newsletter, podcast, website, or other property that carries inventory.
- A placement is a sellable ad position within a publication.
- A slot is one placement on a specific date or date range.
- Available slots can be booked. Unavailable slots fall outside the placement's schedule.
- A booked slot shows its advertiser and workflow status. It can also show its deal, tags, assignee, price, custom fields, or task progress.
- A blocked slot is deliberately unavailable. A deal hold reserves capacity for a deal before a slot is booked.
Publication headers summarize booked slots, open slots, and booked revenue for the visible period. Financial totals are hidden for team members without permission to view financials.
Choose your scope
Use the selector beside Inventory to move between two scopes:
- All publications gives you a portfolio view across the workspace. Use it to compare availability, spot gaps, and act across publications.
- One publication focuses the hub on that publication. Newsletter, podcast, and other publications open in List by default. Website publications open in Timeline because their slots can span date ranges.
The selector is searchable and shows a 30-day snapshot for each publication. Choose New publication at the bottom of the selector to add one. To archive or restore a publication, open Settings → Publications.
Pick the view for the job
The four view buttons share the same scope, date, and filters. Switching views changes how the same inventory is presented.
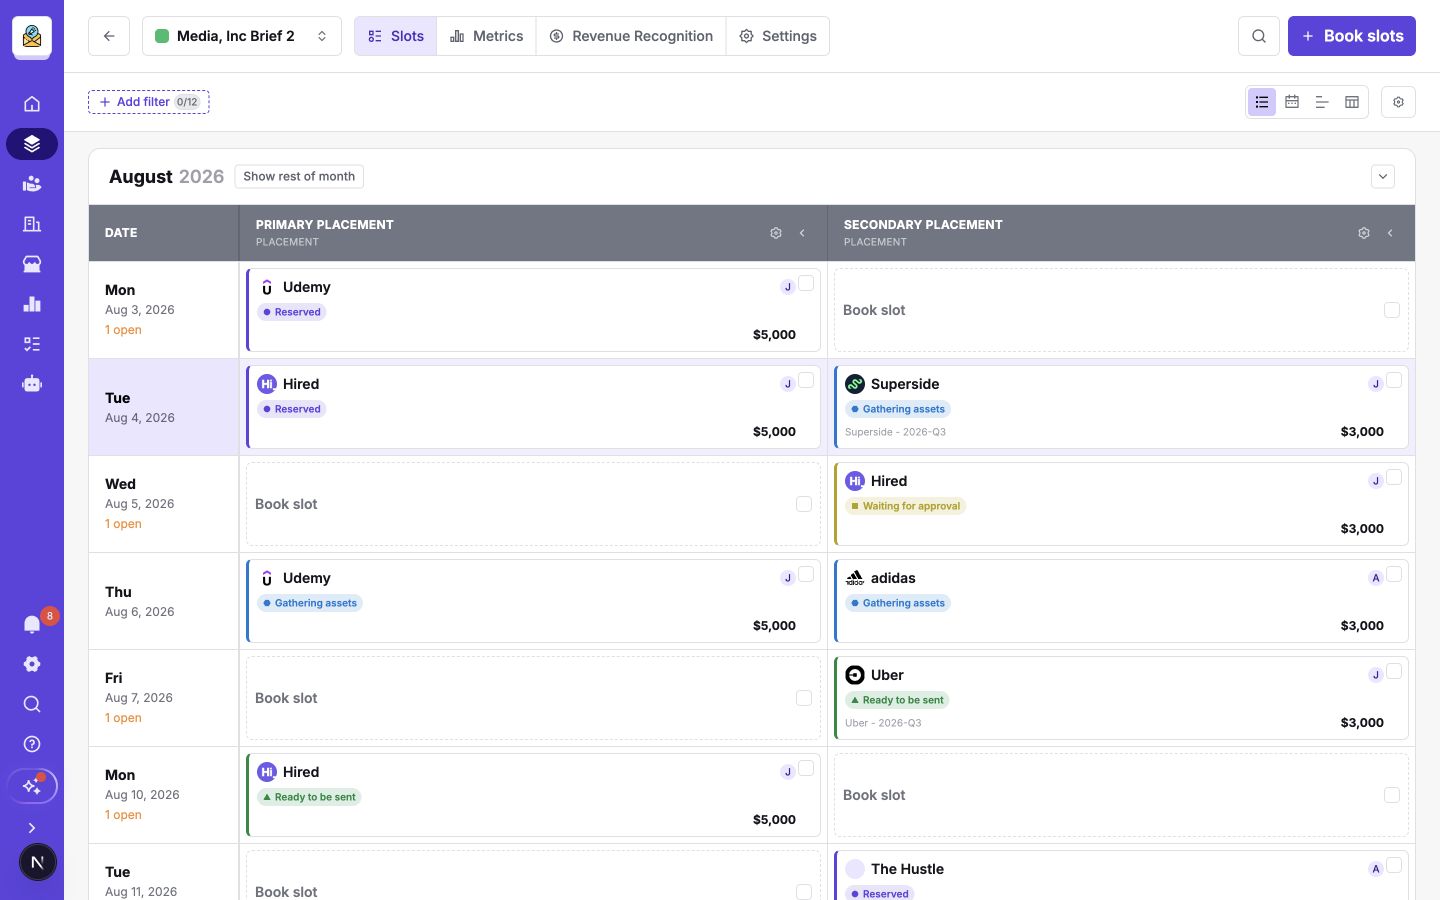
List
Use List for day-to-day operations. In a single publication, dates form rows and placements form columns, so you can work through bookings and open capacity in sequence. Choose Show rest of month when you need more than the initially visible dates.
At the all-publications scope, List becomes a chronological agenda of booked slots. Choose Previous 30 days, Previous 7 days, Today, Next 10 days, Next 30 days, or Custom. Next 10 days includes today and the following nine days. With Custom, choose both dates in the Date range picker.
The agenda shows bookings whose start date falls within the range. A flight that started earlier is excluded even if it is still running. Use Calendar, Timeline, or Table to review running flights.
Open Columns to show the deal name, the deal's sales agents, company, publication, slot status, assignee, activity, or custom fields. Drag column headers to reorder them. Saved views retain the selected columns and their order.
Turn on Group placements to group each date's bookings and holds by publication and placement in a compact layout. Each booking keeps its own row and actions. The Run dates column shows a single scheduled date or the full start–end range, while the placement name appears once in the group heading. Save or update the view to keep this grouping with it.
The Deal column shows the campaign name in bold and wraps long names. Company shows only the customer, such as Vault Comics, in regular text on one line. Hover over a truncated company name to read it in full.
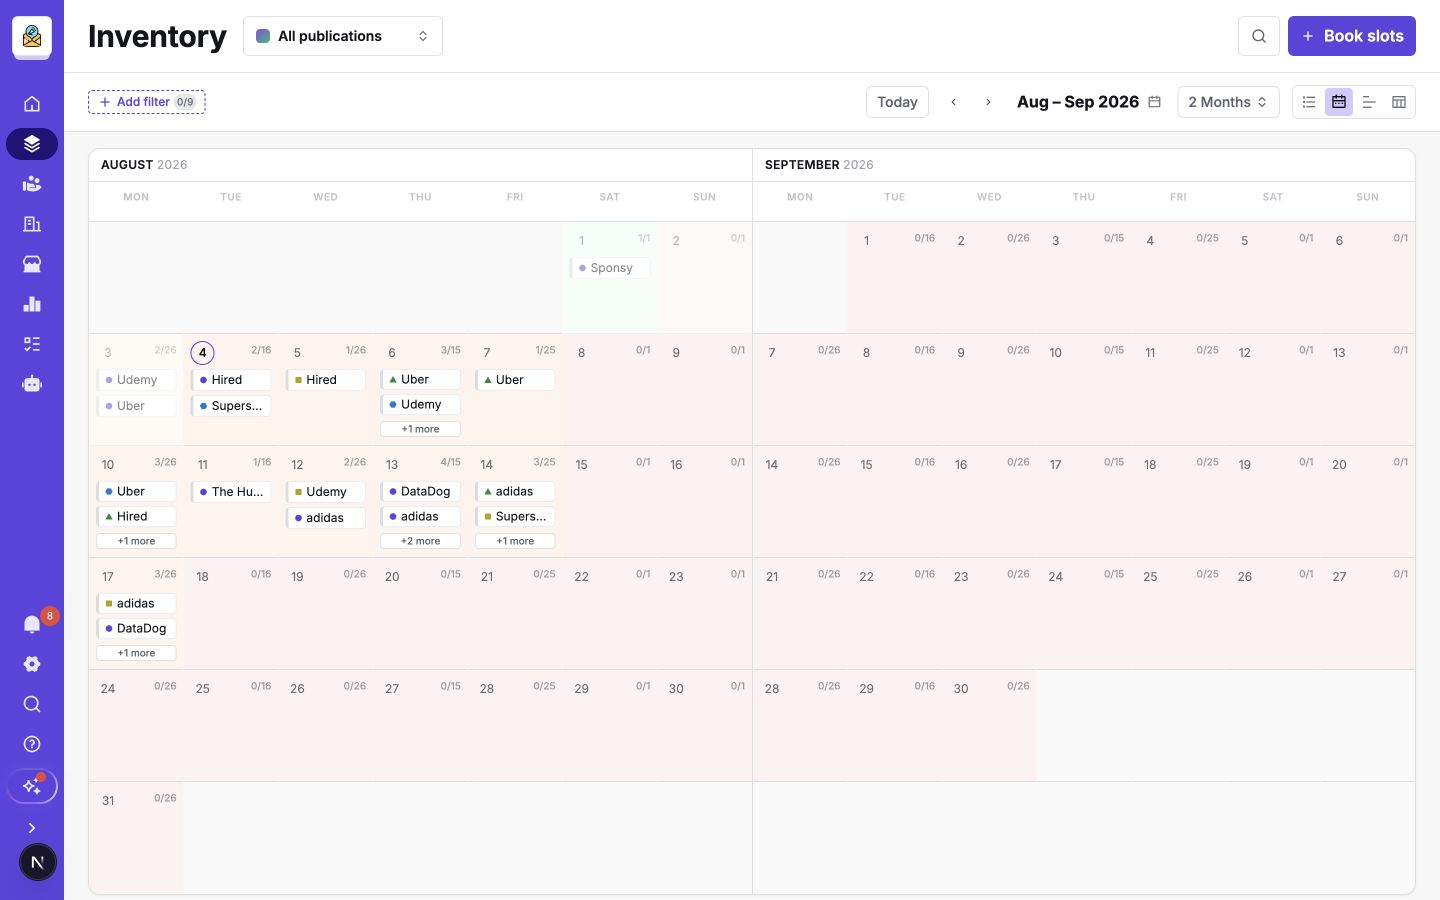
Calendar
Use Calendar to answer what is booked and what is still open. Individual hold labels show the advertiser and placement. Hover over a day to see the full placement names for its holds; open the day to review all competing holds.
- Day shows the selected day's inventory in detail.
- Week shows publications and placements together in a seven-day grid.
- Month, 2 Months, Quarter, and Year show portfolio capacity at progressively wider planning horizons.
In Day, choose Placements only for a compact layout or Associated editorial to group bookings by their associated editorial email. Editorial groups show leaderboards first, then promo boxes and featured lists. Bookings without an associated editorial appear below the named groups within each publication. Use each placement's Columns menu to choose and reorder its fields.
Longer calendar ranges display the booked-to-total capacity for each day. The legend distinguishes empty, partially booked, full, blocked, and deal-held inventory. Select a day to inspect its slots.
Timeline
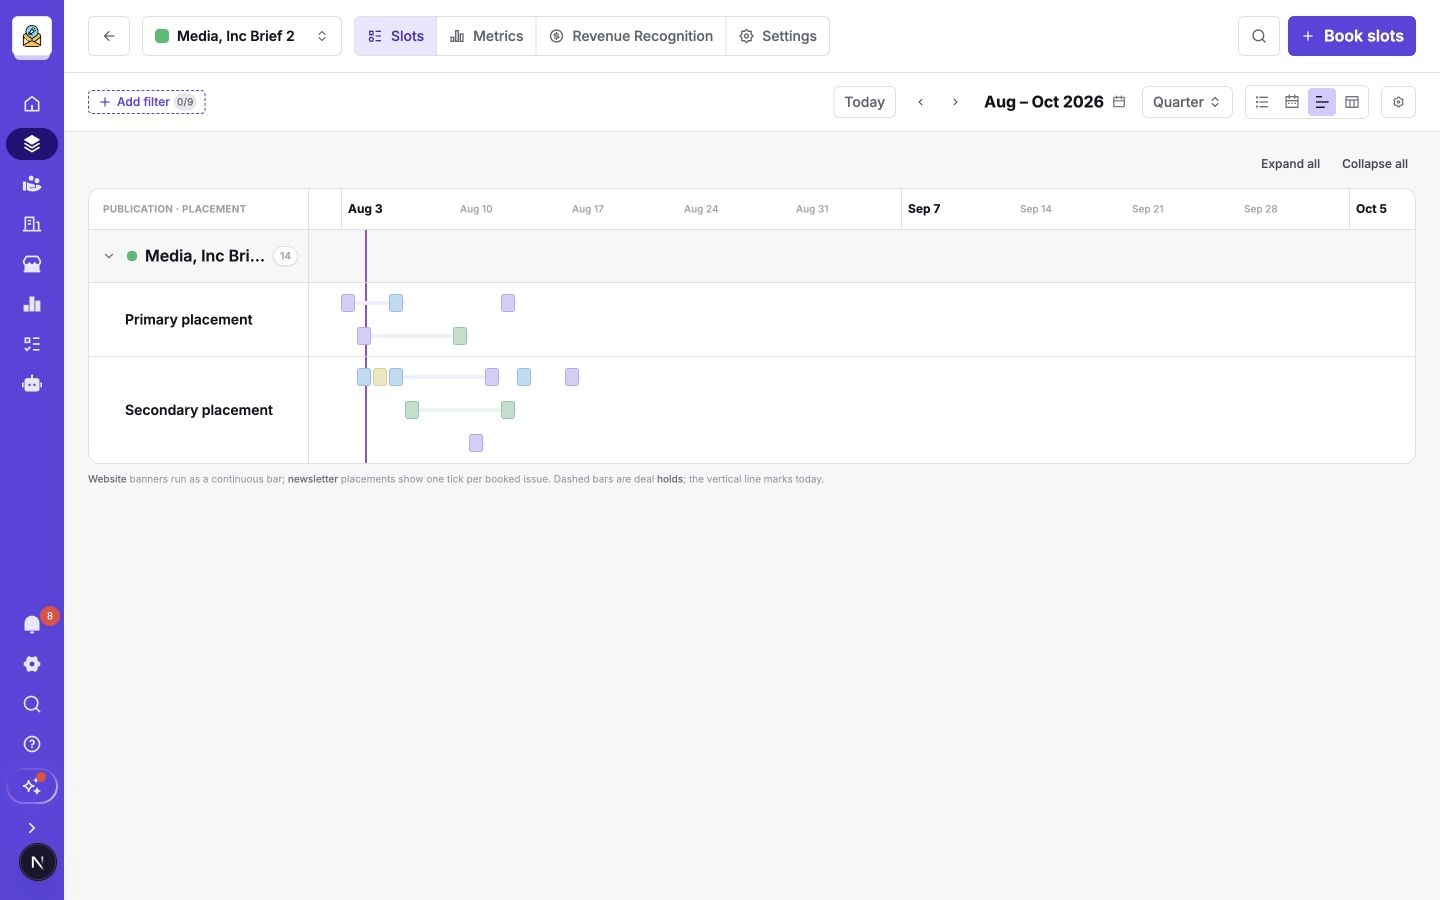
Use Timeline for campaign and flight planning across Week, Month, Quarter, or Year.
Website bookings, and bookings on placements with end dates, appear as continuous bars across their start and end dates. Newsletter and podcast bookings appear as individual ticks. Dashed bars represent deal holds, and the vertical line marks today.
Booking bars show Deal name - Customer, as do website bookings in the weekly Calendar and booking chips in the monthly Calendar. Labels shorten with an ellipsis when space runs out. Hover to see the full name, including on very narrow timeline bars. Bookings without a deal name show the customer instead.
Table
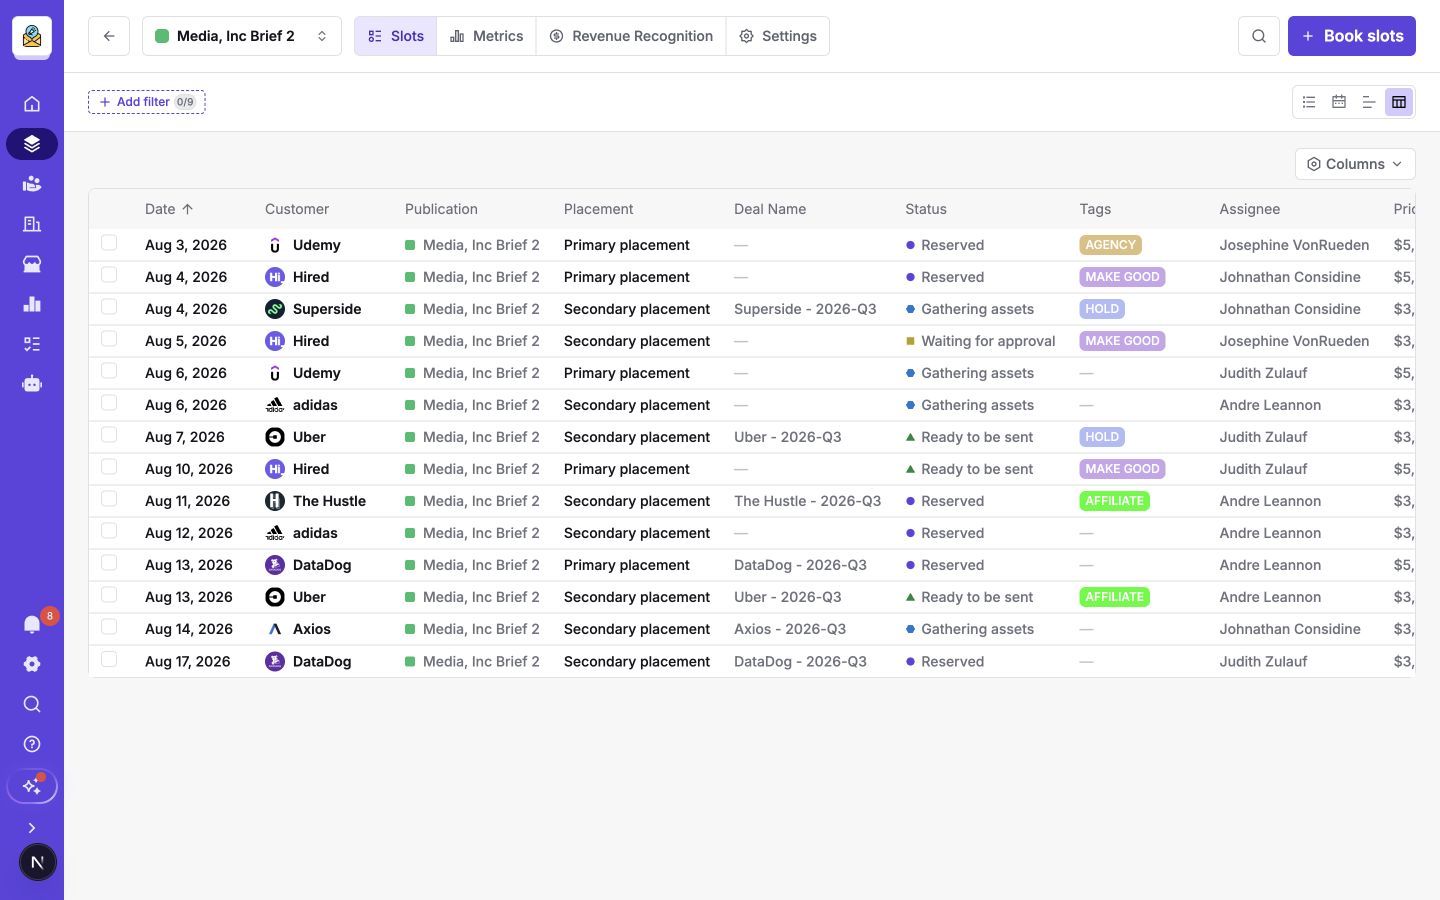
Use Table when you need operational detail. Sort booked slots and use Columns to show or hide fields such as date, customer, publication, placement, deal, status, tags, assignee, and price.
Navigate dates and ranges
Choose Today to return to the current period. Use the arrows to move backward or forward, or select the displayed date to jump to another date.
You can also use these single-key shortcuts when you are not typing in a field:
Dfor DayWfor WeekMfor Month2for 2 MonthsQfor QuarterYfor Year
Only shortcuts supported by the current view are active.
Filter inventory
Choose Add filter to reveal only the controls you need. The portfolio scope includes filters for Publications, Placement, Status, Availability, Tags, Assignee, Created by, Sales rep, and Customers.
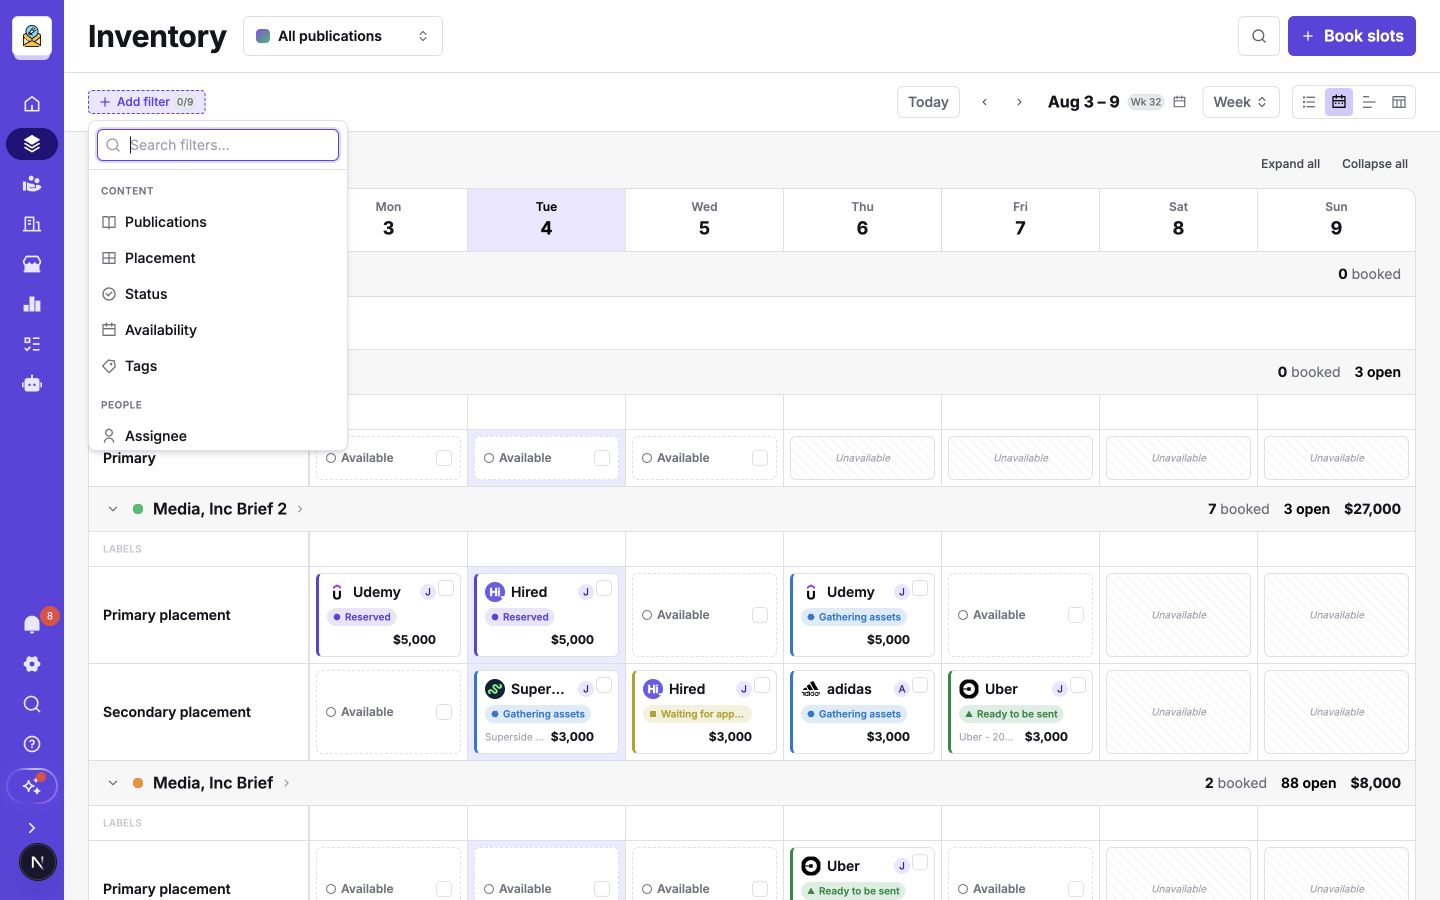
The all-publications List offers a Date range picker when you choose Custom. Date ranges are also available in Table. Choose the start and end dates in the same picker. Filterable publication custom fields appear when you focus on one publication; fields shared across publications, such as Platform, can also be filtered in All publications.
Added filters appear as controls in the toolbar. You can change their values, remove one filter, or reset all filters. Filters carry across views so you can inspect the same result as a calendar, timeline, list, or table.
Calendar grids keep nonmatching bookings visible but faded, so occupied inventory still looks occupied. Faded bookings cannot be selected or have their status changed from the grid. Day, List, Table, and Timeline show the matching bookings.
Save and reuse views
Set up Inventory, choose Save view in the saved-view bar below the main navigation, and enter a name and optional description. Choose Personal for your own view or Workspace to make it available to your team.
Choose Saved views to open the sidebar. Views are grouped into Workspace and Personal. Search by name or description, then select a view to open it. The current view has a purple highlight and a checkmark. You can also choose Save current view at the bottom of the sidebar.
A view saves its publication scope, view type, date setting, filters, List date preset, columns and placement grouping, Day columns and grouping, and slot-card layouts. It opens on today, so a weekly view returns to the current week. Custom date filters keep the dates you selected.
The active view's name and description appear in the saved-view bar. Changing the setup shows Unsaved changes. Choose Update view to save the changes to that view, or Save as new to create another view. Day column and card-layout changes are included when you save or update a view. Older views keep your current display choices until you save those choices into the view.
In the sidebar, open a view's three-dot menu and choose Edit details to change its name and description. Choose Duplicate view to copy its saved setup, then choose the copy's name and visibility. Delete view asks for confirmation before removing it.
Use the close button in the saved-view bar to close a view while keeping your current filters.
Team members with the saved-report update permission can update or rename Workspace inventory views. Only the creator can delete a view or change its visibility. Personal views remain editable only by their creator.
Customize slot cards
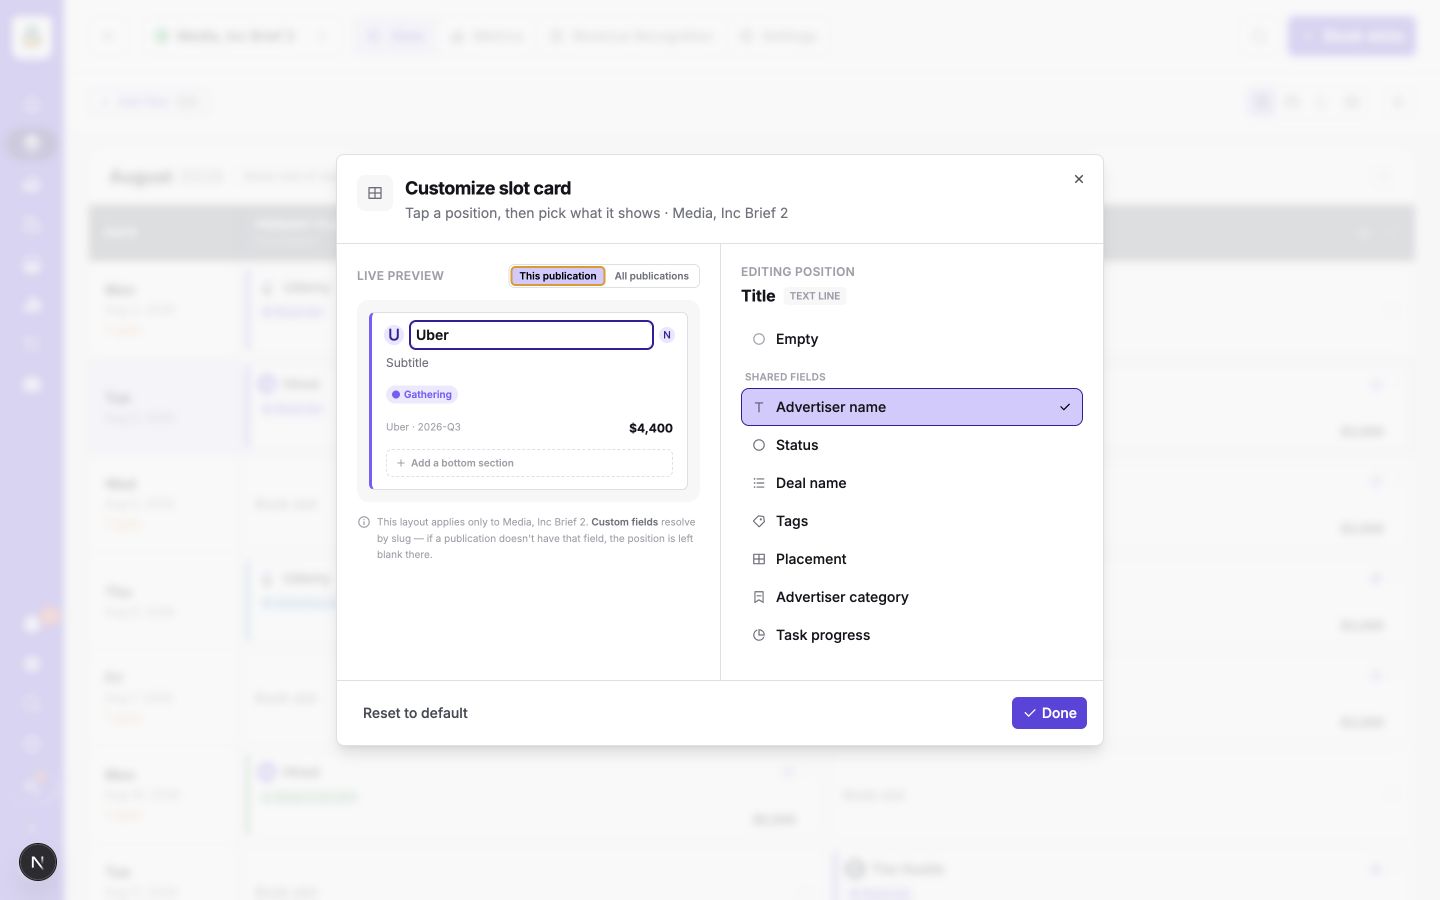
Choose the gear icon on a card-based view to open Customize slot card. Select a position in the live preview, then choose what it should display.
Shared choices include advertiser name, status, deal name, tags, placement, advertiser category, and task progress. Publication custom fields are also available. You can save a layout for the current publication or apply a shared layout to all publications. If a publication does not contain a chosen custom field, that position stays blank.
Book slots
You can start a booking in three ways:
- Choose Book slots in the top-right corner.
- Select an available cell, then choose Book slot from the selection bar.
- Select several available cells to book them together.
The booking panel requires at least one date and placement. You can also add a customer, status, deal, tags, assignee, pricing, a copy and assets due date, and publication custom fields. Choose Create flight when you want to build a sequence of dates for a campaign.
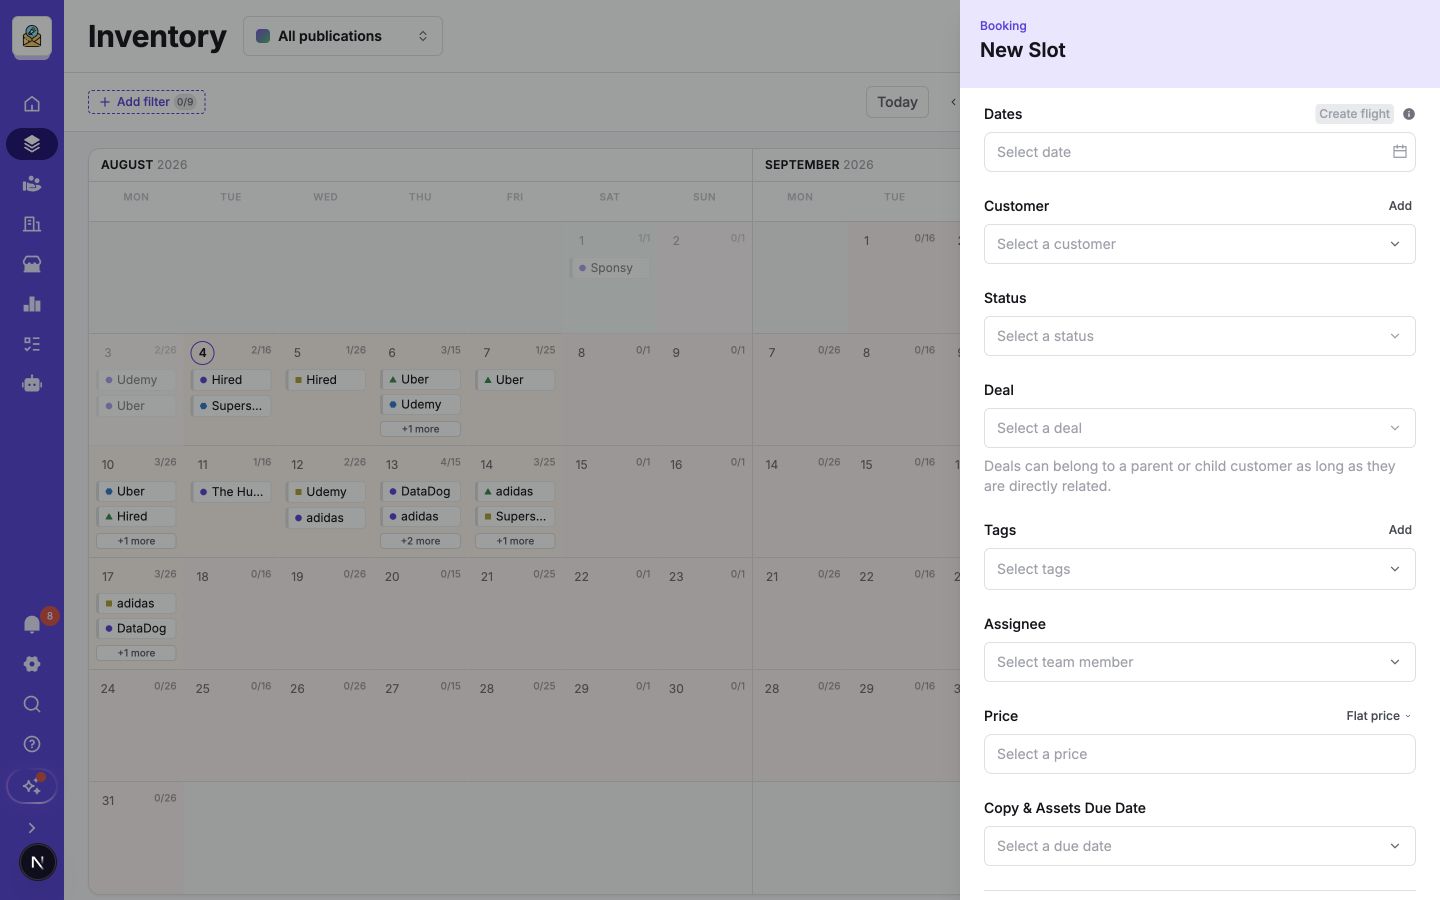
If the customer does not exist yet, choose Add beside Customer. A selected customer gets a direct link to its Customer Portal. Deals can belong to the customer or to a directly related parent or child customer.
Set a flat price or choose a dynamic pricing model such as CPM or CPC. The due date appears in the Customer Portal and can trigger reminders through Automations.
Open and manage a booked slot
Select a booked card or table row to open its details. The slot panel contains:
- Details for dates, customer, status, deal, tags, assignee, price, due date, and custom fields. Changing the slot date updates the due date automatically: the publication default when one is set, otherwise the same business-day gap. Weekend due dates snap to the previous weekday.
- Content for the copy and assets configured by the placement. Use Reuse assets to pull content from an earlier slot for the same customer.
- Metrics for manual or ESP-synced performance. Podcast slots can also store an episode URL for Apple Podcasts and Spotify previews.
- Activity for the change history, private team comments, and public comments shared through the Customer Portal.
Autosave in the slot panel
When autosave is enabled for your workspace, changes in Details, Content, and Metrics save after a short pause. You can keep typing or switch tabs while a save runs. Save sends pending valid changes sooner and shows a loading indicator while changes are saving.
Autosave is enabled separately for each workspace. Workspaces without it keep the manual Save flow.
The small badge beside Editing in the panel header shows Unsaved changes, Saving…, or Saved. It stays visible as you scroll and includes pending edits from other tabs of the same slot. On the full slot edit page, the same badge sits beside Copy Slot ID, and autosave works in Details, Content, and Metrics there too. Flight and bulk editors show the affected scope beside the badge: an individual flight editor autosaves the entire flight, while a bulk editor updates the selected slots. Metrics keeps its usual slot scope.
Valid fields can save while another field needs attention. Fix the inline error to save that field. If you go offline or a save fails, your edits stay available while Sponsy remains open. The unsaved-changes indicator lets you reopen the editor and retry. Closing the slot panel lets pending saves continue.
Wait for Saved in the header before closing or refreshing the browser tab. The browser warns about unsaved changes; leaving anyway can lose them. Sponsy does not recover those edits after the tab closes. Wait for file uploads to finish too.
Editing synced metric values can pause automatic metric updates for that slot, as with a manual save. Use Enable automatic sync in Metrics when you want scheduled updates to resume. If two people edit the same field, the latest successful save is kept.
Choose Next beside the status to advance a slot to the next status in the publication workflow.
In Calendar by day or week, click a booking's status to choose another status without opening its details. The all-publications List also lets you change the status directly in its Slot status column. Timeline bars and ticks have status and selection controls too; hover over or focus a narrow bar to reveal them. Use a booking's checkbox to select several slots, then choose Edit slots to change their status together.
Work with multiple slots
Use the checkbox in the corner of a slot to select it. As soon as you select a slot, an action bar appears at the bottom of the Inventory Hub. The available actions depend on whether you selected open or booked slots. A selection cannot mix open and booked slots: selecting a slot of the other type clears the current selection and switches the action bar. Choose Clear at any time to cancel the selection without changing anything.
Take action on open slots
Select one or more available slots when you want to reserve capacity, build a sales opportunity, share dates, or make dates unavailable.
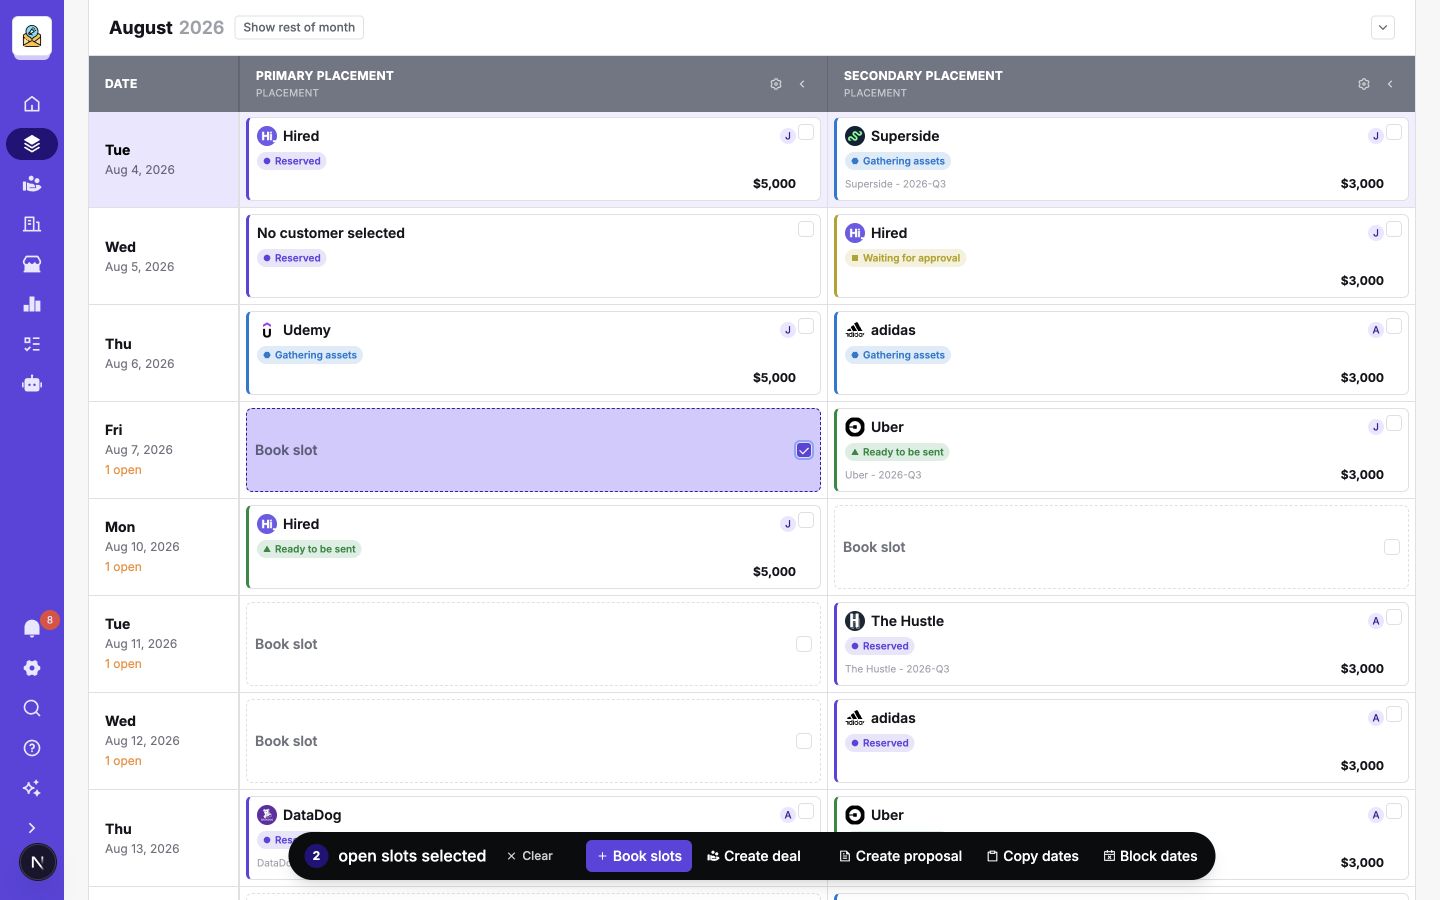
- Book slots opens the booking panel with every selected date and placement already added. Complete the customer, status, deal, tags, assignee, pricing, due date, and custom fields, then create the bookings together.
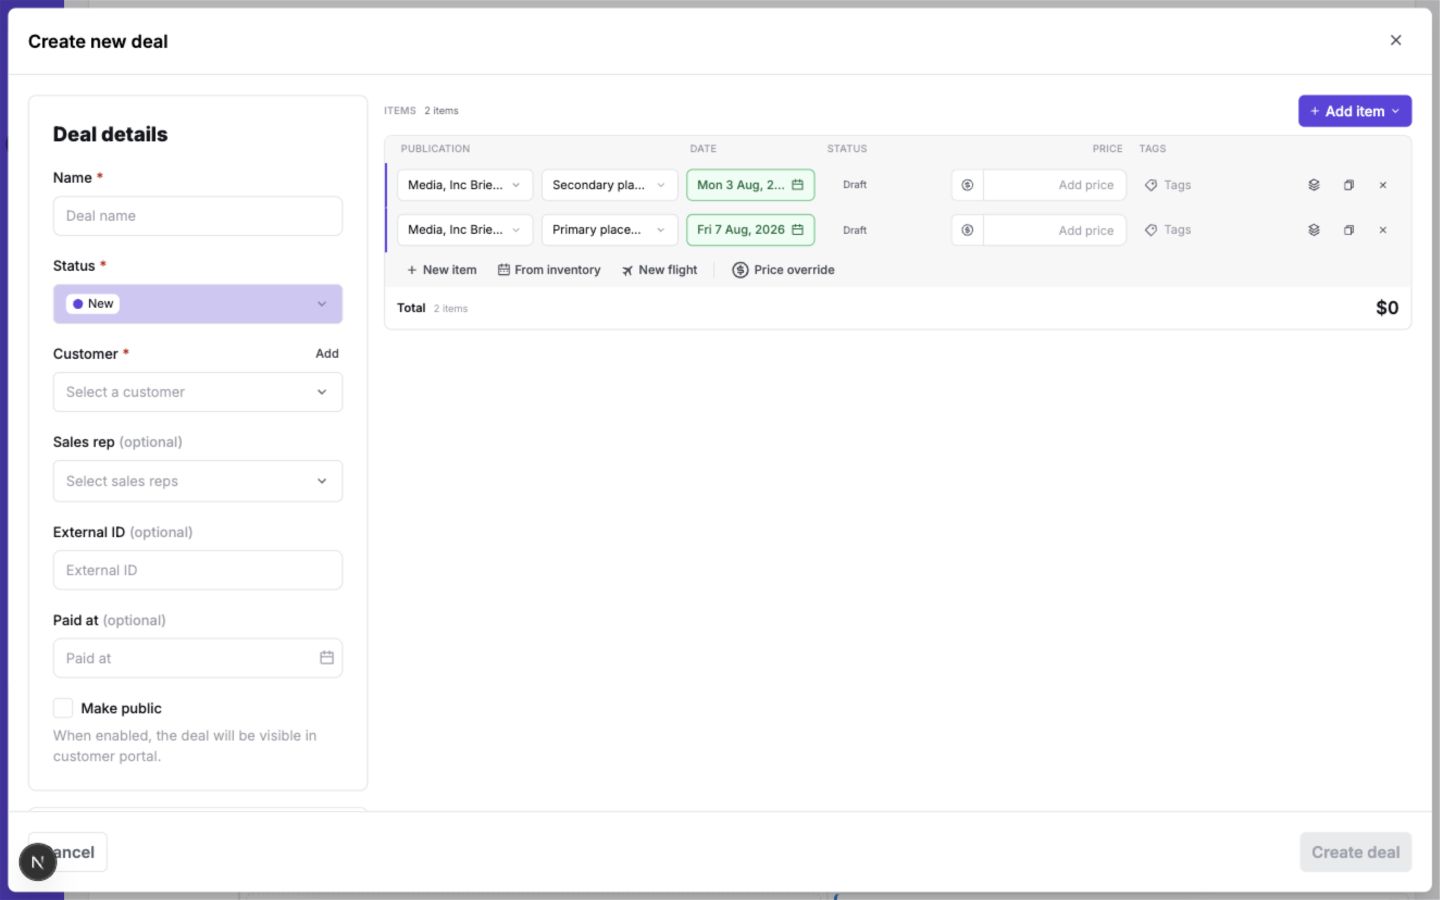
- Create deal starts a new deal with one draft item for each selected date. The publication, placement, and date are prefilled. Add the deal name, customer, status, sales rep, prices, and any other details before creating it.
- Create proposal starts a proposal using the selected dates as its inventory items. Use this when the dates are candidates for an advertiser but should not be booked yet.
- Copy dates copies the selected dates to your clipboard. You can paste them into an email, proposal, note, chat, or any other text field.
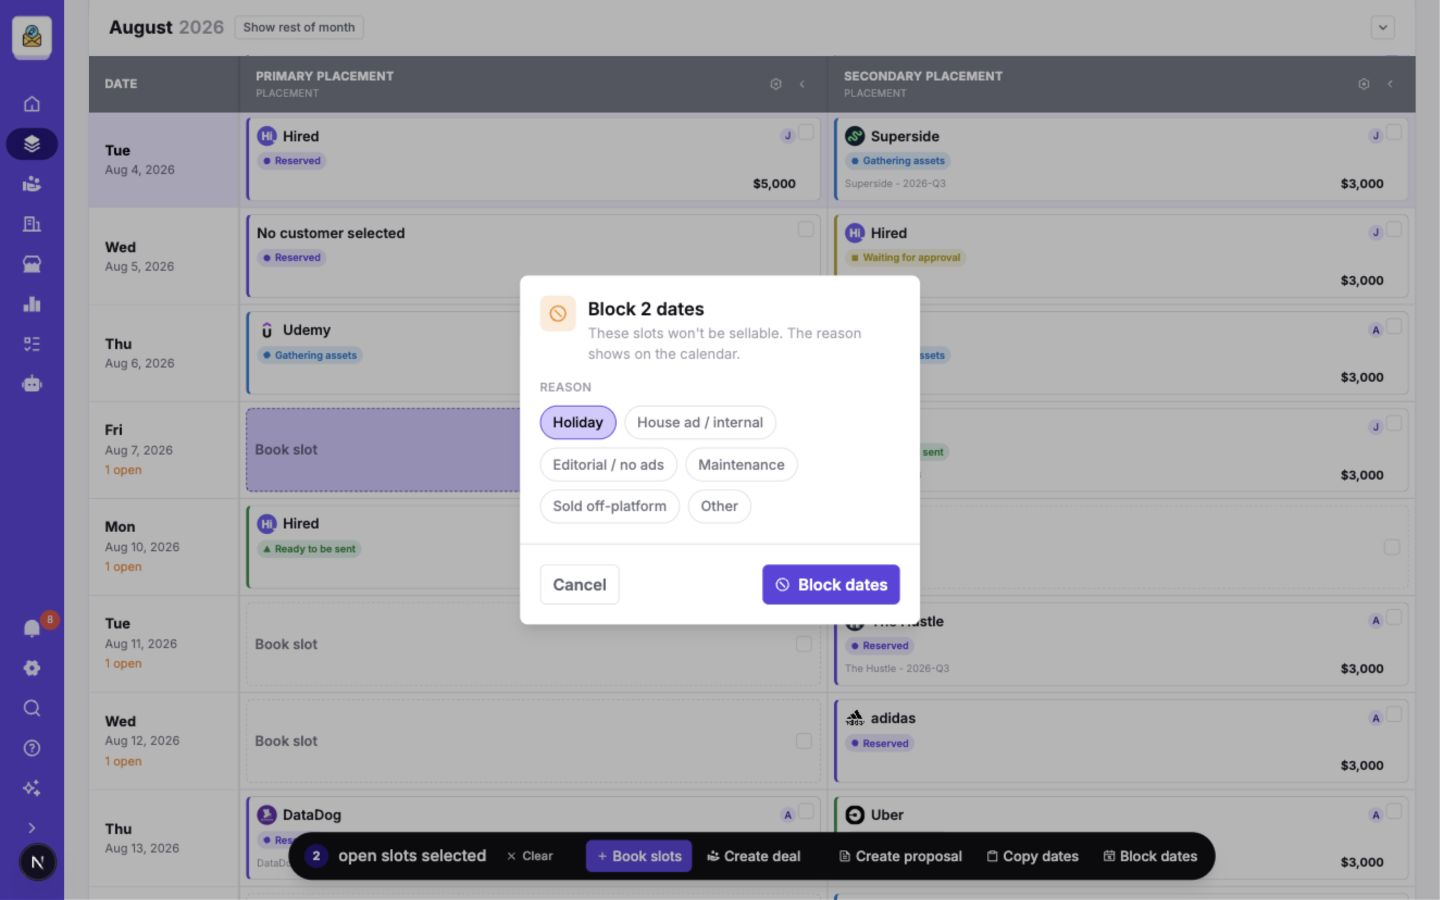
- Block dates makes the selected slots unsellable. Select a reason so teammates can understand the block directly from the calendar.
When blocking dates, choose Holiday, House ad / internal, Editorial / no ads, Maintenance, Sold off-platform, or Other. The selected reason appears on the calendar. Blocking availability does not create a booking or deal.
Take action on booked slots
Select one or more booked slots to reveal the booked-slot actions. You can select bookings in the all-publications scope when you need to update inventory across several publications at once.
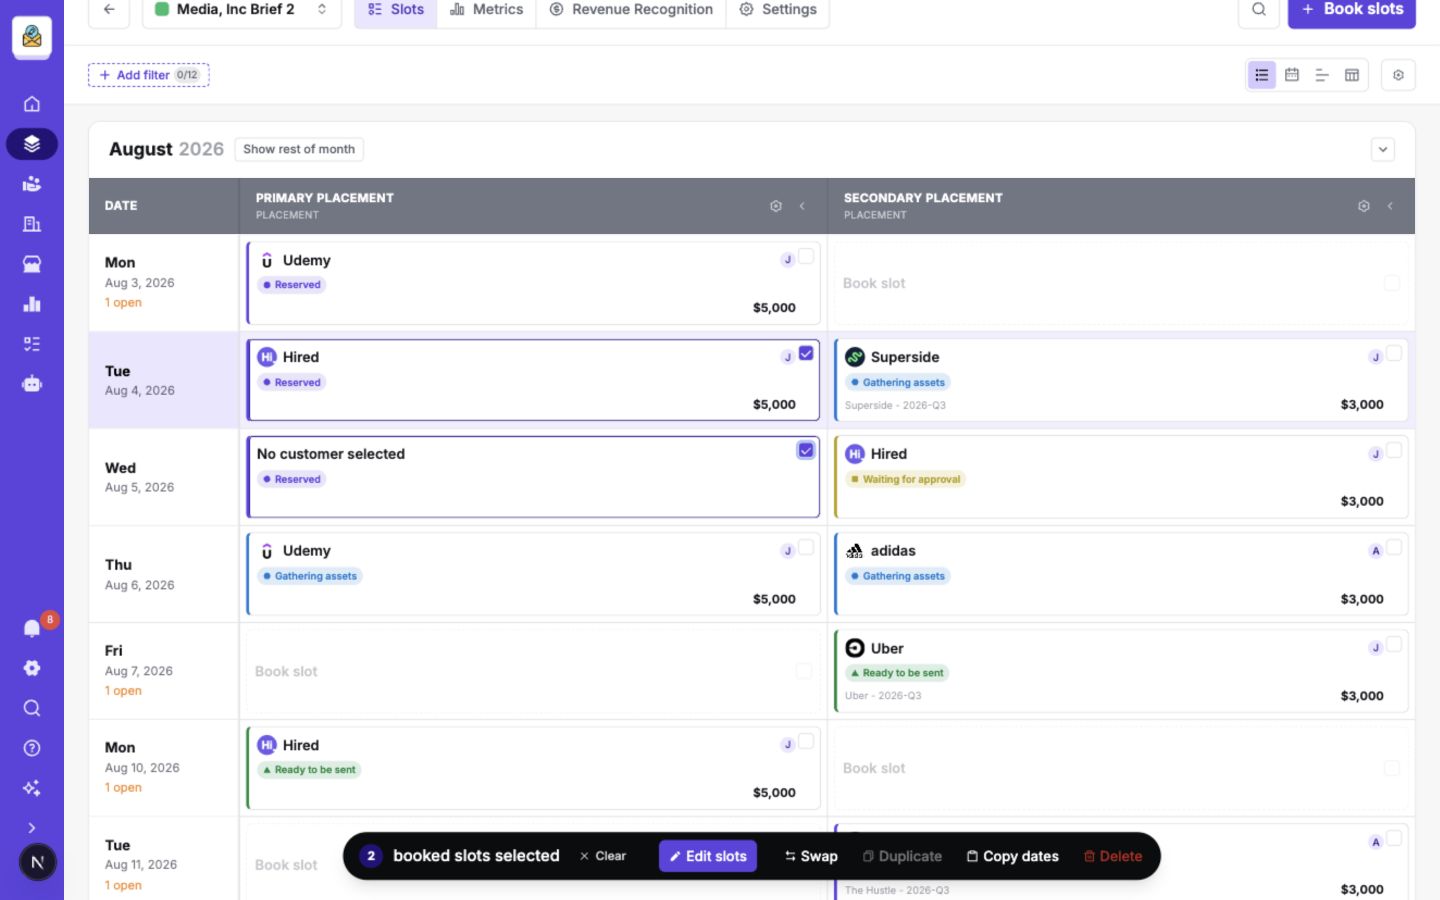
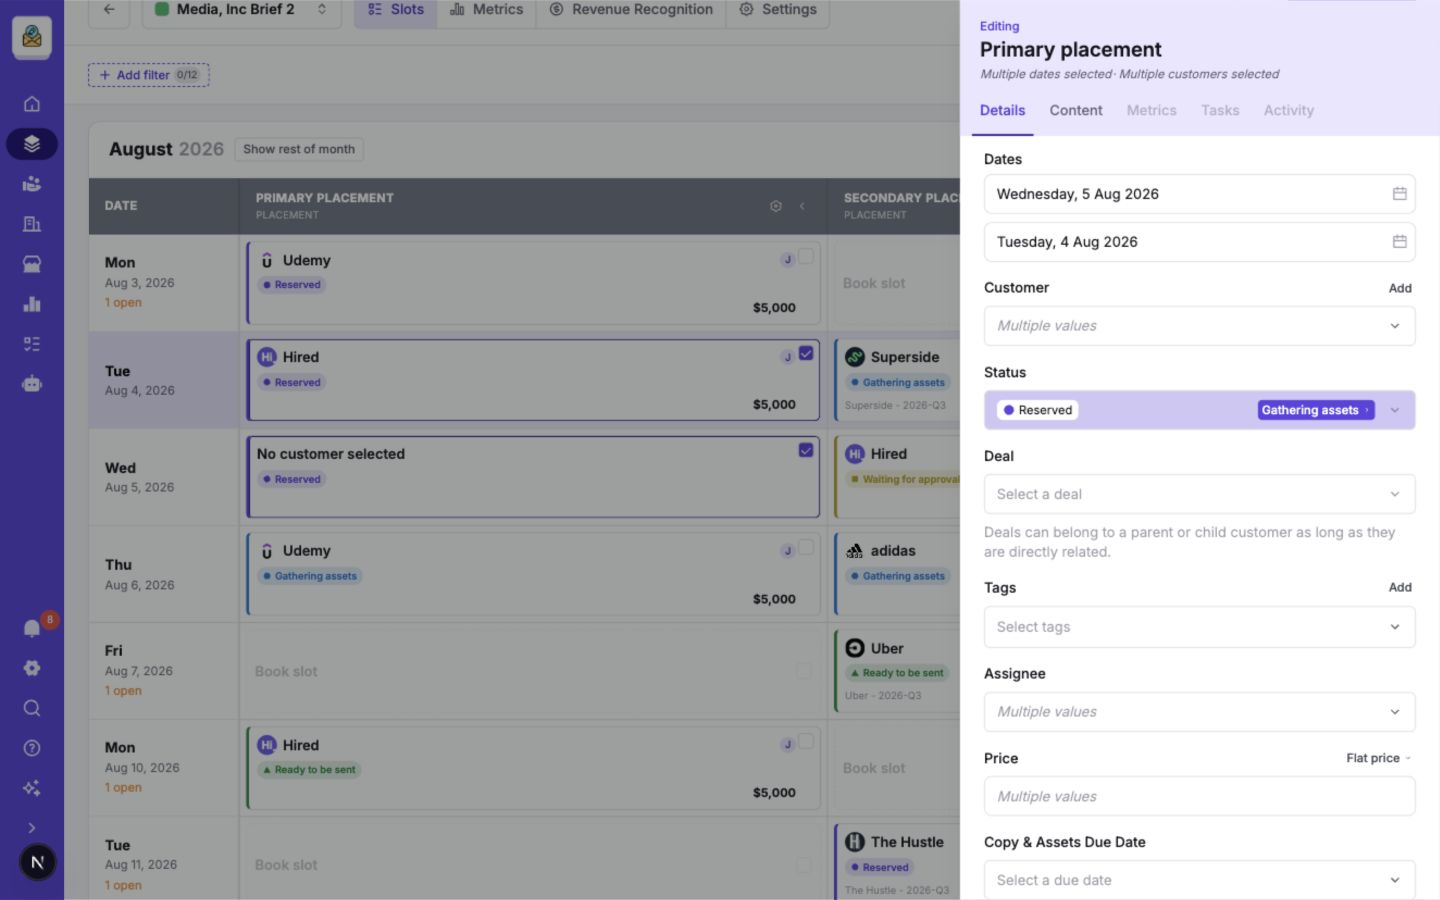
- Edit slots opens one editor for the complete selection. Use it to update dates, customer, status, deal, tags, assignee, price, copy and assets due date, or custom fields. Fields with different existing values are marked Multiple values so you can tell which information is not shared by every selected booking. Review the selection before editing. With autosave enabled, valid changes save after a short pause; otherwise choose Save to apply them.
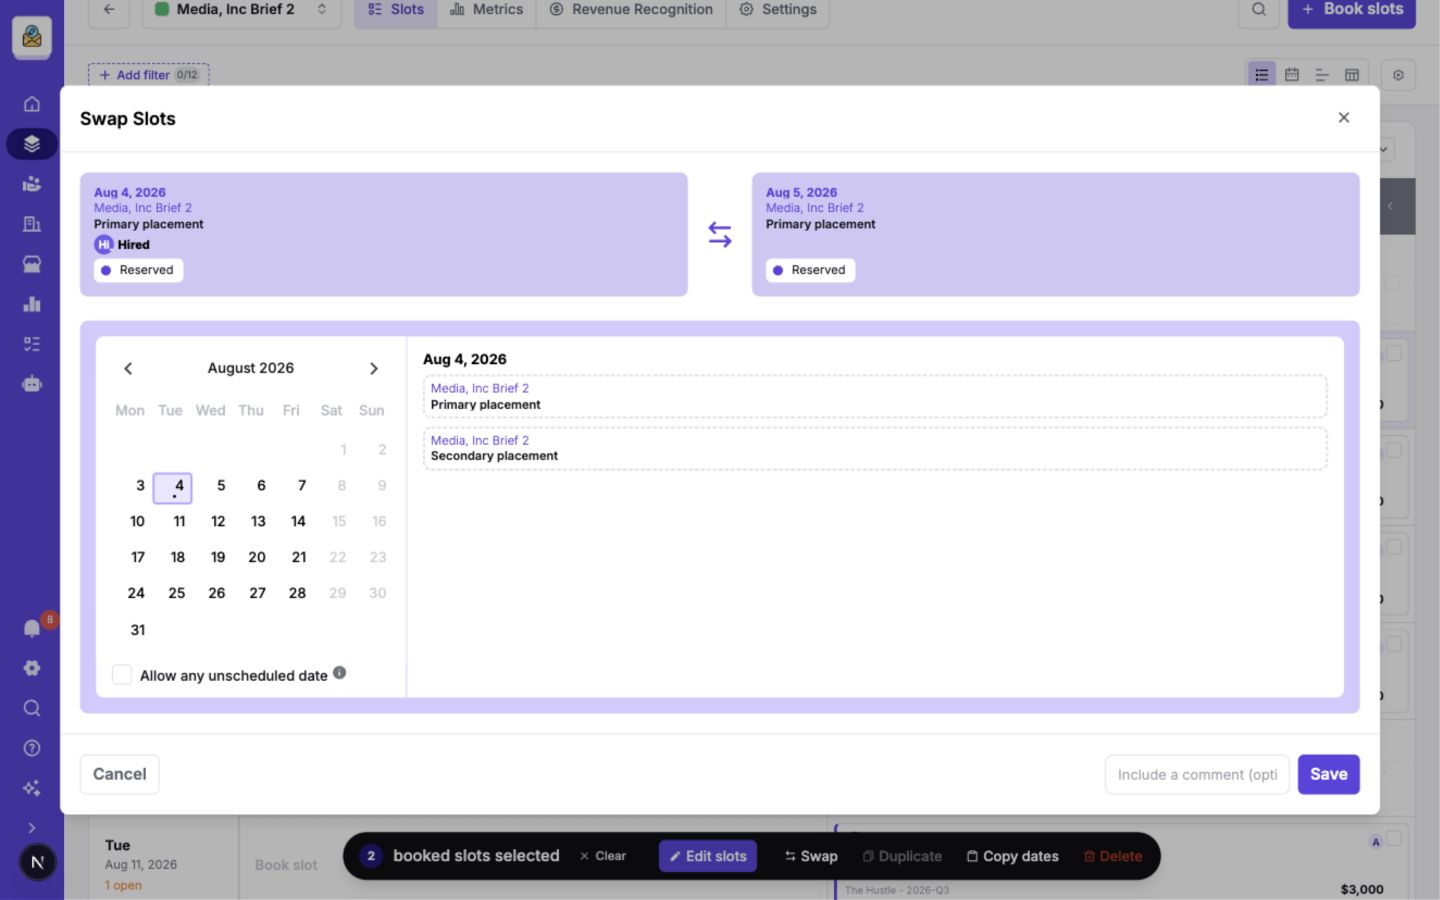
- Swap moves one booking to another available date or exchanges two selected bookings within the same publication. It is available for one or two bookings selected in a calendar or grid view. Review the source and destination at the top of the dialog, use the calendar to choose the destination when needed, optionally add a comment, and choose Save.
- Duplicate copies one booked slot. This action is available when exactly one booking is selected in a calendar or grid view; select the new date and placement in the duplicate flow before saving.
- Copy dates copies the selected booking dates to your clipboard without changing the bookings.
- Delete removes all selected bookings after you review and confirm the deletion.
The bulk editor keeps every selected date visible at the top. If the selected bookings have different customers, statuses, assignees, prices, or other values, the corresponding fields show their mixed state until you replace it.
The swap dialog shows both bookings before you save the exchange. For a move to an open slot, use its calendar and placement list to choose a valid destination. Enable Allow any unscheduled date only when the booking should fall outside the publication's normal schedule.
Publication tools inside the hub
When you focus on one publication, the header adds Slots, Metrics, Revenue Recognition, and Settings. Use Publication settings to control the schedule, placements, statuses, custom fields, notifications, integrations, ad blocks, and task templates that drive the Inventory Hub.
Publication settings
Open the Inventory Hub, select one publication, and choose Settings. These settings define the availability, workflow, and content structure used throughout the hub.
Basics
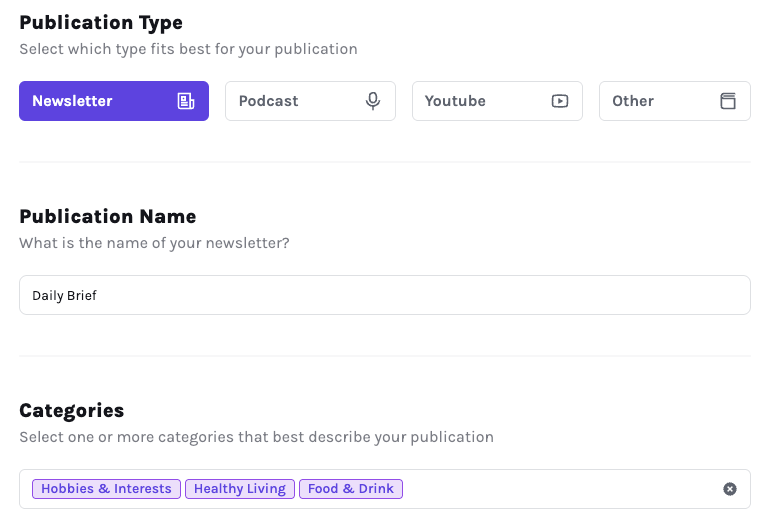
Update the publication's type, name, and categories.
Schedule
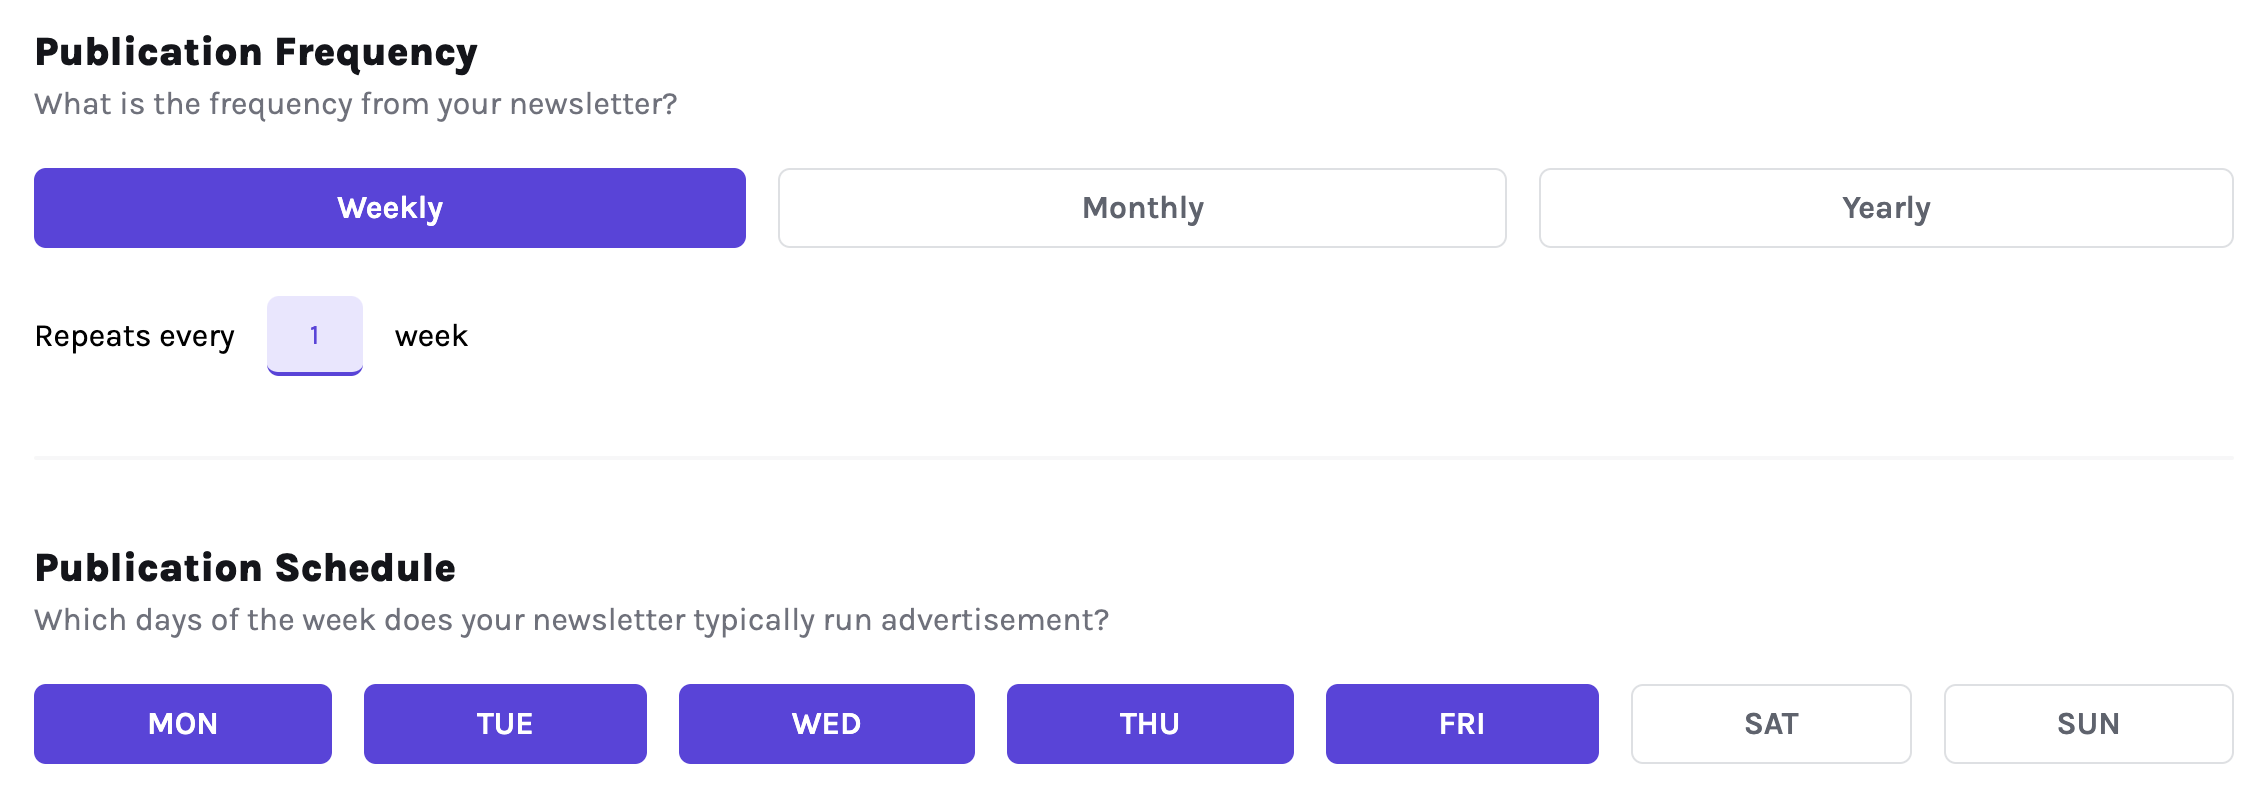
The publication schedule determines which dates and placements are available in the Inventory Hub. Choose a Weekly, Monthly, or Yearly frequency.
Weekly schedule
For weekly schedules, you can specify the exact days your publication runs. Additionally, you can adjust the frequency:
- Every Week: The publication runs on the selected days without interruption.
- Every X Weeks: If your publication follows a less frequent schedule (e.g. every 2 weeks), you can set a reference date to establish the starting point. Sponsy will use this date as the "base week" to calculate subsequent schedules.
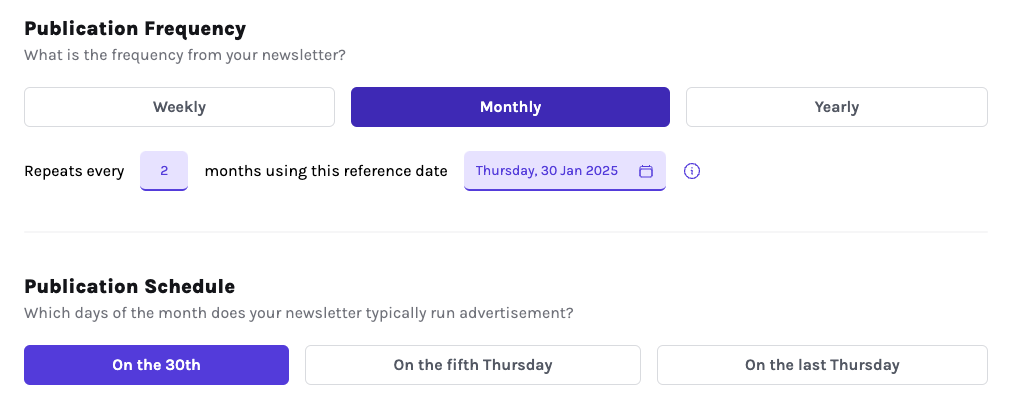
Monthly schedule
For publications that run monthly, the reference date determines the pattern. Once you select a date (e.g. Thursday, January 30, 2025), you can choose how the schedule repeats:
- On the 30th of every month.
- On the fifth Thursday of the month.
- On the last Thursday of the month.
This flexibility ensures your schedule aligns perfectly with your content calendar.
Yearly schedule
If your publication runs just once a year, you can select the exact date it occurs by choosing a reference date.
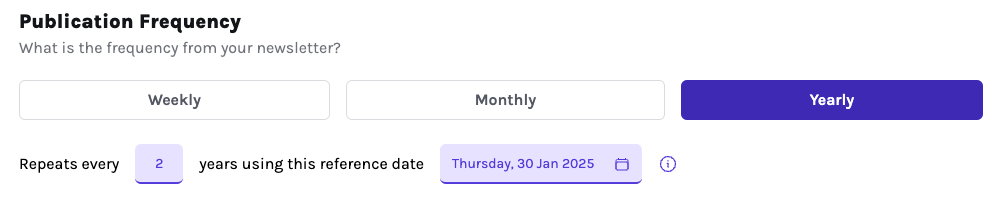
These settings keep the Inventory Hub aligned with the publication's real schedule.
Block dates
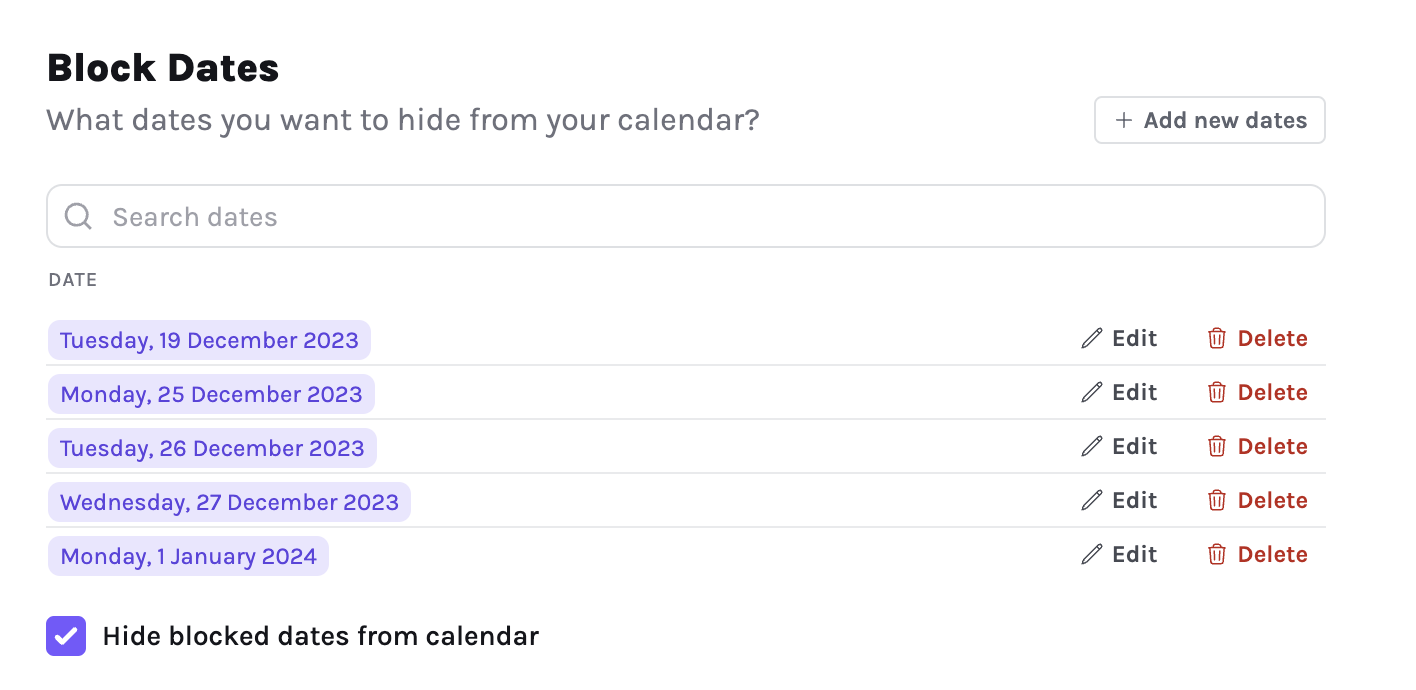
Add blocked dates when you know the publication or placement will not run, such as on a holiday. Blocked dates appear as unavailable in the Inventory Hub and cannot be booked.
Default due date
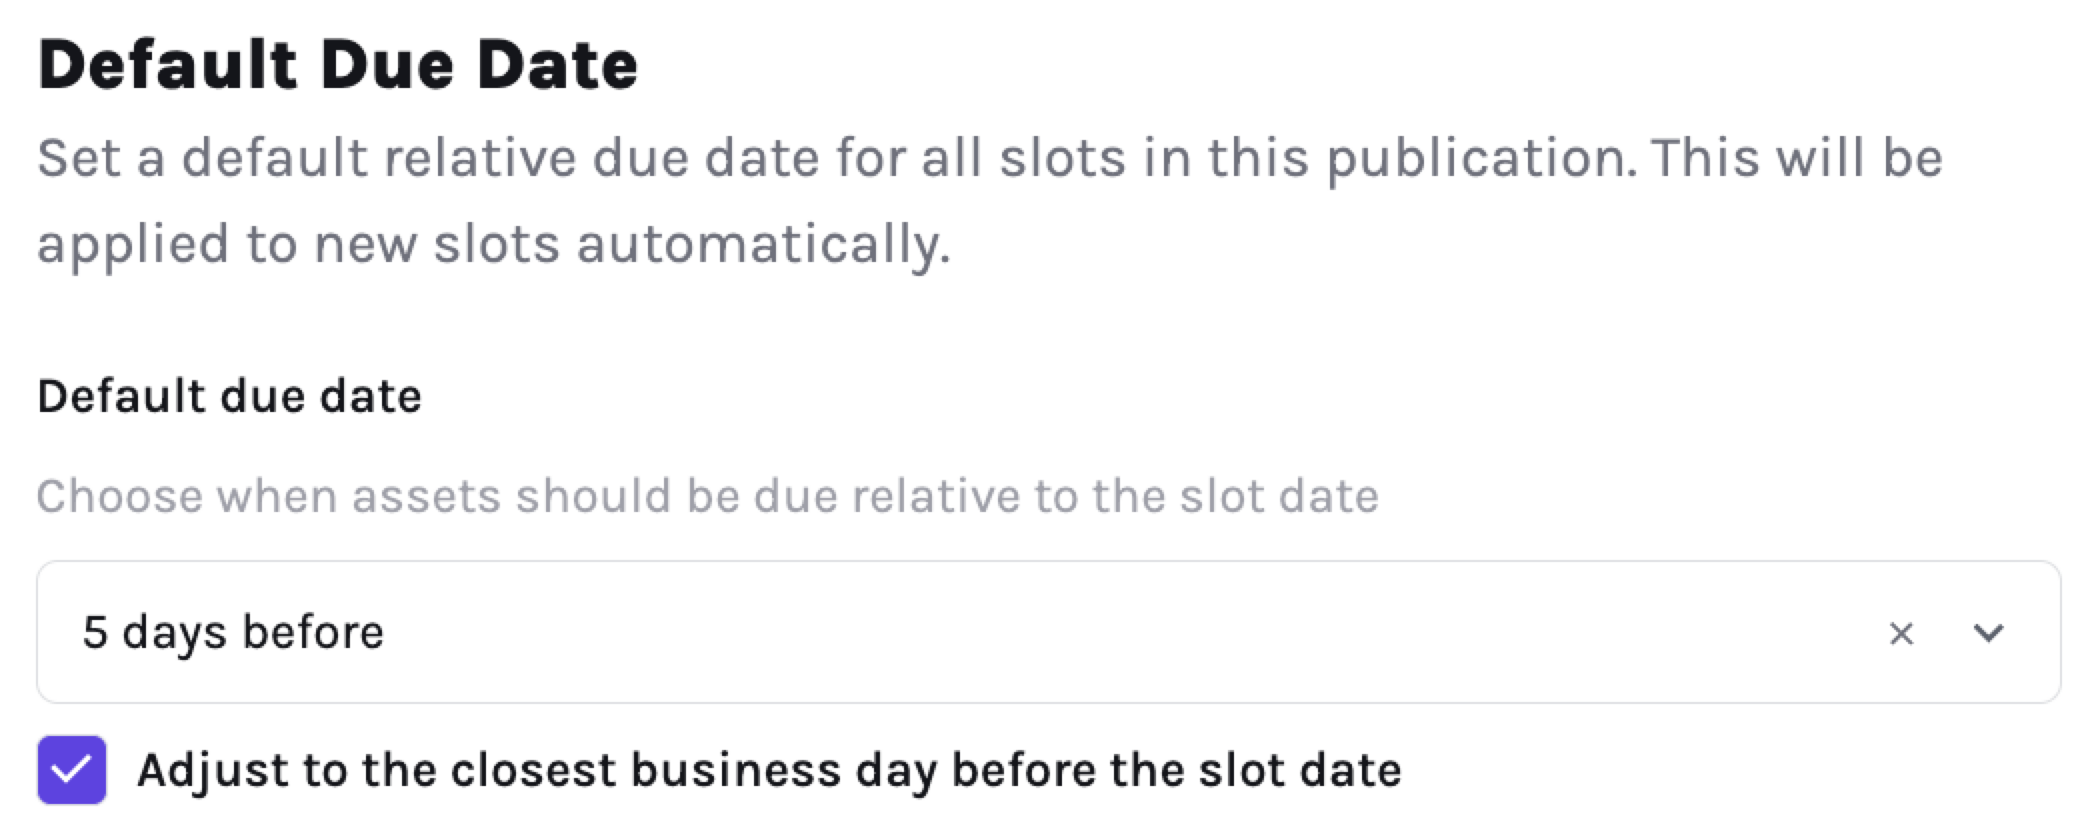
Save time by setting a default Due Date for slots in your publication. It is applied to new slots and whenever a booked slot is moved to a new date.
Placements
A placement is a sellable ad position within a publication. Its settings control availability, pricing, content requirements, and how the placement appears throughout Sponsy.
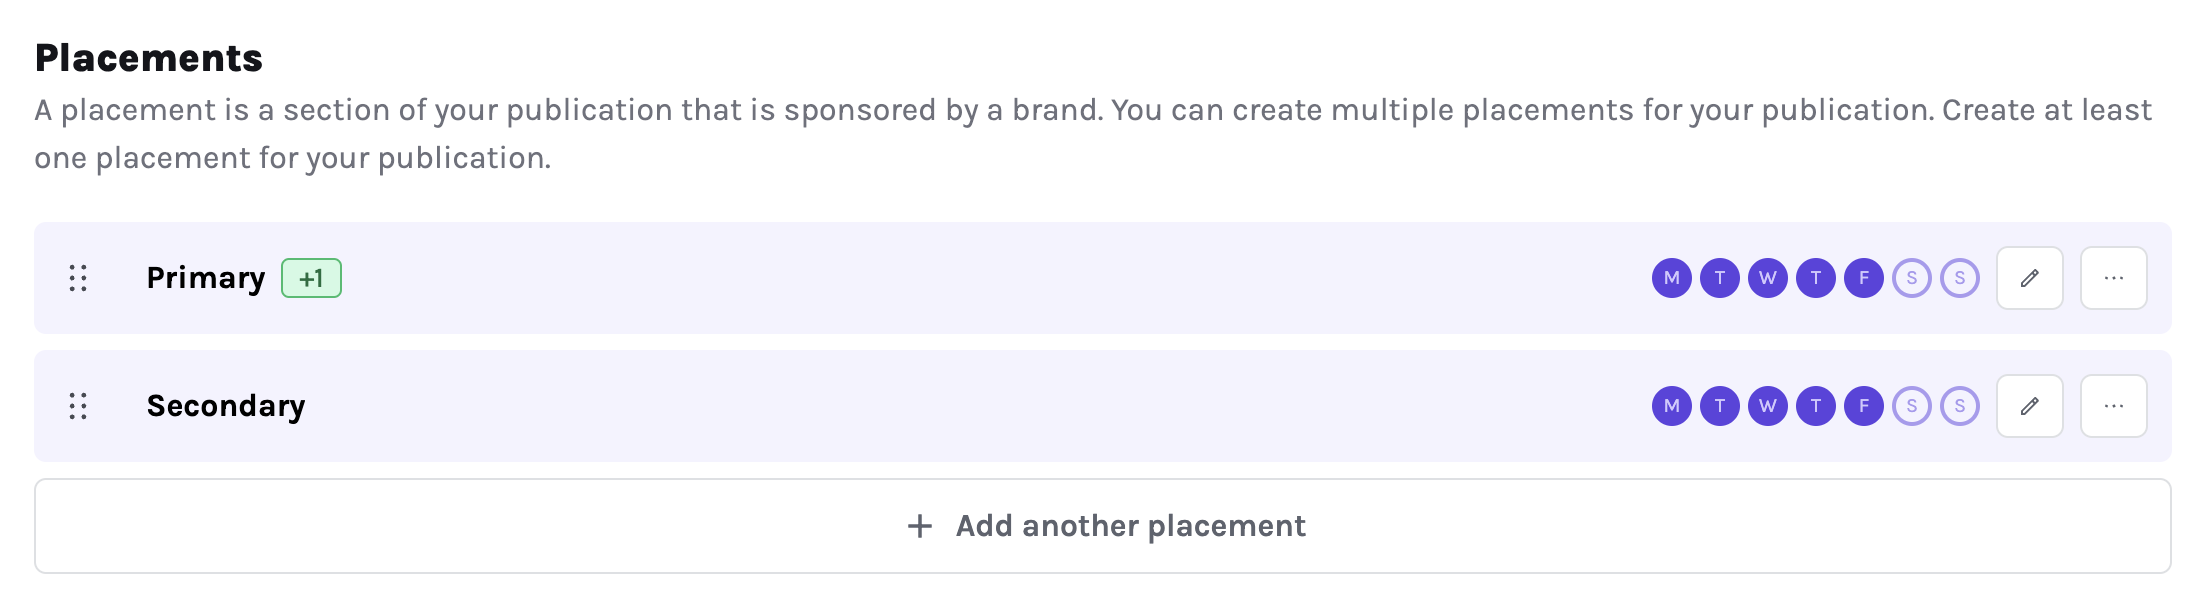
When creating a placement, here’s what you can define:
- Name: Every placement needs a name to identify it.
- Color: Assign a color to make it visually distinct in your weekly calendar.
- Base Price: Enable the
Use base pricetoggle if you want all slots in this placement to default to a specific price when no custom price is set. - Scheduling: For publications running on a weekly schedule, you can specify which days of the week this placement is available. This is especially useful for placements that are tied to specific publication days.
- Placement Groups: If you have multiple identical placements, toggle the
Create a placement groupoption. This allows you to create several identical placements at once. For example, if you have a "Bottom Quick Links" section with multiple ad slots, you can define how many identical placements should be created. - Customer Portal Description: You can add a short description for the Customer Portal. This text will appear on slots from this placement, helping advertisers understand its purpose or requirements.
- Allow end dates (publications of type Other only): Turn this on when a placement runs for a period of time instead of on a single day, such as a nav bar item or a featured list. Each booking then has a start date and an end date. See End dates on Other placements.
- Allow overlapping bookings (website publications only): Let several bookings run on the same placement at the same time.
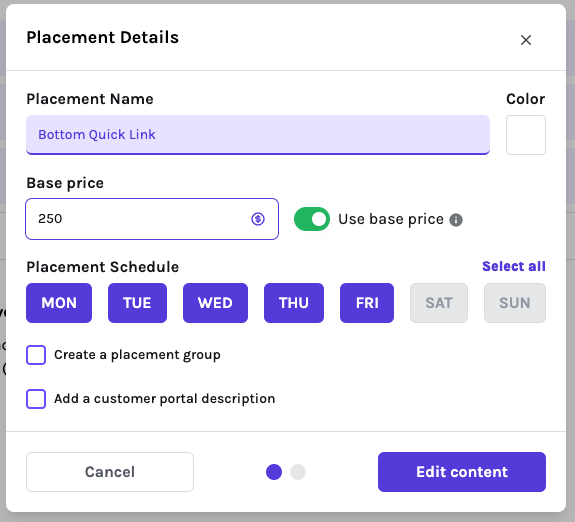
Configure placements carefully so customers see clear requirements and the Inventory Hub reflects your actual capacity.
End dates on Other placements
Website publications always book date ranges. Publications of type Other book single days by default, because "Other" covers many kinds of inventory. You can switch individual placements to date ranges without changing the publication type.
To turn it on, open Settings → Placements, select the placement, and enable Allow end dates. If the placement is a group, every position in the group follows the same setting. To turn it off again, first shorten any bookings that run over several days to a single day, or remove them.
Once it is on:
- Booking: When you create a slot or pick dates for a deal item on that placement, Sponsy asks for a Start date and an End date instead of individual days. The booking is saved as one slot that covers the whole run.
- Availability: A placement is taken for every day between the start and end date. Sponsy warns you if a new run overlaps an existing one, and the date pickers mark those days as unavailable.
- Editing: Open the slot to change its start or end date. Swapping a booking onto another placement with end dates keeps its run length.
The publication keeps the views it already has. Here is how bookings with an end date appear in each one:
| View | What you see |
|---|---|
| List | The booking appears on its start date, with the date it runs until. |
| Timeline | The booking is a continuous bar from its start date to its end date. |
| Table | The Date column shows the full range, from start to end. |
| Calendar | Only the start date is shown. Use List or Timeline to see the full run. |
Unlike a website publication, an Other publication still opens in List and doesn't switch to the website-style Timeline by default. Placements without end dates keep working exactly as before, one slot per day.
Bookings made through a storefront or a proposal on these placements are still single days. You can extend them to a range afterwards by editing the slot.
Setting up content fields
The next step is to configure the Content Fields. These fields determine what information or assets are required for ads in that placement. Sponsy provides several field types to choose from:
- Rich Text: Ideal for long-form content, allowing formatting options like bold, italics, and hyperlinks.
- Short Text: A single-line input, perfect for concise entries like CTAs or headlines.
- File: For uploading assets such as images or other media files.
- URL: Specifically designed to capture links.
- Single select: A dropdown where the customer chooses one option from a predefined list.
- Multi-select: A structured list where the customer can choose multiple options.
- Collection: A repeatable group of fields, useful when customers need to submit several related items, such as multiple products, links, or creative variations.
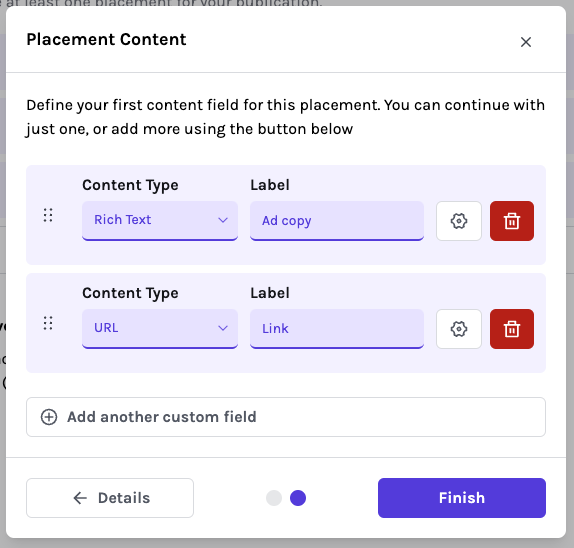
You can also organize related content fields into groups. Field groups keep larger placement forms easier to scan in Sponsy, the Customer Portal, and Storefront.
Content field options
Use these options to control which fields customers can see and what they must provide.
Choose the gear icon beside a field to configure its behavior in customer-facing pages such as the Storefront and Customer Portal:
- Helper Text: Add a brief description or guidelines for the field (e.g., "Provide a link to your landing page"). This appears beneath the label for better clarity.
- Character or Word Limits: In
Rich TextandShort Textfields, you can set maximum character or word limits to ensure concise input. Leave it blank for no limit. - File Size: For
Filefields, specify the maximum allowed file size in MB. - Required: Makes the field mandatory for completion for customers.
- Locked: Prevents customers from editing the field.
- Private: Hides the field to customers, making it visible only to your internal team.
- Public visibility: Choose whether a field should appear in customer-facing flows such as the Customer Portal or Storefront.
- Don't count as submitted content: This field does not count towards asset readiness in the customer portal. Changes to it also won't start automations triggered by Slot content updated in customer portal. Use it for questions that aren't assets, such as which copywriting support the customer wants.
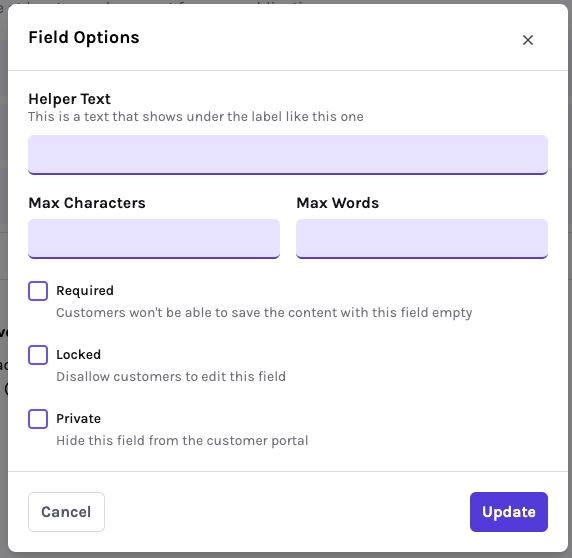
By customizing these fields, you can ensure each placement captures exactly the information needed, streamlining the process for both your team and advertisers.
Storefront
The Storefront tab holds what this publication offers on your Storefront by default: the placements you sell and the audience stats you show. Every storefront block for this publication starts from these and keeps following them, so you set a rate card once instead of once per storefront.
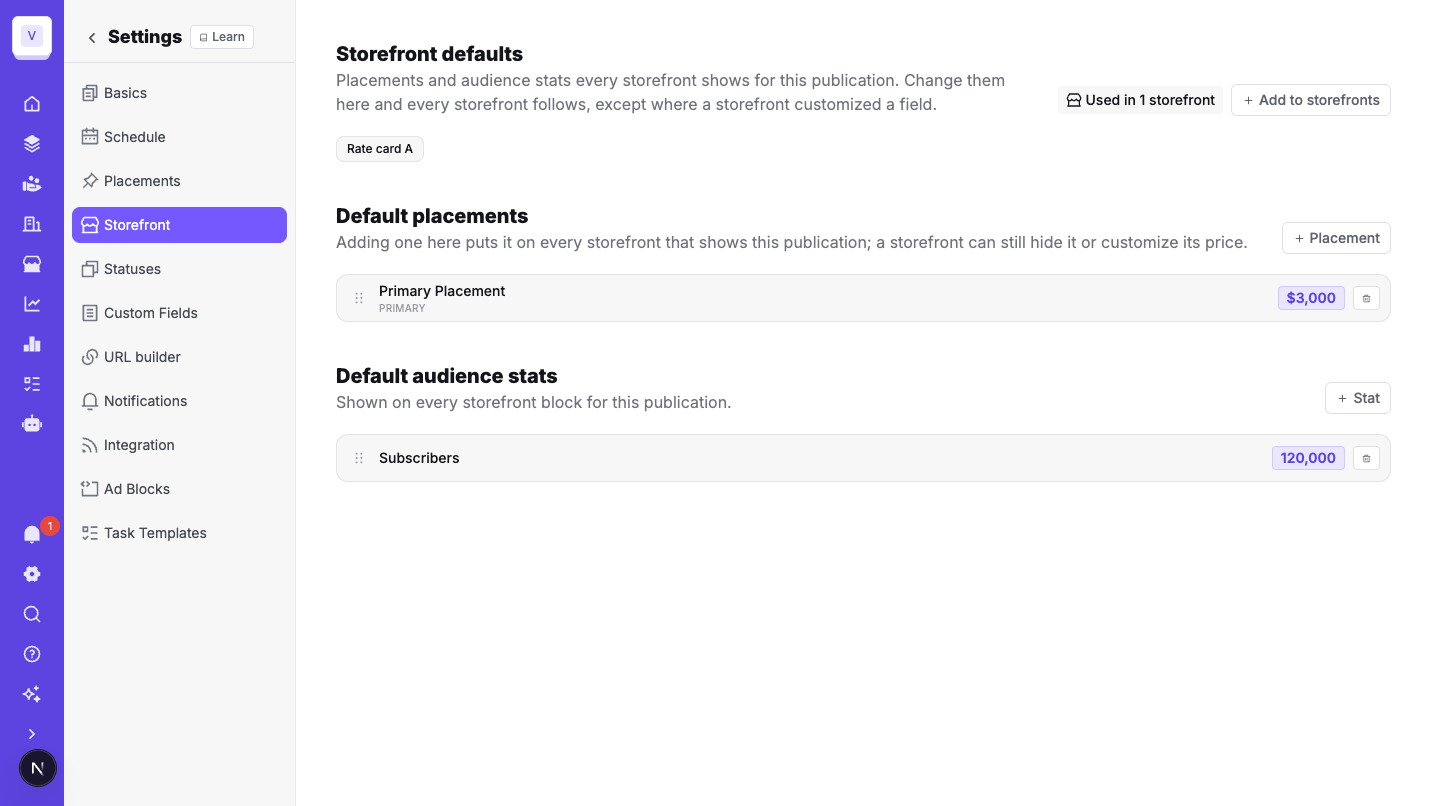
- Default placements: choose a placement, then set the name sponsors see, the storefront price, and a short description. Drag to reorder. Adding one puts it on every storefront that shows this publication; removing one takes it off all of them.
- Default audience stats: the numbers shown beside the publication name — a value you type, a category or country, or a live value from a connected ESP. Use clear labels such as Subscribers or Open rate.
- Used in N storefronts: the storefronts currently showing this publication, each linking to its editor.
- Add to storefronts: pick any number of storefronts and Sponsy appends a Publication block to each, with the defaults already in place.
A storefront can still customize a default's name, price, or description for itself, or hide it; those changes stay on that storefront and are not overwritten by later edits here. Placements and stats added directly on a storefront block are storefront-only and do not appear on this tab. See Keep several storefronts in sync.
The storefront price is separate from the placement's base price above: the base price is what a booking defaults to inside Sponsy, the storefront price is what sponsors see and pay on the public page.
Statuses
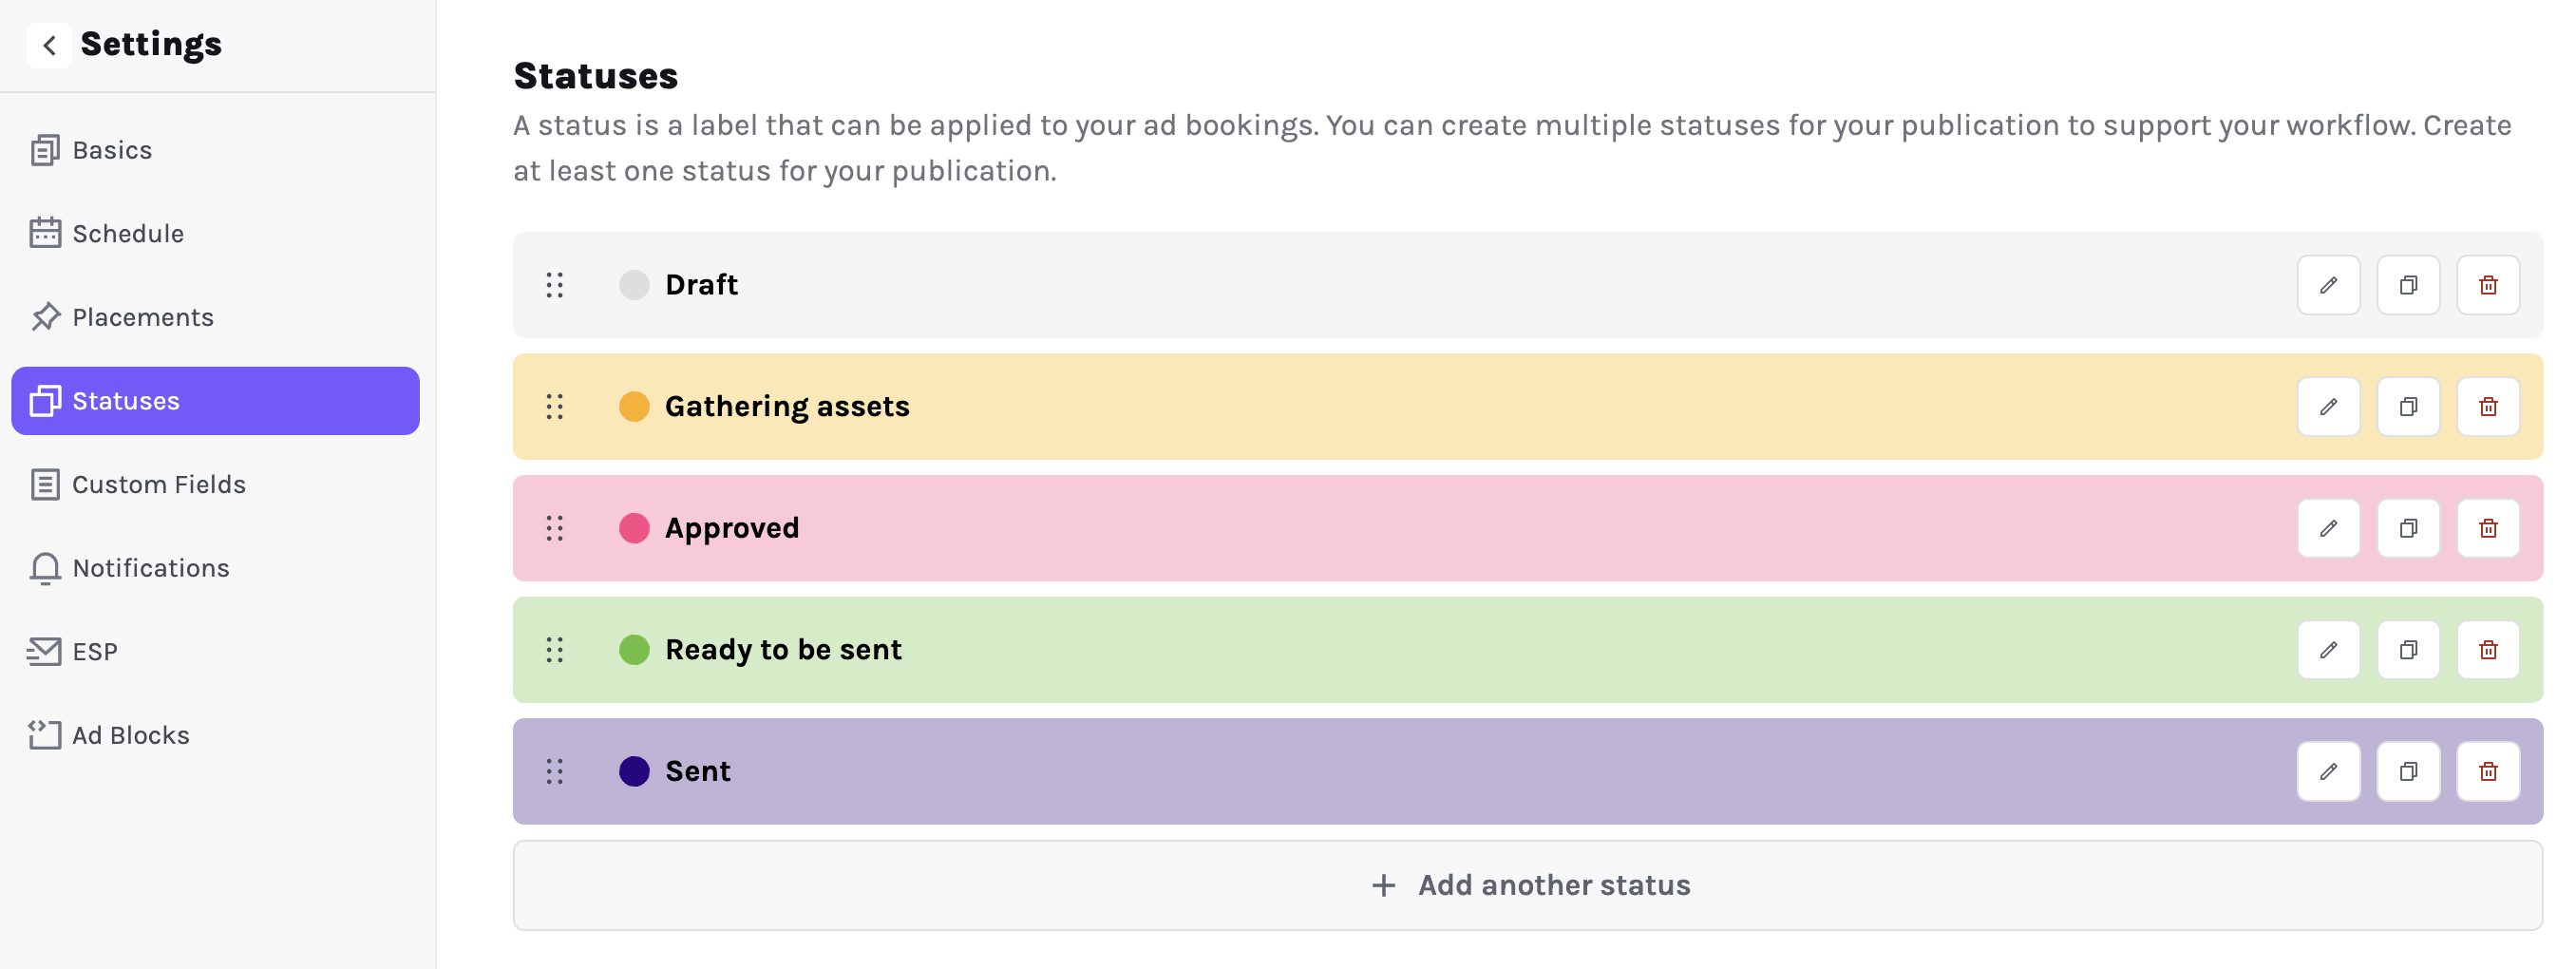
Statuses define the stages a slot moves through. Add, remove, reorder, rename, or recolor statuses to match your workflow. The current status appears on booked cards throughout the Inventory Hub.
Turn on Marks slots as completed for statuses that mean the ad has finished. The customer portal uses this setting for its Completed progress state. Changing a slot back to another status updates that state, even if its run date is in the past. Existing statuses named Deployed or Completed have the setting enabled automatically; configure it explicitly for other names.
Custom fields
Publication custom fields require Pro or Custom. Use them to add specific attributes to your slots for your publication or workflow.
- Text: Store freeform notes, descriptions, or labels.
- Dropdown: Choose from a predefined list of options and set a default when needed.
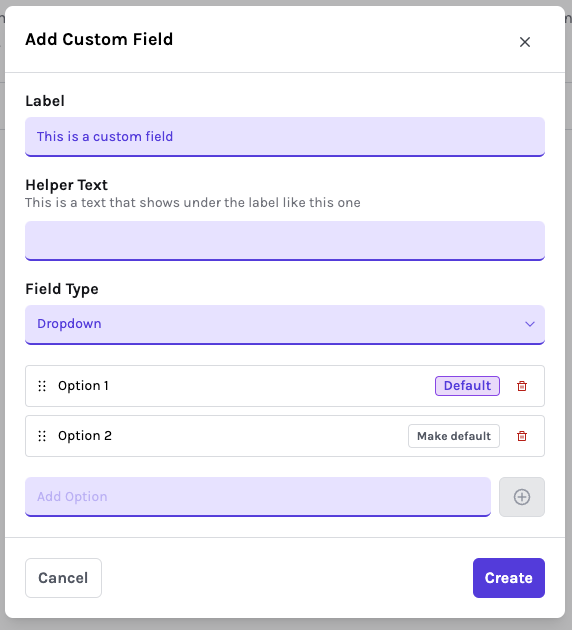
Custom fields appear on every slot, giving you the ability to track additional details such as payment terms, campaign status, or any other relevant information.
Deal custom fields and publication custom fields can also be used as variables in automation emails and Slack messages. See Automations for details.
Notifications
Notifications help you stay on top of your publication's workflow and ensure seamless communication with your team and customers.
You can toggle default notification settings for each publication. If you’ve connected a domain to Sponsy, you can also configure all communications to be sent from your domain and default workspace email. This makes your messages more reliable and personal, enhancing your brand's professionalism.
Here’s an example of the available notification options:
- Send email to the slot assignee when a slot gets approved: When a slot is approved in the Customer Portal, Sponsy emails the assigned team member or, if no assignee is set, the user who created the slot.
ESP
If you’ve connected an ESP in your workspace integrations, you can link it to this specific publication.
By doing this, you can:
- Fetch Metrics Easily: Use the sync button on the metrics tab to pull in performance data with just one click.
- Automate Fetching: Leverage automations to schedule automatic metric updates, ensuring your data stays up-to-date effortlessly.
URL builder
The URL builder lets Sponsy add consistent query parameters to sponsor links when slot content is saved. This helps your team avoid manual UTM cleanup and keeps each click tied back to the right publication, placement, deal, slot, and sponsor. It is available on every plan.
To set it up, open the publication settings and go to URL builder. From there you can:
- Turn the URL builder on for the publication.
- Define the parameters Sponsy should add to sponsor links.
- Use dynamic values such as publication slug, placement slug, parent placement ID, deal ID, slot ID, and sponsor name.
- Choose what happens when a link already contains query parameters: append new values, overwrite existing values, or leave the link unchanged.
To change the order of query parameters, drag the handle beside a row. You can also focus the handle, press Space, use the up and down arrow keys, and press Space again to drop it. Each parameter keeps its value and variables as it moves. Click Save changes to keep the new order, or Discard to restore the saved order.
When the URL builder is enabled, Sponsy applies the configured parameters when slot content is saved. The preview shows how the final URL will look before you apply changes.
If you update the publication settings after many slots already exist, use the bulk link update flow to update matching slot links and tracking links in one job. Bulk updates are recorded in the slot activity history so your team can see which links changed and when.
Ad blocks
This is an advanced feature which requires some technical knowledge. If you feel stuck, please contact us!
Ad Blocks are text or HTML templates used to preview your ads within Sponsy.
You can create multiple Ad Blocks for each placement, customize the HTML content to match the template you're using for ads, and select an existing slot to see a live preview.
You can also import an ad block from an existing source. Upload HTML, paste a newsletter URL, or provide a screenshot so Sponsy can draft the block from the real example instead of requiring you to rebuild it by hand.
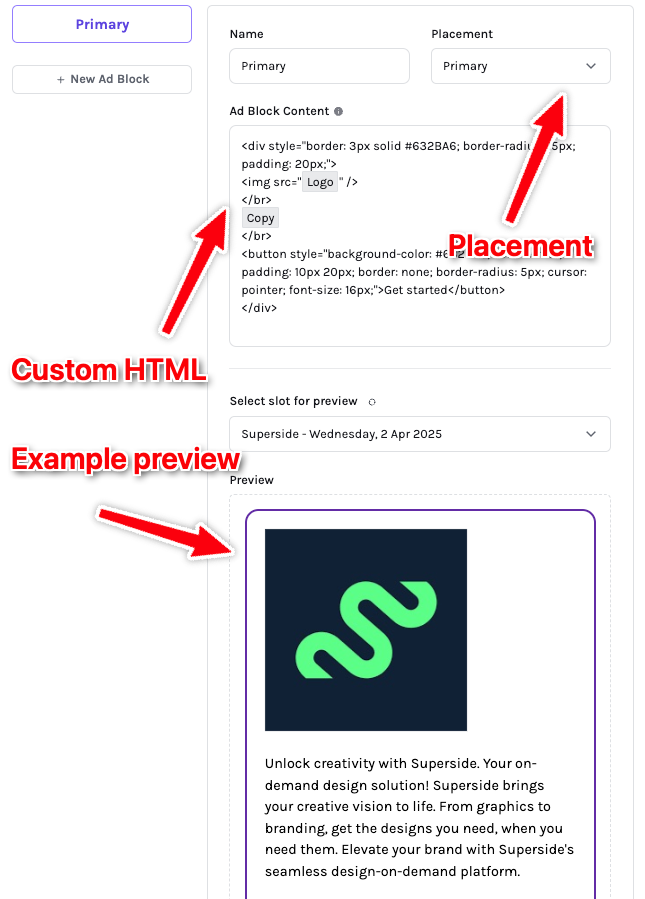
HTML variables suggestions
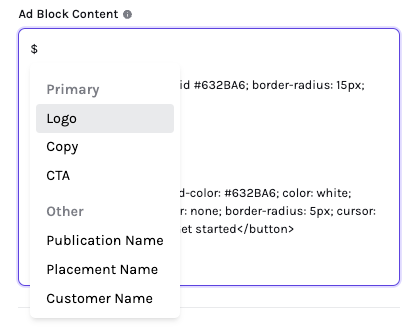
When editing the Ad Block Content field, type $ to view the available variables. You can insert fields from the selected placement, the slot date, the customer name, and customer custom fields. Customer fields use the customer assigned to the slot, so details such as a sponsor logo URL can live on the customer instead of being copied into every slot.
The slot date renders as YYYY-MM-DD. Sponsy resolves these variables in the editor preview, the Customer Portal preview, and the HTML returned by POST /v2/ad-blocks/html.
Styling
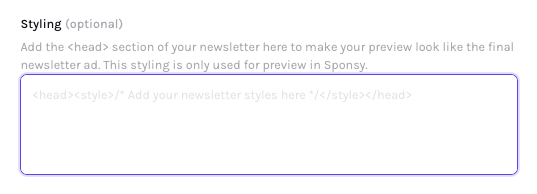
To generate a more accurate preview, you can add the HTML <head> tag from your newsletter. This helps Sponsy render a more realistic preview by applying your newsletter’s styles. Don’t worry—this data is only used for preview purposes and won’t be included in the final ad HTML when used outside of Sponsy.
Chrome extension workflow
The Chrome extension can help you work with Sponsy ad blocks from external tools. Use it to find inventory, copy ad block HTML, and keep placement content aligned with the slot in Sponsy.
If your team uses beehiiv, the extension also includes a beehiiv-specific workflow for copying ad blocks directly into the beehiiv editor.
Task templates
On Pro and Custom, configure the tasks that Sponsy should create with every new slot. Use this for repeatable SOPs with predefined steps, due dates, tags, and assignments. You can add tasks manually on every plan.
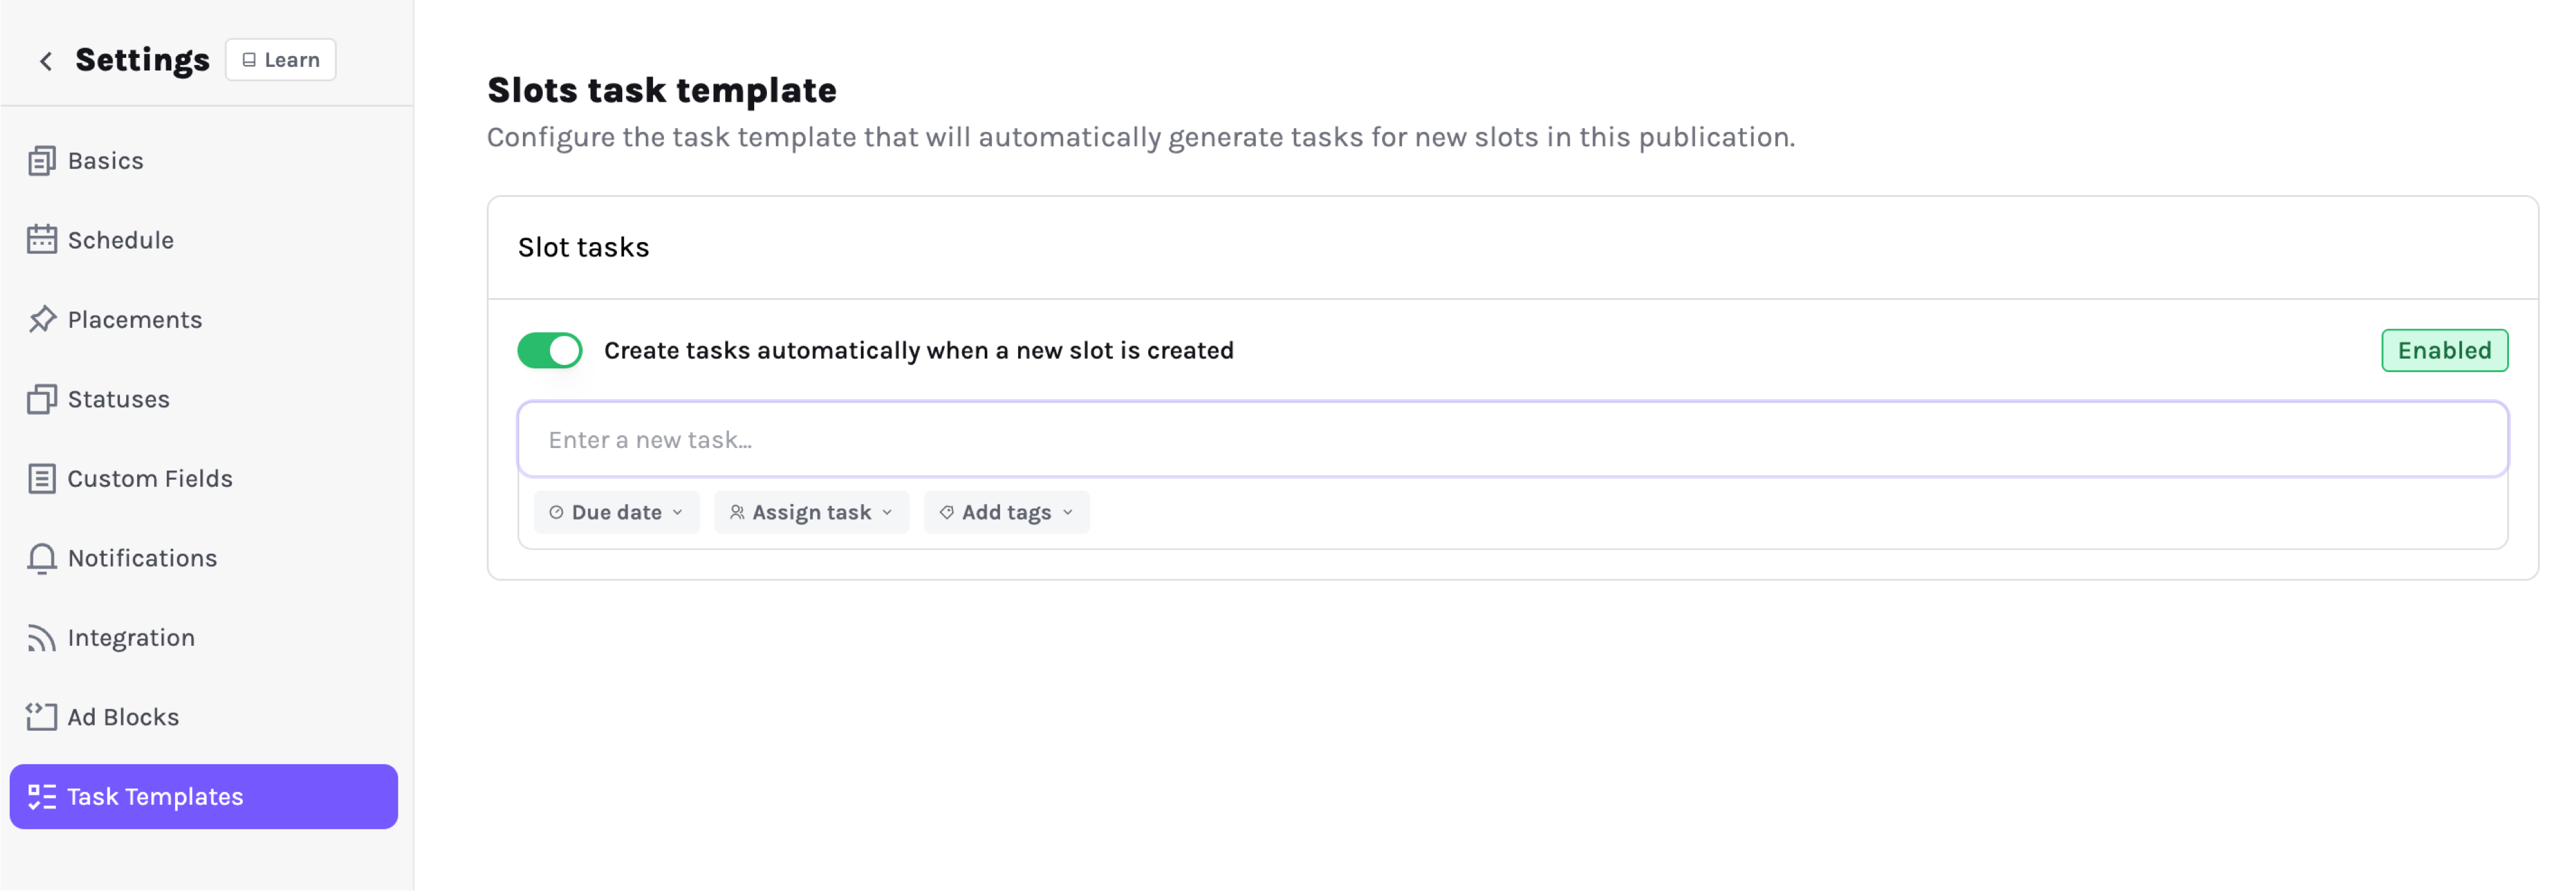
For each task, assign one or more team members, add tags, and set a due date relative to the slot date.
When a new slot is created for the publication, Sponsy creates the configured tasks automatically.